Microsoft hyper v what is. Installing Hyper-V. Shared network folders
Hello friends, in today's article we will connect a Hyper-V virtual machine to our Windows 8 and install it on it operating system Windows 7 and Windows 8, we will also answer all questions asked by users. By the way, you can also transfer your entire physical computer to Hyper-V! Several of my acquaintances system administrators work only on Hyper-V and have even already forgotten what a normal operating system is. At the very beginning, we publish a few of your letters.
Installing Hyper-V
If your computer is running Windows 8 Pro or Windows 8 Enterprise (corporate), then you can use the Hyper-V virtualization system or, in simple words, use the built-in operating windows system 8 virtual machine. It is very easy to operate and I have no doubt that you will understand it.
Hyper-V requires your processor to support virtualization technology. Before work, be sure to turn on the Computer BIOS options:
Intel Virtualization Technology for intel processors or "AMD Virtualization" for AMD processors.

I warn you that Hyper-V is primarily designed and designed for IT professionals and is used on servers.
When working in Hyper-V, you will not be able to use a flash drive, sound card, and WiFi, VirtualBox is preferred in this regard. But I still think that those who read this article know why they need it.
For its operation, the Hyper-V virtual machine puts forward small requirements:
Windows 8 Pro must be 64 bit.
The presence of at least 4GB of RAM.
Hyper-V connection
We open Control Panel

and choose Programs

Programs and Features. Turn Windows features on and off

Find the Hyper-V section and mark it with a tick and click OK.

There will be a short search for the required files and reboot.


After rebooting, go to the Metro interface and left-click on the arrow, then select Hyper-V Manager,

the Hyper-V installation wizard appears. We click on the name of our computer, then Create a and Virtual machine.

Hyper-V settings
1) Getting started. This wizard will help you create a virtual machine, click Next.

2) Indicate the location. We assign a name to the virtual machine in Latin, for example Windows 7. We indicate the location of the files of the Hyper-V virtual machine, since I have no space on the C: drive, I will tick the box Save the virtual machine in a different location and click browse, then indicate the disk D: and Next.

3) Indicate the generation. I want to install Windows 7 so I will choose Generation 1.

4) Allocate memory. I have 8GB of RAM on my computer, which means I can painlessly allocate 2GB of RAM for a virtual machine. We mark the item "Use dynamic memory for this virtual machine" and Next.

5) Network setup. We skip this parameter (we will configure the Internet connection later) and click Next.

6) Connect the virtual hard disk. We mark the item Create virtual hard disk... So in the second point Specify the location, we indicated the location of the virtual machine files on the D: drive, then by default the virtual machine will offer us to place the virtual hard drive on the D: \\ Windows 7 \\ Virtual Hard Disks \\ drive.
Friends, the item Size 127 GB does not mean that 127 GB will be immediately "squeezed out" on your D: drive.
Note: A virtual hard disk can be created at the very beginning, that is, before you create a virtual machine, in which case you can choose which one to create a virtual hard disk, for example:
Dynamic (it grows in volume gradually, according to the accumulated data, at first it takes several megabytes).
Fixed size(immediately requires allocation for the necessary space, if you create a 120 GB disk, then you must allocate exactly that much space).A fixed-size hard drive is considered to be more efficient.
For more information, see the end of the article.

7) Installation parameters. We mark the item Install the operating system later. Further.

8) Done

How to set up Internet in Hyper-V
Now let's set up the network. In the main Hyper-V window, click on the Virtual Switch Manager button.

In the window that appears, select what type of virtual switch you want to create. I will choose the type - External network. FROM create virtual switch.

Choose an arbitrary name for the virtual switch. Network wifi adapter on my computer made by "Atheros", so I will choose that name. Apply.


We choose Options

A window will open, on the left side of which you can see two sections with different parameters, if you select the parameter you need with the left mouse, then on the right side of the window it will be possible to configure it.
Network adapter... On the right side of the window, select our "Atheros" Virtual Switch, Apply and OK.

Installation on Hyper-V operating system
Now the actual question is how to install an operating system in a virtual machine. To install a Hyper-V virtual machine, you need to boot it from the installation windows disk 7 located in the drive or for these purposes, you need to use an ISO image with Windows.
, then on the right side of the window using the buttons Up and Down we set the load of the virtual machine from what you need:Compact disc - boot from the installation disk or iSO image.

We choose Controller 1 IDE and click on the plus sign, then the DVD drive, if you want to boot the virtual machine from the DVD drive, check the Physical CD and DVD drive item: then insert the Windows 7 installation disc into the drive.
Also, to boot the virtual machine and install the ISO image with Windows 7, you can use Windows 7, in this case, you need to select the File image item and click the Browse button, in the explorer that opens, select the image with Windows 7 and click Open. Apply and OK.

Push Startand the virtual machine starts up. Hyper-V boot from image ISO Windows 7. Double-click the left mouse on the thumbnail of the Hyper-V virtual machine window,

a window will open in which we will work with you. Press any key, otherwise the Windows 7 installation disc will not boot. At the top of the window there are virtual machine settings buttons.

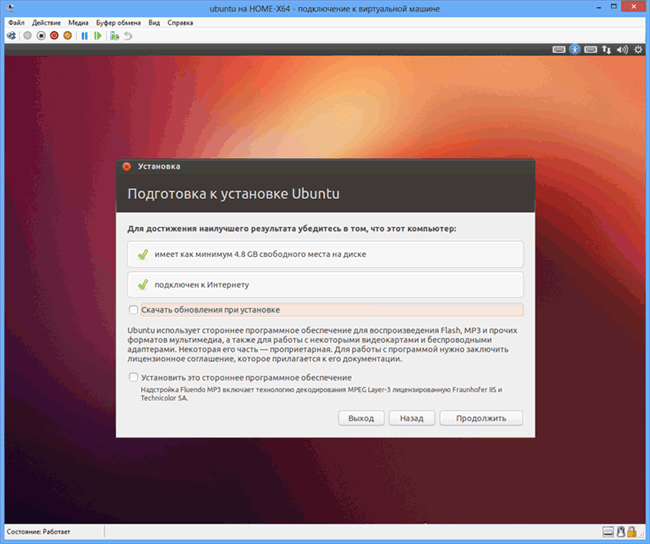
The familiar Windows 7 installer dialog box. Next, you can install the Windows 7 operating system on the virtual machine. The entire process is described in detail in our article.

Here we are with you and connected the Hyper-V virtual machine to our operating system and installed Windows 8 on it, the Internet is present on the virtual machine. In the same way, you can install Windows 8 on it.


How to create a virtual hard disk in Hyper-V
Friends, a virtual hard disk in Hyper-V can be created not only during the process of creating a virtual machine.
In the main window of the virtual machine, select Create a -> HDD


Select disc format. You can choose a new hard disk format, but note that it is not supported by early operating systems prior to Windows 8

Select the disc type. You can create a disk of a fixed partition, which is considered to be more efficient

We indicate the location of the virtual hard disk, if you have little free space on the C: drive, then place the virtual hard drive on the D: drive. Click the Browse button and point to the D drive:

Disk setup. If we create a non-dynamic extensible virtual disk, and the virtual disk is a fixed partition, so we must specify the exact size of the disk, if we specify the size of 127 GB, then this is exactly how much our virtual disk will occupy on the D: disk. Make sure you have that much free space on your D: drive.
note per parameter Copy the contents of the specified physical disk, you can use it if you want to transfer your physical computer along with all the settings to a virtual machine!

The virtual hard disk has been created. When creating a new virtual machine in step Connect virtual hard disk we can mark the item Use an existing virtual hard disk, then click Browse and specify the location of the virtual disk -D: \\ New VHD.vhdx

Blue screen on creationvirtual switch inHyper-V
Friends, several times I had to deal with the fact that in the new Windows 8.1 operating system in the Hyper-V virtual machine, when creating a virtual switch, the operating system went into a blue screen with an error:
The problem seems to be caused by the following file: fwpkclnt.sys UNEXPECTED_KERNEL_MODE_TRAP *** STOP: 0x0000007f.
I tried to solve the problem in various ways: reinstalling the virtual machine, restoring system files, removing antivirus and firewall, updating drivers for all computer components, including the network card. Unfortunately, only changing the network adapter helped.
Ever since Microsoft was introduced to PC users in 2008 trial version HYPER V, computer technology has made great strides forward. Meanwhile, no matter what innovations the modern world may bring, this hardware virtualization system, developed on the basis of a hypervisor, cannot do without today. True, today on Windows 7 you can install both the HYPER V SERVER and the HYPER V MANAGER component, which makes it somewhat easier to use it when debugging a network.
Nevertheless, practice shows that the installation of HYPER V often causes confusion, especially in cases when a beginner or a user who is not familiar with the features of such microsoft systems and the basics of configuring it for networking. In this case, it turns out that it is simply impossible to leave unanswered the question of how to install and configure HYPERV MANAGER and HYPER V SERVER on a computer with Windows 7.
Option number 1: Install and debug the HYPER-V server
It's no secret that today Microsoft's HYPER V SERVER system is presented in several assemblies, each of which has its own advantages and disadvantages. In particular, not so long ago, the release of windows server 2012 r2 hyper v became available to Internet users. However, the most popular option is still microsoft version HVS 2008 R2 with Core setup.
In addition to the HYPER-V base, it does not provide for additional extensions, which, however, is not a minus, but a plus, considering that this ensures optimal consumption of hosting resources at the highest possible performance indicators. The installation and debugging process consists of several stages.
Stage I - preparation of the computer
On preparatory stage you need to do 3 basic steps:
- download and burn a bootable drive with the image HYPER V SERVER 2008R2. As a basis, you can take the same free distribution kit from the Microsoft website. It will do just fine;
- check if the processor supports hardware virtualization;
- set the parameters for starting the computer from an external drive.
ІІ stage - installation of the system on Windows 7
After completing the preparations, we connect the USB flash drive / disk with the HYPER V SERVER 2008 R2 image to the computer and boot from it. In the window that appears, select English as the working language, change the time format to Russian and click the Next button:

Next, click the Install now button, and then, after reading the license, we confirm acceptance of the terms of the agreement for the use of Microsoft HVS 2008 R2. After that, select Custom ("Full") as the installation option and go to the step "Layout hard disk»:

Here, the principle of action is the same as when installing / reinstalling Windows: we format the hard drive, and then divide it into 2 partitions. The first one will be reserved for the placement of the hypervisor (the amount of memory is at least 15 GB); the second - for containers of virtual machines in the network (5 GB of memory will be enough). After completing the breakdown, click Next and wait until the data is copied and the computer is restarted.
ІІІ stage - determination of basic parameters
After the HYPER V SERVER 2008R2 installation is complete and the restart is complete, the program will prompt you to set the network administrator password. The default requirement is a 6-digit password with 1 capital letter and 1 digit (special character). After this step, two windows with consoles should appear on the screen - standard command line and the options (control) console on a blue background:

At this point we will have to work with the HVS 2008 R2 Options Console:

To begin with, select step 8, mark the required network adapter, and then write down the ip-address, default gateway and subnet mask. After saving the settings, go to the main menu, select item 7, drive in the English letter E for, and then the number "2" - connect without restrictions on clients. Then we return to the main menu again, select item 9 and similarly set the date and time for the server on the network.
Stage IV - debugging additional parameters
For correct work HVS 2008 R2 on the network must also set the server name and set up the workgroup. To do this, select item 1 in the menu, drive in the letter W and assign a name to the working group (it must match the name of the network administrator's PC). Then we select item 2, specify the network name of the server (for example, HVS-2008) and save the changes by restarting the system. Next, set other parameters remote control... To do this, we connect remotely to the PC, select item 4 and alternately execute the commands from subparagraphs 1 and 2 until reboot.
Now download the package of tools RSAT developed by Microsoft, and we unload from it in Windows 7 the program data of the HYPER-V manager, designed for administering virtual machines. After that, all that remains is to set the parameters for users and install the necessary services on the PC.
Option number 2: Preparing the HYPER-V manager
To connect to the network instead of the HVS 2008 R2, you can also use the HYPER-V manager. It is easier to install, although the base for it is limited only to the assembly of Windows 7 Professional and higher. One way or another, the procedure is as follows:

As computing power increases, professionals and ordinary
users are paying more and more attention to virtualization systems. In Win2k8
a powerful Hyper-V virtualization tool is built in, which is capable of fundamentally
change the situation on the market for such solutions.
Hyper-V technology
A couple of years ago, the situation on the virtualization systems market resembled a complete
calm. Users and administrators wishing to install one of these
products, chose traditional solutions. And very often this decision
turned out to be well-known VMware, which has long (and deservedly been) occupied
place of the leader. But now the situation has changed dramatically and looks like a race
processors when one mistake can be costly. Virtualization today
is used by about 10% of all servers in the world, which is a very solid piece
pirogue.
It all started with Microsoft buying Connectix and releasing a new one on this
product market - Microsoft Virtual PC. The piquancy of the situation was not so much
in the emergence of another competitor, how much in what Virtual PC was offered
absolutely free. And therefore, despite some of its shortcomings (for example,
absence good means and management functions), the newcomer was very
not bad. And most importantly, manufacturers, in order not to be left behind, were forced to
answer with the appearance of free, albeit somewhat limited in capabilities
versions of their products. As an example, I will give VMware Player, which can
use only ready-made images, but does not know how to create them on his own.
The last problem was solved by the emergence of services like
EasyVMX allowing sculpting
the desired image directly online, and some software manufacturers began to spread
along with the usual versions of their products, there is also a ready-made image for VMware Player.
Be that as it may, Microsoft was able to quickly rank among
leaders in virtualization products.
Hyper-V technology has become one of the key features of Win2k8, although the first
releases of this system included the beta3 version of Hyper-V. The final release was promised
180 days after the announcement of Win2k8, but it appeared at the beginning of the summer, for two months
earlier than the stated date. Today it is included in 64-bit versions of Win2k8
Standard / Enterprise / Datacenter (Web and Itanium - none) - and as a standalone product
called Microsoft Hyper-V Server 2008. The latter is completely free and not
requires CAL (Client Access License); you need a license only for guest
Windows. Hyper-V technology can be used in both mode complete installation (from
graphical shell) and Server Core.
The capabilities provided by Hyper-V in different versions Win2k8 multiple
differ. So, Hyper-V Server 2008, in fact, is very lightweight
version of Win2k8 Standard, from which almost everything that does not apply
virtualization. Only the hypervisor controls are retained. Intended
this option is for "pure virtualization" (there are simply no other services there), but
but it requires an order of magnitude less resources than the same Server Core. It supports
(like Standard) up to 4 physical processors and up to 32 GB of RAM. Start up to
128 VM, local management GUI unavailable and missing
support for clusters - which does not allow creating fault-tolerant
solutions and implement the possibility of fast migration.
Another difference between the versions is the number of VMs that can be run without
additional licensing. The Standard license "includes" one free
VM, in Enterprise - 4; the number of VMs in Datacenter is not limited.
The main disadvantage of the new technology: rather high requirements for processors.
As you probably noticed, there is no support for 32-bit systems (at all
speaking the x86 platform architecture was never meant to run
several operating systems at the same time; in addition, it has various
restrictions, for example, the maximum RAM size is 4 GB). Work possible
only on 64-bit processors that support intel technology VT or AMD-V
(formerly called Pacifica). The BIOS must have a security mechanism activated
executable code (Intel XD or AMD NX).
The hypervisor is running on Ring-1 - it communicates directly with the server equipment,
without the intervention of the main OS, whose role in Hyper-V is minimal. Microkernel
hypervisor architecture (size - less than 1 MB) allows you to abstract from
main functions. Resource allocation management (CPU,
RAM, I / O). Each Hyper-V server has one Parent Partition and
several child partitions (by the number of guest OS, Child Partition).
The parent partition is a virtual device with direct access to the hardware
resources. Guest OSs use Parent Partition to access the device.
The announced capabilities of Hyper-V are quite impressive:
- Both uniprocessor and multiprocessor virtual
machines with a maximum number of processors 24; - The physical server can operate in a configuration up to 1 TB of RAM, virtual
machines support 128 GB of RAM; - The ability to run up to 192 virtual machines simultaneously, the number
configured but not running VM is limited to 512; - Simultaneous operation of 32- and 64-bit versions of guest OS;
- Support for virtual local area networks - VLAN up to 4096 devices;
a single VM can have up to 12 virtual network adapters; - A VM can have 4 virtual disks, each up to 2040 GB in size;
- Ability to create snapshots of running virtual machines. IN
such a copy is also recorded system state, data and configuration
hardware.
For creating backup the Volume Shadow service can also be used
Copy Service (VSS). Therefore, if necessary, you can quickly return the virtual
server to the previous state. By default, the maximum number of virtual
there are 16 processors and 128 virtual machines. To increase their number to
specified 24 and 192, you need to install the update
KB956710.
Depending on the versions of the parent and guest OS, some of the
characteristics will differ. So, Win2k8 Standard and Hyper-V Server versions
only support up to 32GB of RAM in guest systems. Guest Win2k8 in Standard
can have 1,2 and 4 CPUs, 2k3 / Vista - 1 or 2, all others - only 1.
It is obvious that the potential of Hyper-V is quite high, in many respects it
confidently bypasses similar programs. Will they all be in demand in
the nearest future is another question.
The number of officially supported guest operating systems is constantly increasing.
An updated list can be viewed on the Hyper-V page (www.microsoft.com/servers/hyper-v-server).
Today, this is almost the entire family of OS from Microsoft, starting with
version of WinXP Pro SP2. Only SUSE Linux is listed as a non-windowed system.
Enterprise Server 10 SP1 (not surprising given the agreement between
Novell and Microsoft). But others work fine under Hyper-V.
Linux distributions - Debian, Ubuntu, Mandriva. There is information about successful
FreeBSD guest launches.
Installing Hyper-V
Since currently hyper-V technology is developing very actively,
Before starting the installation, I recommend rolling the latest system updates:
among them there will certainly be something new for Hyper-V. For this in the mode
full installation, select Start -\u003e Control Panel -\u003e Windows Update, click View
update history, specify and then install the necessary updates. In Server Core
the update is viewed by the "wmic qfe list" command. Alternatively, you can
just download from the Microsoft website and install in a standard way, or
use the "Server Manager". Specifically, KB956710 should be installed,
KB950050. Some updates will require a subsequent system reboot. But
there is one more nuance that you need to know about. Many Hyper-V tutorials
it is recommended to use only the English version of Win2k8. Fortunately for those
who do not speak Shakespeare, Microsoft has released update KB951636 - set
Hyper-V Language Pack (support.microsoft.com/kb/951636), which contains and
Russian language. This update contains two packages: for x86 and x64 guests.
But before installing it, you need to install Windows Server 2008 MUI Language
Pack, and then add the required language support to the system. Last thing
nontrivial. You need to extract the directory of your language from the img-image (inside several
files, the main one is Lp.cab), then in the "Regional and Language Options"
go to the "Keyboards and Languages" tab, where click on Install / uninstall
languages \u200b\u200band point to the extracted directory with language files.
The process of adding a new role itself is performed as standard in the "Manager
Server Manager using the Add Roles Wizard called
by clicking the "Add Roles" link. By going to the "Select
Server Roles ", check the Hyper-V checkbox and go to the next step" Create
Virtual Networks. "One or more physical
network adapters that will be used to create virtual networks.
Recommend to use one network device only for remote
control a computer without using it in a virtual network. Next, we get acquainted with
settings and, if everything is in order, press the Install button. Perhaps there will be
it was suggested to perform some actions, for example, enable support
BIOS virtualization for Intel VT (for AMD-V it is enabled by default). By
all questions there are links here, where you can get
Additional information. A reboot will be required a little later. After restart
be sure to register in the system under the same account... Some more
time will be spent on automatic installation components and configuration when
See the Resume Configuration Wizard.
To install Hyper-V in Server Core mode, you need to make standard
server settings (see article "No windows, no doors" in August] [for
2008) and then enter the command:
\u003e start / w ocsetup Microsoft-Hyper-V
In addition to the Hyper-V role itself, the remote management tool "Hyper-V
Tools ". If you plan to manage Hyper-V from another Win2k8, then in
Open the Server Manager "Features" and click (Add Features).
In the component selection window, go to "Remote Administration Tools
Server -\u003e Role Administration Tools ", where we mark" Hyper-V Tools "(Remote
Server Administration Tools -\u003e Remote Administration Tools -\u003e Hyper-V Tools).
Hyper-V management
To manage Hyper-V settings in Win2k8, "Hyper-V Manager" is offered
(Hyper-V Manager) that we installed in the previous step. Like everyone else
tools in this system, the dispatcher is mMC console and allows
manage not only local, but also several remote servers. You can
call either from Server Manager, or as a separate application from the menu
Administrative Tools.
The layout of the Hyper-V Manager window is standard. The window is divided into three parts.
The left side displays a list of Hyper-V servers to which the manager is connected. When
using the settings on the right, the actual control is performed
operation of the selected server. The window in the middle shows and edits
some options as well as selectable by VM.
When you start the manager for the first time, you must accept the terms of the license
agreement. Next, we connect to the remote server by clicking the "Connect to
Server ", or select the local system. Before starting further settings
I advise you to go to "Hyper-V Server Settings" and go through the points there. For instance,
by default, virtual disks and snapshots are placed in one of the directories on
system drive C. This is not very practical in terms of performance,
security, and backup. Better to use a separate section
for their storage. The rest of the parameters allow you to configure the reaction of the virtual
system to a combination of switching windows (
virtual machine (
If you already have ready-made virtual machines (for example, created in Virtual
Server), then they can be imported into Hyper-V. To do this, just click the link
"Import Virtual Machine", and then point to the directory where the
related files.
Most of the settings are made using wizards, so the process
creating a new virtual machine is pretty simple. It is necessary to go through everything
a few steps, but first it is better to get acquainted with some subtleties.
Virtual networks and disks
Hyper-V can use three types of virtual machines to communicate with VMs and VMs.
networks:
- External (External) is a universal type that can
use for communication between virtual devices on the same physical
server, including the parent section, as well as external servers; - Internal (Internal) - intended for communication between
virtual systems located on one physical server, including
control network. It differs from the previous one in that it should be attached to
a real network device; - Private (Private) - used for communication between virtual
devices on the same physical server and is internal,
isolated from the rest by a virtual network that does not use
virtual network device.
To create a new virtual network, select the "Virtual Network Manager" link.
The Virtual Network Manager window will open, showing all
virtual network devices connected to Hyper-V during installation. For
convenience in the Name field, you can write another name for the network device and add
its description in the Notes field, to make it easier to navigate among the many
virtual devices. By default, all created virtual network devices
are of type External (by the way, you can specify an alternative physical
the device with which it will be associated). If necessary, this type can be
change by setting the switch in the "Connection Type" field to a different position.
Finally, at the very bottom, the VLAN identifier is written (optional). Button
Remove removes the selected virtual adapter. To create a new
network, click the link "New virtual network" in the left panel, indicate the type of network,
press the Add button, and then edit the parameters.
Hyper-V server can handle three types of storage devices:
- Hard disk connected directly to the server;
- Storage area network (SAN) connected by
Internet SCSI (iSCSI), Fiber Channel, or SAS technologies; - Network-attached storage (NAS) - one
or multiple servers used to store information and connected
usually over Ethernet.
The virtual machine creation wizard has practically no settings related to
virtual hard disk (file with the extension .vhd). More flexible option
there will be a preliminary creation of virtual disks and their connection at the stage
creating a new VM. To create a new virtual disk, select "New - Hard
Disk "and follow the instructions of the disk creation wizard. The second step" Choose Disk Type "
allows you to set the type of disc. The default type is "Dynamically expanding"
that is, a dynamically expanding virtual disk as it fills up. This
type allows you to efficiently use disk space, but you have to
control the available space on the physical disk. An alternative is the type
"Fixed size" - fixed size disk. When you create it, the image immediately
fills the entire allocated space, regardless of need. Problems with
there will be no shortage of space for such servers, but, given that the "disk"
occupies consecutive blocks and does not waste time on them
redistribution - its performance is higher than that of the dynamic one. These two
types are found in other virtual machines. Hyper-V has another look
disk - "Differencing", the purpose of which is somewhat different. Such a disk stores
only differences from another disk. This allows you to isolate all changes to
virtual device. The main disk can be used as a kind of reference and
must be in read-only mode.
In addition, Hyper-V has the ability to directly use a physical disk
without creating a virtual one (only local disk or LUN (logical unit number)
SAN environments). In this case, the virtual system must have exclusive access
to such a section (set Offline in Disk Management!), and its size is limited
the capabilities of the storage system itself. Naturally, he cannot be "Dynamically
expanded "or" Differencing ".
After selecting the disk type, proceed to the next step of the wizard, where you can
indicate its location. The size of the virtual disk is specified at the "Configure
Disk ". By switching the checkbox to" Copy the contents of the specified
physical disk ", we can set a partition for direct access.
systems will be shown in the list below. In the future, you can change some
parameters of previously created hard drives. To do this, in the "Hyper-V Manager"
select "Edit Disk" and point to the desired image. At the "Choose Action" stage
there are three options available to reduce the size of the image,
redistributing free space, change its type (Dynamic to Fixed) and
increase the size.
Like the wizard for creating a hard disk, the menu also includes a wizard.
creating an image of a floppy drive, the principle of working with it is the same.
So, it's time to create a new virtual machine. Selecting "New - Virtual
Machine "and follow the instructions of the" New Virtual Machine Wizard ".
information in the first step, we enter the name of the new VM and, if necessary,
specify a different location for the files. Set in the "Assign Memory" window
the amount of RAM that will be available to the VM (cannot be larger than the size
physical memory in the computer). Next, select the network from the drop-down list,
to which the VM will be connected. Create a new virtual disk or select from
list is available. And at the "Installation Options" step, specify the source, with
which the OS will be installed. It can be a physical CD / DVD drive, ISO image,
boot floppy (physical or image) or network PXE boot. To
create a VM, at the last step, click Finish. After a while new VM
appears in the "Dispatcher" window. By the way, to cancel the work of the master, on any
stage, click Cancel; the Finish button is also active, and if you clicked it by mistake,
a VM or other virtual device with incomplete characteristics will be created.
To start the VM, select it in the "Manager" window and click the Start link.
Subsequently, you can change the main VM settings, including adding more
devices by selecting the Settings link in the context menu.
Conclusion
Hyper-V is quite powerful in features and at the same time easy to configure
a product with high performance and scalability. By cons is
to attribute an ardent love to 64-bit platforms and a small number officially
supported OS. Probably these features, plus the free
distribution, will allow it to confidently take its niche among such solutions.
INFO
Hyper-V Management Tools
Besides the built-in "Hyper-V Manager" in Win2k8, there are other tools
management. A similar one is available at support.microsoft.com/kb/952627
manager for Vista SP1. There is also a more powerful solution: System Center
Virtual Machine Manager (SCVMM) 2008, the main purpose of which is to manage
arrays of virtual servers in a large company or provider network. Wherein
it can run as a standalone application but it is recommended to pair it with
other System Center solutions. Also SCVMM supports Microsoft Virtual
Server and VMware ESX. In this case, it will allow not only managing, but also monitoring
the state of virtual machines (load, number of available resources,
system events). An evaluation 120-day version of SCVMM can be downloaded here
on the product page:
www.microsoft.com/systemcenter/virtualmachinemanager.
Hyper-V control keys
When working in a virtual system using Hyper-V, you will need
some keyboard shortcuts, since the standard Windows shortcuts (given in
brackets) in full screen mode work differently:
Ctrl + Alt + End (Ctrl + Alt + Del) - show "Windows Task Manager";
Alt + Page UP (Alt + Tab) - switch between programs;
Alt + Page Down (Alt + Shift + Tab) - switch between programs in reverse
okay;
Alt + Insert (Alt + Esc) - minimize the active window and open the next one;
Alt + Home (Ctrl + Esc) - opens the "Start" menu;
Ctrl + Alt + Pause - switch from window to full screen mode and back;
Ctrl + Alt + Left Arrow - release the mouse and keyboard from the virtual window
cars.
Some combinations and reactions to them of the parent and virtual systems can be
configure in "Hyper-V Server Settings".
And
Hyper-V virtualization technology was originally called Viridian.
Hypervisor - a program that allows parallel execution of several
operating systems on the same computer. The hypervisor also provides
isolation of operating systems from each other, protection and security, separation
resources between different running OS and resource management.
VT (Intel Virtualization Technology) - one of the hardware technologies
resource virtualization developed by Intel. AMD has in its
arsenal of a similar AMD-V technology, in which it is implemented (as opposed to Intel VT)
virtualization of the real addressing mode (8086 compatibility mode).
Hyper-V officially supports almost everything as a guest
32x and 64x versions of Windows, starting with XP Professional SP2 and ending with Win2k8
(this also includes Windows HPC Server 2008) and SUSE Linux Enterprise Server
10 SP1. Support home options not declared.
Distributing server roles between virtual machines instead of running
multiple server applications on one operating system contributes to
increasing the level of security.
WWW
You can create a ready-made image for VMware Player on the EasyVMX website:
www.easyvmx.com.
Helpful Hyper-V resources.
We will add components Hyper-V in Windows 10, consider the option of creating a virtual machine using Hyper-V, and also consider its parameters.
Add Hyper-V components.
Launch "Run"in either of two ways:
- Right-click on the menu "Start" and choose "Run". (Fig. 1)
- Press the keyboard shortcut "Win"+"R".
Introduce appwiz.cpl(Fig. 2)
 Fig. 2 - Enter appwiz.cpl
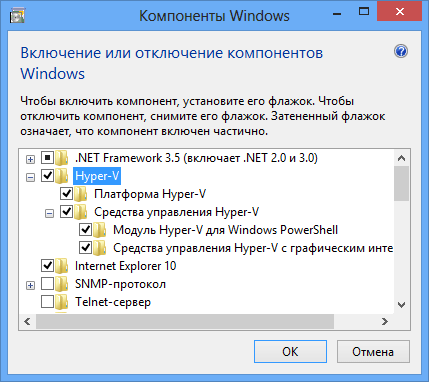
 A window will open "Programs and Features"... Left click Turn Windows features on or off. (Fig. 3)
 Fig. 3 - Programs and components.
 A window will open "Windows components" ... We select everything that is in the section Hyper-V. (Fig. 4)
We press "OK".
 Fig. 4 - Selecting Hyper-V components.
 We are waiting for the installation of components - Applying changes, and press "Restart now". (Fig. 5)
 Fig. 5 - Application of components, system reboot.
 On this Adding components this is done. Getting Started with Hyper-V
Running Hyper-V.
On the menu "Start" -> "Facilities windows administration" a shortcut appeared "Hyper-V Manager"... We launch it. (Fig. 6)
 Fig. 6 - Launching Hyper-V Manager.
 Before us is the starting window "Hyper-V Manager". (Fig. 7)
 Fig. 7 - Hyper-V Manager start window.
We select our computer on the left, I have it - DESKTOP-9PLBR7Q, a menu appears on the right "Actions", Click on the item "Virtual Switch Manager". (Fig. 8)
 Fig. 8 - Go to the Virtual Switch Manager.
 AT "Virtual Switch Manager" click "Create virtual switch". (Fig. 9)
 Fig. 9 - Create a virtual switch.
 Enter Name, I have it - Hypernet and note, I have this - Hyper-V network. (Fig. 10)
Also choose Connection type... I chose to connect to External network through my network card - "Realtek PCIe GBE Family Controller"... And also checked the checkbox "Allow the managing operating system to share this network adapter".
We press "Apply".
 Fig. 10 - Properties of the virtual switch.
 Pops up a warning "Pending changes may disrupt network connectivity"(Fig. 11) I assume that this article will be read by beginners, which means they are unlikely to repeat step by step after me, using the server involved, of their enterprise 😀 ... Therefore, it's okay that we can lose the network connection for a while. We press "Yes" and we are waiting "Applying changes".
 Fig. 11 - Warning about possible network connection failure.
 Now going into "Network connections" -\u003e "Configure adapter parameters"... We can see our newly created vEthernet (Hypernet), also adjacent to it is not connected vEthernet (Default Switch) - "The standard network "automatically provides virtual machines access to the computer's network using network address translation ( NAT). NAT at the moment we are not interested. And we will not touch this switch (Fig. 12)
 Fig. 12 - Network connections -\u003e Configuring adapter parameters.
 This completes the network setup. Let's move on to the most important thing, for which the virtualization system was created Hyper-V - FROM creating a virtual machine.
Creation of a virtual machine.
Right click on our computer -\u003e "Create" -\u003e "Virtual Machine"... (Fig. 13)
 Fig. 13 - Creating a Hyper-V virtual machine.
 The "New Virtual Machine Wizard" will open (Fig.14)
- Click the button "Done"to create a virtual machine with default settings.
- Click the button "Further"to create a virtual machine with specific configuration options.
 Fig. 14 - Virtual Machine Creation Wizard.
 Specify the Name of the virtual machine and its location (Fig. 15)
I decided to test with Ubuntu Server 18.04.
Therefore, I have this:
- Name:ubuntuserver 18.04.
- Location: E: \\ hyper-v ubuntu server 18.04 \\.
 Fig. 15 - Specify the Name of the virtual machine and its location.
 We select the generation of the virtual machine. (Fig. 16)
In most cases, you should choose the second generation, but if you are installing something 32-bitit is worth choosing - Generation -1.
Personally, I have Ubuntu Server 18.04 64-bitwith the support UEFI, hence I choose - Generation 2.
 Fig. 16 - Selecting the generation of the virtual machine.
 We allocate the amount of RAM. (Fig. 17)
Enough for my operating system 1Gb RAM \u003d\u003e I leave the default ones written 1024 Mb... Let's go "Further".
 Fig. 17 - Allocating the amount of RAM.
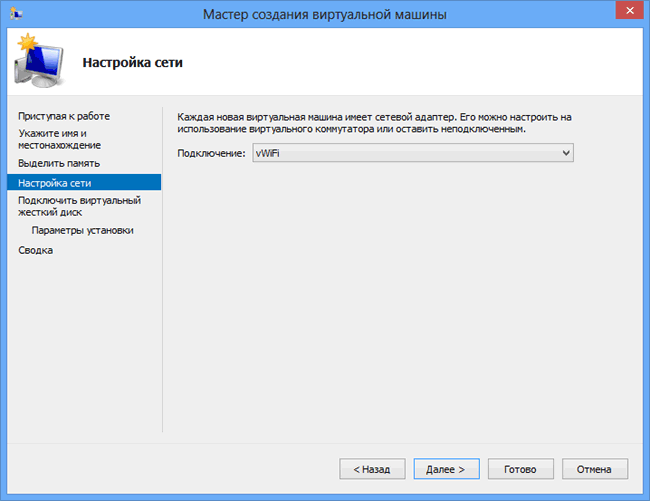
 Choose which switch our network interface will be connected to. (Fig. 18)
We choose our "Hypernet" , let's go "Further".
 Fig. 18 - Network configuration.
 Create a virtual hard disk (Fig. 19)
We indicate Name, Locationand maximum The size file virtual HDD.
I have so:
- Name: ubuntu server 18.04.vhdx.
- Location: E: \\ hyper-v ubuntu server 1804 \\.
- The size: 10 GB.
 Fig. 19 - Create a virtual hard disk.
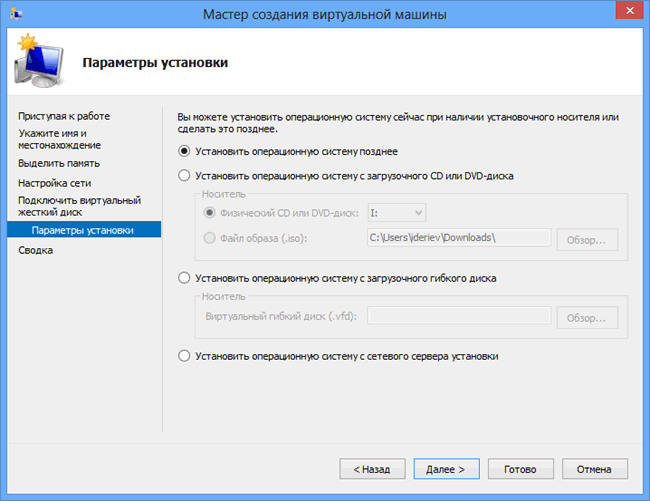
 We choose ISO image from which we will install the operating system. (Fig. 20)
Choose an item Install operating system from boot image file -\u003e Click "Overview" -\u003e Choose iso image... -\u003e We press "Further".
 Fig. 20 - Selecting an OS image.
 Completion of the virtual machine creation wizard (Fig. 21)
We press "Done".
 Fig. 21 Completing the virtual machine creation wizard.
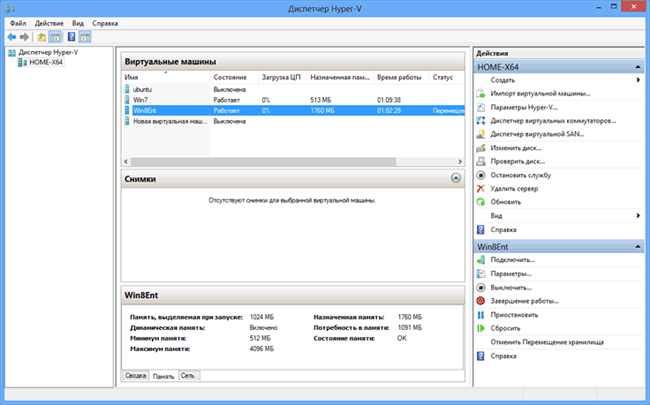
 Now in Hyper-V Manager we see the newly created virtual machine - ubuntu server 1804... (Fig. 22)
Right-click on it -\u003e "To plug".
 Figure 22 - Hyper-V Manager, New Virtual Machine.
 A window will appear (Fig. 23)
If you want to install the system Windows then when you press the button "Start" you should start the installation, without any errors.
But in order to start Ubuntu Server 18.04Had to "File" - > "Parameters"-> "Safety" disable "Safe Boot". (Fig. 24)
 Fig. 23 - Connecting to a virtual machine.
  Fig. 24 - Disable Secure Boot.
 Turn on the virtual machine (Fig. 25)
 Fig. 25 - Turn on the virtual machine.
 Everything is fine, the virtual machine started up. The installer meets us Ubuntu Server 18.04.(Fig. 26)
 Fig. 26 - Running virtual machine. Ubuntu Server 18.04 Installer.
 Changing the parameters of the virtual machine.
Let's make a small overview of the virtual machine settings so that you can see the main functions before deciding to use the virtualization system Hyper-V.
"File" - > "Options".(Fig.27) Fig.27 - Go to "File" -\u003e "Options"Equipment.
"Firmware" - you can change the boot priority of devices in the virtual machine (Fig. 28)
 Fig. 28 - Selecting the boot priority.
 "Safety" - can "Enable / Disable Secure Boot", "Enable / Disable Encryption Support ". (Fig. 29)
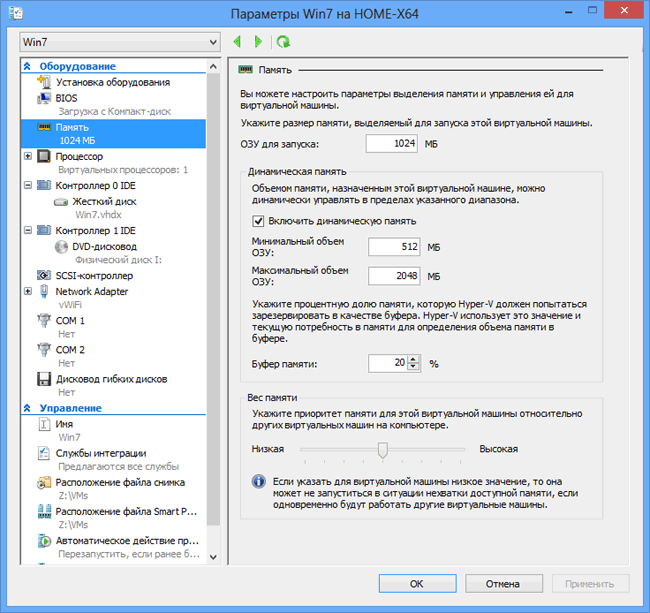
Figure 29 - Virtual machine security settings."Memory"- you can edit the amount of allocated RAM, Enable / Disablefunction Dynamic memory.(Fig. 30)
 Fig. 30 - RAM parameters.
 "CPU"- you can edit the number of virtual processors in accordance with the number of processors on the physical computer. (Fig.31)
You can also distribute the load in "Resource management".

"SCSI controller"can add HDD, DVD driveor Shared disk. (Fig. 32)
 Fig. 32 - SCSI controller parameters.
 You can also change parameters of connected media, for example, here we can change the inserted into the virtual DVD drive ISO Image (Fig. 33)
 Fig. 33 - Media parameters.
 "Network adapter" you can change the configuration network adapter: Choose Virtual switch, register VLAN ID, customize Bandwidth. (Fig. 34)
 Fig. 34 - Network parameters.
 Control.
"Name"- you can easily change the virtual machine for a more convenient one for your use (Fig. 35)
 Fig. 35 - Name change.
 "Integration Services"- Select the services you want to make available to the virtual machine. . (Fig. 36)
 Fig. 36 - Integration services.
 "Checkpoints" - Here you can customize Control points (snapshot, restore points), enable the automatic mode of their creation and designate their storage location (Fig. 37)
 Fig. 37 - Control points.
 "Smart Padding File Location"- You can specify the path to the swap file. (Fig. 38)
Smart Padding- a function that makes it possible to use the paging file on the host if there is not enough memory to boot a virtual machine.
 Fig. 38 - Location of the Smart Padding file.
 "Automatic actions on startup" - You can select the operation you want to perform with this virtual machine when the physical computer starts up (Fig. 39)
So Windows 8 is officially presented and its active distribution begins. Accordingly, at least some of us will soon be faced with the question: is it worth updating the existing OS?
Indeed, Windows 8 pre-installed on a new PC (even the most ordinary, not a modern hybrid-transformer) will certainly not cause much rejection, since its "desktop" part is not much different from Windows 7. The absence of the Start button can be easily compensated for by one from third-party utilities, many of which are able to almost completely hide Metro, so that they face a new interface (which I still find inappropriate on desktop computer or regular laptop) will rarely be necessary And some new windows functions 8 undoubtedly useful: secure boot, improved emergency tools, new task manager, differentiated work with wireless networks etc.
But from the point of view of the present windows user 7, the situation is far from so straightforward. Yes, Windows 8 is more modern, fractions or a few percent faster, it contains some additional usefulness, but after all, the transition to it will require not only money, but also time (which in many cases are the same thing) - to study, master new techniques, arrangement of the working environment, solving compatibility problems of familiar software. In forums, you can often come across an opinion like that, they say, it's okay, you quickly get used to it - the question is: for what?
In fact, there are some features in Windows 8 that can please even the most conservative PC user. And this, of course, is not Metro at all, which (together with the WinRT API) is certainly the most fundamental change in Windows 8, but relevant only for a relatively small devices from touch screen, first of all, tablets. There are more practical innovations, one of which is an embedded virtualization system based on the Hyper-V hypervisor.
Client hypervisors
Hyper-V technology came to Windows 8 from Windows Server. Formally, it is intended to replace the outdated Virtual PC and XP Mode, but in fact it has a slightly different positioning and more differences than similarities. Hyper-V is simply referred to as a hypervisor, although the term (synonymous with Virtual Machine Monitor, VMM) applies to all virtualization systems. Therefore, in order to avoid confusion, they are divided into two categories - Type 1 and Type 2. Hypervisors of the first type are also called bare-metal, that is, they work directly on hardware, without a general-purpose parent OS. This includes Microsoft Hyper-V, VMware ESX / ESXi, Citrix XenServer, Xen, KVM. The second type, accordingly, functions as an application within the parent OS and uses its various mechanisms. Examples - VMware Workstation / Player, Oracle VirtualBox.
Hypervisors of the first type are technologically more complex, but they are also more efficient in the sense that they provide minimum overhead costs and maximum isolation of virtual machines (VMs). Therefore, they have won recognition in the server environment. However, this does not mean that they will not be used on a client PC. For example, the use of two VMs - personal and work is usually considered as a typical scenario. In the first, the user does what he pleases, in the second, strict security policies and other restrictions are applied, since it provides access to company data. Isolation of VMs virtually eliminates cross-infection by viruses, Trojans, etc. In the case of a second type of hypervisor, for example, an ingenious keypad interceptor that penetrated the parent OS can potentially steal information from the VM.
Therefore, the class of "client hypervisors" was formed several years ago, with the improvement of virtualization technologies, primarily hardware support. Typical representatives were NxTop from Virtual Computer and XenClient from Citrix. Today, both technologies are owned by Citrix and are combined in different solutionsmore and more aimed at the corporate market. Why is it necessary to speak about a separate class of software? Because server solutions are not well suited for functioning on a PC and for use by ordinary users. After all, client solutions require not only support for mass equipment, but also specific interface solutions for working within one PC, while the server model assumes almost exclusively remote access.
Microsoft quite unambiguously calls the built-in hypervisor in Windows 8 Client Hyper-V, but its differences from server Hyper-V are much less than, say, XenClient from XenServer. The fact is that while Citrix had to implement the interface part from scratch, as well as the virtualization of the video adapter to provide 3D support in one of the VMs, Microsoft's task was much easier due to the originally peculiar architecture of Hyper-V:
As you can see, the Microsoft hypervisor still assumes the parent, or root OS (sometimes also called "partition"), in which it is actually built. This OS, respectively, is in a special position, in particular, although it is partially virtualized (as can be seen from some characteristic features), but still has access to a video accelerator and a lot of other equipment. In comparison, the XenClient architecture looks like this:

In reality, there is also a privileged VM, designated as Control Domain, but it is specialized, designed only for organizing access to the rest of the user VM. In the case of Client Hyper-V, the root OS is assumed to be the main working one, since only it will fully operate the graphics accelerator and ensure maximum performance.
A notable difference between client Hyper-V and server Hyper-V is its ability to work with wireless adapters. In a server environment, this feature is not in demand, therefore it is not supported, but for a client environment it is the norm. The complexity arises because the Hyper-V network infrastructure is based on a virtual switch that differentiates packets based on the MAC addresses of the virtual adapters. This scheme works great when organizing an internal network, as well as providing access to the outside through a wired physical adapter:

But it is impossible to transmit packets with different MAC addresses over the Wi-Fi channel, so the standard scheme had to be slightly adjusted. More specifically, another intermediary was added to it in the form of a network bridge:
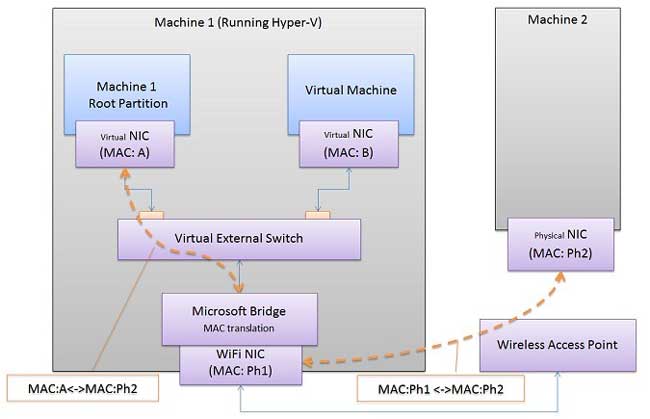
The bridge simply maps the IP address to the virtual network card with its MAC address, which ensures the correct routing of packets that come from the external network. Naturally, the bridge is created and configured automatically as soon as the user selects the appropriate settings.
Client Hyper-V
Hyper-V is included in 64-bit Windows 8 Pro and Enterprise and is an optional feature. Accordingly, first you need to install it, after which it is immediately automatically activated (after a mandatory reboot):
For it to work, however, several conditions must be met. Formally, it is said about 4 GB of RAM, although it is quite possible that it will start on a smaller volume - memory is needed not so much by the hypervisor itself as by virtual machines.
A really fundamental requirement is a processor with support for virtualization and SLAT (Second Level Address Translation) technology. For the server hypervisor, SLAT is not a prerequisite and is only needed for RemoteFX to work. The latest technology is not supported in Client Hyper-V, but apparently SLAT is used to optimize overall performance in the absence of efficient virtualization of the 3D accelerator in the VM.
This requirement is met by all relatively new chips from Intel and AMD, for example, almost all i3 / i5 / i7 - in their case, the desired one is called VT-x with EPT (NPT from AMD). You can check the presence of relevant technologies in the processor specifications on the manufacturer's website, and this is where you should start when choosing the configuration of a new computer. However, it should be borne in mind that they must also be enabled in the BIOS, while VT-x with EPT, for example, are often hidden under common name "Virtualization technology". Therefore, a more reliable check of compliance with all conditions of an already finished system can be performed using special utilities.

In this case, VT-x with EPT seems to be not supported (contrary to information from the processor specification), but this is only a consequence of the fact that Hyper-V is already activated on this computer. This indirectly also testifies in favor of the fact that the root OS is still virtualized. By the way, the fact that the virtualization technology is already used by the hypervisor makes it impossible to use another virtualization system in parallel - both VMware Workstation / Player and Oracle VirtualBox will report the impossibility of installation. On the other hand, VMware Workstation 9 allows Hyper-V to be used in a VM, although this scenario is not officially supported.
Perhaps the most universal way finding out the presence of the necessary virtualization technologies - the Coreinfo utility by Mark Russinovich. It must be run with administrative privileges and with the -v switch.
In the absence (for any reason) of SLAT support, the Hyper-V platform item in the list of optional components will simply be unavailable, and accordingly, Hyper-V cannot be installed.
Intel has another virtualization technology in its arsenal - VT-d, but Hyper-V (both server and client) does not use it yet. Unlike, for example, XenClient, which needs it just to support 3D graphics in one of the VMs. But, as mentioned above, Microsoft achieves the same result in a different way.
Usage
After Hyper-V is installed, work in it is carried out from the Hyper-V Manager:

The server itself does not require special configuration, except that it is worth considering where the files of virtual machines and disks will be stored and, if necessary, adjust the location. This is done in Hyper-V Settings:

- private will combine only virtual machines;
- the internal one will add the physical host to them;
- external provides VM access outside the host and for this must be connected to a physical network adapter.
Some kind of configuration is required only in the latter case - you need to select the correct adapter (if there are several), which will provide access to the local network or the Internet.

After that, you can create virtual machines. This process is managed by a special wizard who will guide the user through the main stages.


In the process, a minimum of settings are provided, in addition, you need to note that, unlike other virtualization systems, the type of future guest OS is not indicated. That is, approximately the same virtual equipment is offered for all occasions. It, however, can be slightly adjusted in the VM Settings. Most often, you may need to add an "outdated" network adapter (for compatibility with some guest operating systems), adjust dynamic memory settings (more on this below), add virtual processors, connect additional virtual hard disks or change their type (dynamic is created by default, then how fixed provide slightly better performance, and differencing allows you to keep the original virtual disk unchanged).


Having configured all the necessary parameters, you can start installing the guest OS. Officially as the latest, Hyper-V supports all client and server versions of Windows, starting from XP and 2003, respectively, as well as CentOS 6.0-6.2, RHEL 6.0-6.2 and SLES 11 SP2. It is assumed that all these operating systems correctly recognize the virtual hardware and, in addition, Hyper-V integration components are available for them, which provide a number of additional drivers and support for specific operations. This, however, does not mean that you cannot install other operating systems. Some time ago, Microsoft transferred the code needed to interact with Hyper-V to the Linux community and became one of the official developers of the free OS. Thus, today some distributions are already ready to work in a Hyper-V environment without additional effort, in particular, this applies to latest versions Ubuntu (12.04 and 12.10 for sure), although in my case the IP parameters had to be set manually, for some reason I could not get them via DHCP. But then everything went absolutely smoothly:
There are two ways to work directly with a VM:
- using the standard Virtual Machine Connection console, which, due to its limitations (sound will not work in it, only text is copied through the clipboard, etc.), it is recommended exclusively for installing and configuring the guest OS;
- through Remote Desktop Connection, where you can take full advantage of the RDP protocol and various small conveniences.
In the latter case, of course, you must first enable remote access in the guest OS. Unfortunately, as mentioned, RemoteFX is not supported in Client Hyper-V, so graphics acceleration is only possible on the root OS. In guests, this drawback is partially compensated by the capabilities of RDP, which provides support for some graphical effects, as well as sound transmission, redirection of USB devices, file exchange between the host and the VM via the clipboard, etc.

These possibilities are fully revealed if Windows 8 also acts as a guest OS. In this case, a multi-touch touch interface will be supported (if appropriate equipment is available), a menu with specific commands will appear.

Additional features
Having migrated from the server environment, Client Hyper-V lost some of its "corporate" capabilities. In addition to the already mentioned RemoteFX technology, clusters, live migration, replicas, etc. have disappeared. From non-trivial functions, you can still move a virtual machine to another location (for example, to a new hard disk) without having to shut it down:

Dynamic memory has also been preserved. This feature implies adjusting the amount of RAM of the VM, depending on its current needs and settings. As always, its functioning requires compliance with a number of conditions. First, the guest OS must support hot-add memory. This is true for most modern operating systems, both server and client, in particular - for all Windows, starting from Vista SP1. Second, the integration components must be installed. Among the latter, the dynamic memory driver plays an important role:

It takes over the free RAM and returns it to the hypervisor for subsequent redistribution.
Dynamic memory must be specially enabled for each VM, while you can configure detailed parameters:
In particular, “memory weight” should be understood as the importance, value of a particular VM. The higher this parameter, the less chances that memory will be taken away, and the sooner it will be added if possible. You can control the action of the dynamic memory mechanism in various ways, for example, using a special tab in the Hyper-V manager:
It is also worth paying attention to the possibility of saving the VM state, creating VM snapshots for easy rollback to previous states. The import function makes it easy to copy and transfer VM files, and then quickly connect it to Hyper-V.
Summary
Despite a number of limitations, client-side Hyper-V has the same scalability as server-side. Plus, the virtual machines are fully compatible and migrate seamlessly. This, in particular, allows you to use a personal computer for testing and debugging a VM, so as not to "clog" the production virtualized server.
Preservation of architecture and general organization Hyper-V in Windows 8 also suggests that Microsoft's client virtualization is geared more towards IT professionals and developers than general users. Unlike XP Mode from Windows 7, where publishing applications made it possible to almost completely hide the VM, in Windows 8 the user will have to work directly with the VM and understand its capabilities and limitations. Generally speaking, the current Client Hyper-V doesn't quite fit the idea of \u200b\u200bclient hypervisors. It's a server technology, after all, just slightly adapted for the PC.
On the other hand, Client Hyper-V's server-side origin is and strong point... High scalability, support (unique for client solutions) heap memory and some other technologies indicate debugging and a large "margin of safety".
VMware Workstation and Oracle VirtualBox are certainly more "client-side" than Hyper-V. Their advantages include 3D graphics in the VM (although Oracle is not very good) and wider and more convenient support for USB peripherals. In addition, both products have more modest system requests, in particular, they can work on 32-bit operating systems, although from the point of view of memory management efficiency 64-bit is preferable. Microsoft can fill most of the gaps with RemoteFX, but its intent is unclear.
Nevertheless, even with all the caveats, Hyper-V in Windows 8 will be a pleasant "gift" for many and will certainly find many uses.