How to make a screen of the program window. How to make a print screen using the PrtScr key. How to take a screenshot of the screen using standard Windows tools
If you urgently need to show or save something to the interlocutor, the user may not know how to take a screenshot on the computer. It's time to learn this!
Why take a screenshot
Read also: How to set a password for a Windows folder? | 7 Best Ways and Programs for Encryption | 2019

It often happens that a screenshot is simply necessary.
For example, if you need to show your screen to your interlocutor or send this data somewhere, if you need to save something that is not saved by pressing the right mouse button, or if you just want to catch a good moment in the video.
And these are just some of the reasons to use such useful function his personal computer or laptop.
For example, you find yourself in a not very pleasant situation, for example, when using a virtual wallet.
And in order to prove to the administration that you are right, you have to provide them with evidence. And here, well, you just can't do without a screenshot.
Or you have to contact the support service for your hardware or software with a problem.
Again, it will not be possible to explain in words, and what remains to be done? Of course, take the opportunity to showcase your screen.
It even happens that you want to capture messages like memories, and “Ctrl + C” alone is clearly not enough.
A lot of little things that would seem to be easy to leave as an image on your personal computer or laptops, but it is simply physically impossible to do this without taking a screenshot.
In fact, the ability to take screenshots can be useful at any time, and therefore it is important to know how to properly screen your screen or the selected window, or maybe just some part of it. Yes, you can even choose one phrase or picture.
Well, to do this, in fact, is quite simple, and in order to take a screenshot, you need to make a minimum of effort. It is very simple, done in a few clicks, and is available even for a child.
Print screen by button
Read also: [Instructions] How to reinstall Windows (7/8/10) on a computer or laptop | 2019
For a start, the print screen is the same, only in different letters. The name, by the way, is from the first method of creating screenshots - the PrintScreen button.
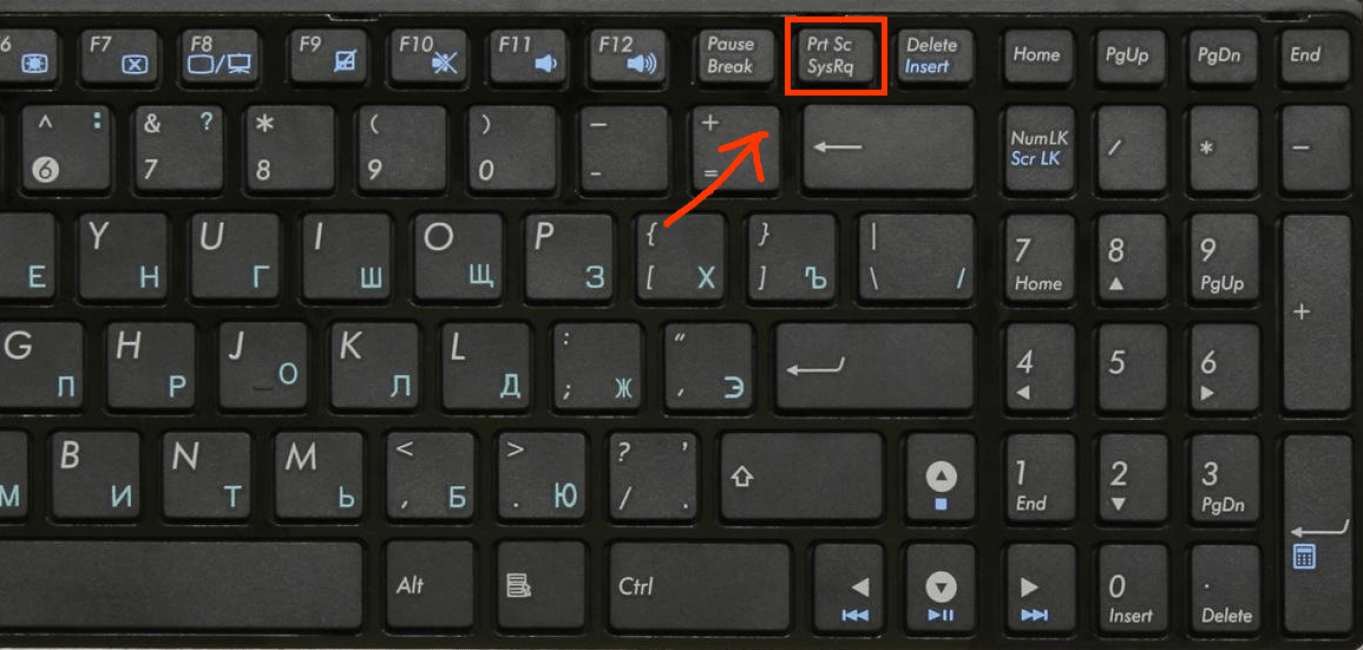
This button may also sometimes be called PrtScr and is usually found on the right side. Its location depends on the type.
So, this button is the fastest and easiest way to take a screenshot of your screen in a matter of seconds.
You just need to press it to save the screen image in the clipboard. That is, so that you can literally insert it anywhere.
Nothing more, just one button, and then you can edit the screenshot in any image editor.
This can be done using Paint, Paint.net, GIMP, or whatever editor you have.
It is important to remember that a screenshot taken using the PrintScreen button captures the entire screen, and if you send a screenshot to someone, that person will see all your tabs in the browser, running programs, absolutely everything. Therefore, editing the print screen can be very important if you don't want others to see more than you need to.
How to take a screenshot on a laptop
Read also:

As with any keyboard, the PrintScreen button on a laptop does not go anywhere. It is in its place, which depends on the type of keyboard, and still performs the function.
But it happens that the user presses the button again and again, but nothing happens. And what then? Can't make a screen on a laptop?
Not at all! It just means that in addition to the keys already known to the user, in case you have a laptop, you need to use. And it looks like Fn + PrintScreen.
The button is signed, “Fn”, and it is located at the bottom left, not far from the space bar.
It's so easy and simple, just two buttons. Well, the screen, again, will be saved for further editing.
And if you are sure that you did everything correctly, and the screenshot still turned out, then it's time to edit it. How to do it right?
How to edit a print screen
Read also: Windows Task Scheduler - how to configure and what can be disabled without damaging the system?
The easiest way is to call the Paint program and cut off everything unnecessary with it.
As you know, this is the simplest "drawing", and just as easy with its help and adjust the size of the screenshot.
You just need:
- Open the "Start" menu, you can do this using the "Win" key or by opening the menu on the left;
- Select a folder called "Standard";
- From there run the program
- By pressing ctrl keys+ V will insert the screenshot into a new canvas.
- Then you need to select the "Select" tool with which you will mark the desired area, and "Crop".
- It remains only to save the image.
And the screenshot is ready!
Nothing fancy at all, just a few clicks and you can send it anywhere.
Likewise, you can edit any accessible programthat you have at your fingertips. Using the "paste" keyboard shortcut, the resulting screen can be placed in absolutely any application.
And if, for example, there is something wrong with the print screen button? Or is it just that nothing is clear here? What to do in this case?
Print Screen with Scissors
Read also: [Instructions] How to connect a printer to a computer on Windows 10 and Mac OS

In Windows 7, the PrintScreen button may not be used at all. Instead, there is a very handy tool called "Scissors".
It is designed to create a screen without further processing it, that is, you can make a print screen of absolutely any size and anywhere on the screen.
It is easy to find and use, and it only takes a few steps:
- All the same "Start", then in "Standard" you need to find a program called "Scissors".
- It opens instantly, it remains only to click on the tab called "Create" and select the size and shape of the field, that is, the future print screen.
- Then it remains only to click on the "Save" button, or add an inscription to the print screen using the "Marker" tool.
Nothing complicated really, right?
Indeed, both ways to make a print screen are very easy and affordable.
True, in different versions of the operating system screenshots are not always the same.
Printscreen on Windows 10
Read also: TOP 5 Ways to take a screenshot on a computer running Windows 10

There are many more ways to create and save a screenshot in the top ten.
Firstly, in some cases screenshots are saved automatically in a specially designated folder. By the way, it is located on the local disk.
Well, and secondly, there are more built-in tools that allow you to make a screen without any problems.
And not only a screen, but even a video recording without additional programs, all this is provided in operating system.
There are several tricks with the PrintScreen key. When you click on it, a screenshot (of the desktop, running programs, etc.) will be automatically transferred to the clipboard, from where it can be inserted into a document or any graphics editor.
If you press the combination alt keys+ PrintScreen, you can only make a print screen of the working window.
For instance, open folder, browser or any in windowed or even full screen mode... For everything to work out as it should, you must first make this window active, that is, click on it.
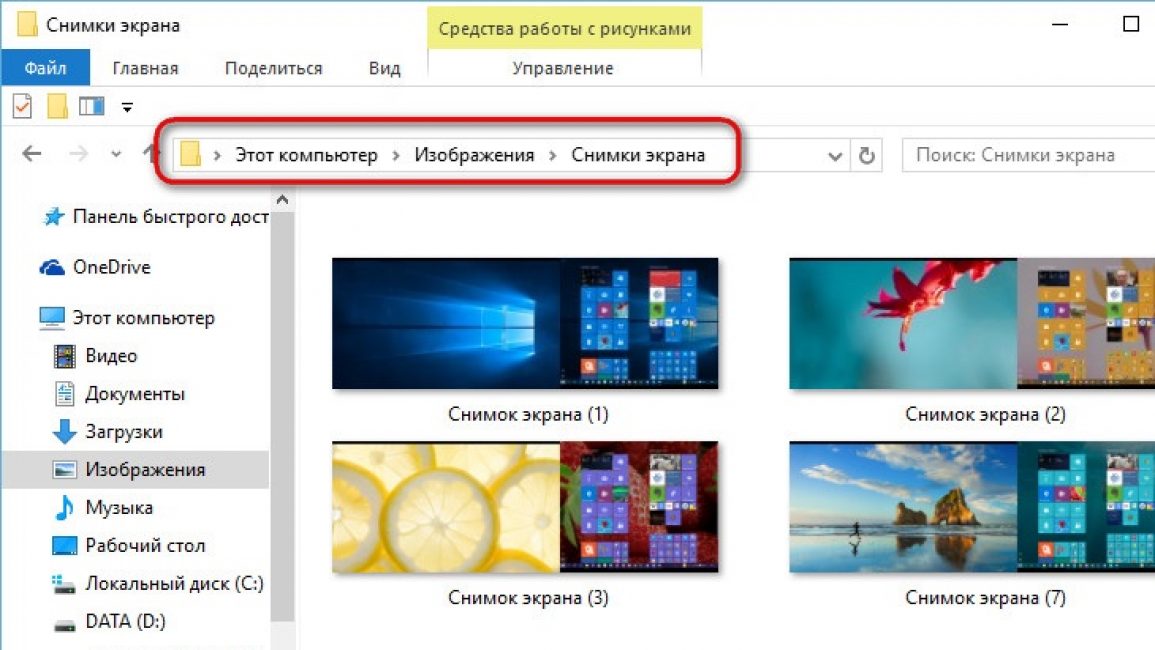
And finally, with the Win + PrintScreen key combination, screenshots will be saved automatically.
That is, they will immediately appear in the system. When you click on these buttons, the prinscreen will not move to the clipboard, but will already appear in the form of an image in standard folder, which is called Screenshots and is in the folder "Images".
But these are just keyboard shortcuts, what about other ways?
Are there other possibilities?
CreatorsUpdate: Game Bar & Scissors
Read also: TOP 4 Easy Ways to Change Any File Extension in Windows 7/10
The Windows 10 operating system, like its previous versions, is equipped with a tool called "Scissors"... Yes, exactly, in addition to key combinations, there are many more built-in ways to take a screenshot.
This is a standard program, so it's very, very easy to find it. You can find it through "All Programs" or just type the name in the search bar and then run the program.
In principle, the algorithm of actions does not change, it is very easy to make a print screen using this program.
As mentioned above, you just need to select the area and shape of the desired screenshot, mark this place on the screen, cut it out, add a caption if you wish, and save. Done!
By the way, you can choose any folder for saving, and a delay function appeared in the top ten, that is, the program can count the required amount of time before making a screen.
Another innovation was the CreatorsUpdate system, that is, improved and expanded key combinations and minor improvements to the operating system. One of these combinations is just how you can make a screen, and this is Win + Shift + S.
Often the user gets lost when looking for a key called “Win”.
In fact, this is just a button that you can use to go to the desktop or launch "Start", and a checkbox is drawn on it.
And finally, the game bar. This is another way to take a screenshot on Windows 10 without using third-party programs or applications.
Game bar is a pre-installed program that is very easy to launch, especially when using various applications.
It was originally designed to record video with open applications and programs, but with its help you can also capture a print screen.
To do this, it is enough to first open any program you need for the print screen, and then press the key combination Win + G.
Desktop printscreen Ubuntu Linux
Probably, many already know how different these operating systems are among themselves.
And if making a screen in Windows is as easy as shelling pears, then in the case of Linux, you may have to try more than one method until the appropriate one works.
The thing is that not in all versions of this operating system the already known PrintScreen button works as it should.
And sometimes it does not work at all, and even the usual key combinations for the same "windows" simply do not work.
But it's still worth trying this key, because sometimes when you press it, the system even automatically prompts you to save a screenshot. That is, it opens a window for selecting a save folder.
In the same way, you can try the Alt + PrintScreen key combination, which will allow you to take a screenshot of the active window, or Shift + PrintScreen to pre-select the area of \u200b\u200byour future print screen.
Sometimes it works, sometimes it doesn't, but either way it's worth a try. Here you don't even need to use third-party editors or the clipboard, the system will save everything for you.
But what if the button and keyboard shortcut don't get a response? In this case, you should use the built-in utility Gnome Screenshot.
It is located in the folder "Accessories", and called double tap left.
With this program, you can pre-select the size and area of \u200b\u200bthe future screen, turn the pointer on or off, or even activate a delay, to prepare the perfect print screen.
All this is very easy and convenient, and does not take much time or your efforts.
However, using the printer screen button is not always convenient, or the user may simply not be able to do this.
Yes, and the same "Scissors" or "Gnome Screenshot" may not be at hand, let alone to remember key combinations.
Then it will be very useful third party programsthat you can use, and that are not inferior to the ease of operation with the PrintScreen button.
Printscreen on a computer without a button
Read also: [Instructions] How to reset Windows 10 to factory settings: All methods | 2019
It would seem that making screenshots using a button is the easiest way. Here I took it, clicked it, clicked it again, inserted it, edited it ... But it also happens that this cannot be done.
Therefore, they will come to the rescue various programs and applications.
With their help, you can take a screenshot in a few clicks, save it in a predefined folder or select a location, immediately edit or select a print screen area.
Most programs are free and take up very little space, are easy to install and are as easy to use as the button, and the choice is very, very large.
You can download a program that combines the functions of a photo and video editor, you can find an application from the manufacturer or from a developer who has invested in it functions not only for creating a print screen, but also for recording video.
It all depends only on the user, and, of course, on the choice of programs that are best suited for creating a screen.
The list of such most suitable programs includes Snagit, Greenshot, Snippy, Jing and others, which allow even the most inexperienced user to intuitively understand the work and make a screen with ease.
You can find them using a search engine, there is different versions and program options. But how can you use such programs correctly?
For taking a screenshot in Windows 7, 10 or more early versions the system responds with a button on the keyboard called Print Screen. Most often, its abbreviated name is indicated - Prt Scr. The key is usually located in the upper center or right side of the keyboard, just behind the F1-F12 row. Before clicking on it, make sure that the screen is displayed exactly as you want to capture it. The most difficult thing for a beginner begins precisely after clicking on Print Screen, because at first it is not clear where the screenshot is saved. But it is the user himself who determines the path of the location of the screenshot, which will require performing a few more steps.
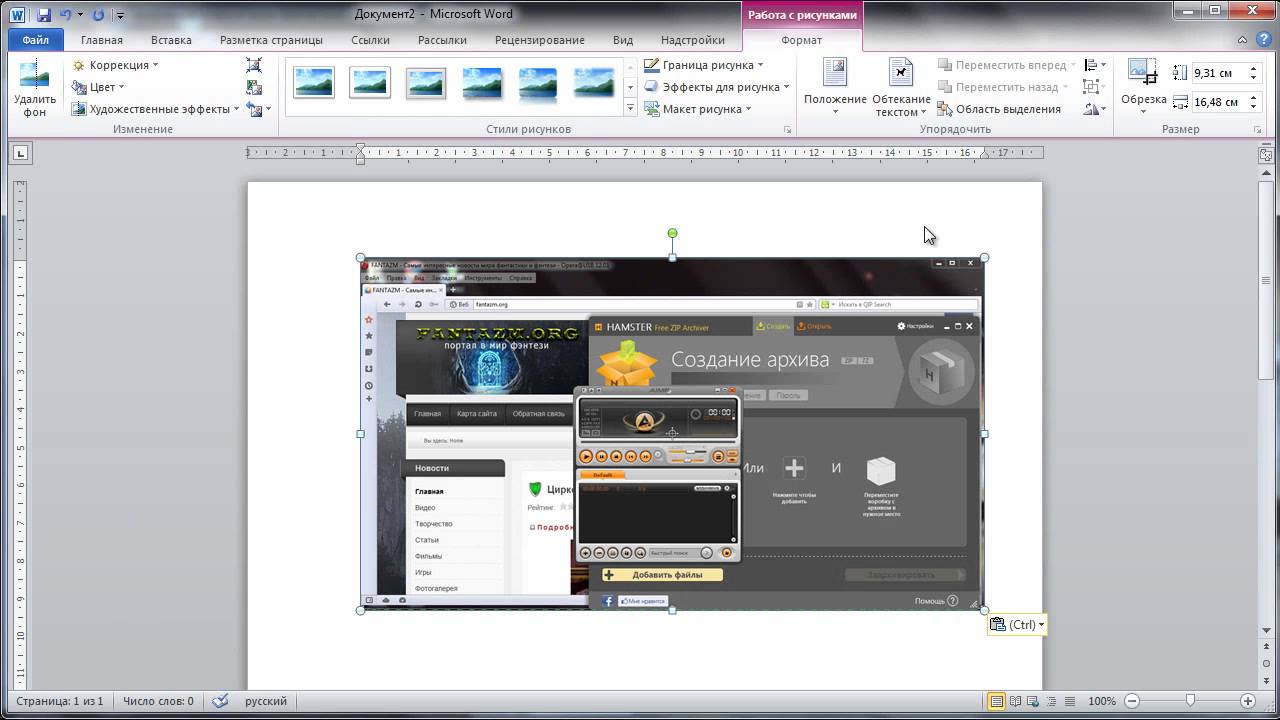
Open any image editor, for which the standard is quite suitable windows program - MS Paint. The application is located in the section of standard programs, which can be accessed through the Start menu. Once MS Paint starts, click on the "Edit" menu item and select "Paste." The screenshot of the computer screen you made will immediately appear in the main field of the program. The same action of inserting an image can be performed using the Ctrl + V key combination. Make sure that you are satisfied with the screenshot. Otherwise, you can use the tools in the program to fix it, for example, select and crop excess edges or flip the image. After that go to "File" - "Save as ..", where you need to specify the folder to save the screenshot and click "Save". The image will immediately appear in the selected folder and will be available for further use.
Here are the advantages and disadvantages of the described method to take a screenshot of the screen on a computer using the keyboard. Its advantages are as follows:
- comparative simplicity and availability;
- compatibility with all versions of Windows;
- data security.
Despite the number of actions required to obtain and save a screen, the "Print Screen + Paint" method remains the most accessible and understandable for both beginners and advanced users. To obtain an image, it is not necessary to resort to the help of third-party programs and people, which helps prevent the leakage of personal data and infecting your computer with viruses. However, this method also has disadvantages:
- a large number of actions;
- tangible time costs;
- dependence on the keyboard.
The method of capturing the screen through the Prt Scr key takes some time to get used to, so there is often confusion in the sequence of actions, which is why you have to turn to the help of specialists again and again. In addition, not everyone may have a workable keyboard with the right key at hand, so every self-respecting user of a personal computer is obliged to understand additional ways getting the coveted shot.
How to take a screenshot of the computer screen if there is no Print Screen button
A lot of users are wondering how to take a photo or laptop if the required Print Screen button is missing? For a start, it's still worth looking for it, because, as mentioned earlier, it can be called differently: Prt Scr, PrScr, or even just have a screen icon. The location of the key may also vary depending on the equipment. However, the oldest computers, which are still installed in many Russian offices, do not really have a Print Screen button. In this case, they will come to the rescue special programs, with which you can easily take a screenshot of the screen on your computer or. Also, applications will be an excellent solution for those who just want to reduce the time for creating and saving screens.
There are many different programs for creating a screenshot, but it is best to immediately pay attention to the simplest and free apps, which at the same time have long proved themselves well among ordinary users. If you try to install the first program that comes across the network, there is a great risk of simply not understanding all of its functions, or, even worse, picking up a virus from the site on which the cybercriminals operate. So one of best apps Lightshot is considered to be in its own way. The program is quickly installed and integrated into the system, starting to run when it starts. In the settings, you can assign any key to take a screenshot, while after pressing it, the image is immediately saved to a user-friendly folder. Thus, it is created in just one step.
You can use the closest analogue of Lightshot - the Screenshot program, which has similar functionality, and which also allows you to take a screenshot of the screen in one action. Snagit and Clip2net are quite good for convenience, which also have their own image editor, which allows you to quickly and easily process the resulting screen. However, there are some drawbacks to the way you can take screenshots using apps:
- not compatible with all Windows versions;
- deterioration in system performance;
- time spent on development.
Alas, most programs do not actually work on the oldest computers, and if installed, they significantly slow down the system with a weak hardware configuration. In addition, it will take some time to learn all the functions of the program and remember how to use it. However, in the future, the process of creating screenshots can be simplified tenfold. Thus, each user decides in his own way which method suits him best. If you rarely have to take a screenshot of the screen on your computer, it will be enough to remember the "Prt Scr + Paint" procedure, but if such a need arises every day, you should think about choosing a suitable program for convenience.
Taking a screenshot of the screen windows tools .
To take a screenshot, there is a special key on the computer keyboard -. Typically, this key is located in the upper right of the keyboard. When we press the PrtScr button, Windows loads the graphic image of the screen into a special area of \u200b\u200bmemory (clipboard).
PrtScr key on keyboard To see this image, upload it to the Internet, etc., you need to save this image in graphic file BMP, .JPEG, .GIF or .TIFF format. For this we use a simple graphic editor Paint, which is included in the standard delivery of any Windows. And now everything is in order. Take a screenshot of the screen using the PrtScr key. Then open the Paint editor: Start - All Programs - Accessories - Paint IN running editor Paint select Edit - Paste (menu at the top). Now we see the screen image displayed in the graphical editor. To save the result, select: "File" - "Save As" Give the screenshot a meaningful name (by default "unnamed"), and select the image format in which we will save the screenshot. BMP, .JPEG, .GIF or .TIFF. (default ".BMP"). Since BMP format gives too big size image, it is recommended to select .JPEG format. This will reduce the size of the screenshot file by 10 times when saving good quality images. Then we press the save button, and that's it, your screenshot is ready. You can show it to friends, send it by e-mail, upload it to your website, etc. How to take a screenshot of the active window Very often you need to take a snapshot of the working window of a program. To do this, it is not at all necessary to take a snapshot of the entire desktop, you just need to remember the key combination - Alt + PrtScr. Just hold down the Alt key, which is usually located to the left and right of the spacebar, and then without releasing it, press the PrtScr button.
  In this case, only the active window will be captured. If the desktop is empty, a full screenshot will be taken. How to save the resulting screenshot to a file is described above. I wish you success in mastering the basics of Windows. Below are some answers to possible questions.
 What is a screenshot? A screenshot is a graphic file that contains a full or partial image of a worker windows desktop... It displays what is happening to the user on the monitor screen.
What is it for? Someone just needs to take a picture of the game to show off to friends. Someone has an error with the program, website, network and wants to get help from the technical support service. Having provided a screenshot of the error to a specialist, you can be sure that he will see the problem literally with your eyes and will quickly help in solving it. It is often simply impossible to explain to another person, communication with whom is possible only through the network, what and how he should do. It is much easier to make and send a series of screenshots to him. In the meantime, there is no need to worry about it. ” Screenshot software In order to automate the process of creating screenshots, to make it more convenient and faster, there is a special class of programs - screenshots. These programs usually sit in the tray (do not occupy the screen) and by pressing hotkey take a screenshot and then save it to hDD computer as a graphic file. Hot Key Screenshot Program Very simple and very quick program... Takes a picture and saves it in special folder... Ideal for those who love simplicity and convenience. Has all the necessary settings for convenient work. You can download the Hot Key Screenshot program here: This program is absolutely free and does not require installation on your computer.
 Screenshot is a useful option and is a normal screenshot. It can be made at any time and saved to your hard drive.
Taking a quick snapshot of Windows 8
In order to capture the entire desktop, you need to use the combination windows keys + Print Screen.
In this case, an image of the entire screen will be created. It will be automatically saved in the package Screenshots located on the tab "Images" .
The saved file will have a JPEG extension. Each subsequent picture will have its own numbering.
You can change the name assigned to the screenshot at any time.
If you need to create a screen specific area screen or make it free-form - use the standard program "Scissors".
Working with it was described in the previous section.
To find this program - go to the START menu and select the option to display all applications.
Click right click mouse by program "Scissors" and pin it to your home screen.

If necessary, you can pin its shortcut to the taskbar.
You can also place the program icon on the desktop.
To do this, right-click on the icon "Scissors" and select item "Open file location" .
This will open a window with standard programs.
Click on the scissors icon and in the list that appears, specify Send to Desktop (Create Shortcut) .
This software is at your disposal at any time.
Windows 10 screenshot options
The top ten has large functionality both in the usual plan and in the creation of screenshots.
They can be done by using the already familiar Windows + Print Screen keyboard shortcut.
In this case, the system will automatically save the file with pNG extension in folder Screenshots .
To open it, go to the tab "My computer" , and then - "Images" .
Another way is to use the Windows + H keys. In this case, the snapshot will be saved to “”.
A side panel will open on the right side of the screen, where you can choose an option to use the screenshot you took.
This list contains the following options:

You can take and edit a screenshot by pressing Print Screen.
In this case, the image will be on the clipboard.
Open the standard editor and use the Ctrl + V keyboard shortcut to paste it into the program's working window.
If necessary, edit and save it.
You can also make a screen of the active window using the Alt + Print Screen combination.
When these keys are pressed simultaneously, a screenshot of the active window will be created at the moment of pressing. Highly convenient way, don't take a screenshot of the whole screen.

In Windows 10, you can use the keyboard shortcut Win + G. In this case, a special game panel will open.
It allows you to record videos and take screenshots during gameplay.
To do this, you need to simultaneously press Win + Alt + Print Screen.

To create a screen, you can also use the standard program "Scissors"... Working with it was previously described.
There are a lot of options for how to take screenshots. However, the list does not end with standard instruments.
Additional programs for taking screenshots
Microsoft Snip
This screenshot manager is free. It can be downloaded from the official Microsoft website.
It allows you to take snapshots of both individual windows and the entire screen, and selective fragments.
with it, you can even record video with various annotations displayed.
This is very useful when creating training videos and various kinds of presentations.
You can add sound to them.

Lightshot

In the Windows 10 operating system, you can take a screenshot of the screen using built-in tools and in several ways. It is very convenient and, moreover, does not require the installation of additional programs.
1st method. Using the Print Screen button and its accompanying keys.
As in previous versions Windows, the easiest way to take a screenshot is to press the PrtScn key. Next, the digital image is placed on the clipboard, from where it can be pasted (using the Ctrl + V hotkey combination), for example, in word document or put it in the paint editor, for editing and saving the picture in the format you need.
When using the Alt + PrtScn combination, a snapshot of the active window will be placed on the clipboard, not the entire screen.
And here is another variant of the Win + PrtScn key combinations. When you click them, the screenshot will be automatically saved in the Pictures - Screenshots folder. It also remains in the clipboard. A short-term darkening of the monitor screen will be a kind of signaling device for taking a screenshot.
2nd way. Using the standard Scissors application.
This program allows you to take screenshots of the entire screen or a specific area of \u200b\u200bit, edit the image and save it in the desired format. There is also a function to delay the creation of a fragment.
You can find the Scissors program like this: Start - All Applications - Accessories-Windows - Scissors. But the easiest way is to launch the application through the Windows search engine, typing in its name there.
To take a screenshot, you need to click on the arrow in the "Create" item and in context menu select the area to create the image. Next, click the "Create" button.

After taking a picture, it can be edited with minimal possibilities, and then saved in any of the formats: GIF, JPEG and PNG.
barbadosmaney.ru
How to take a screenshot of the screen using standard Windows tools.
Rating: 4.3 out of 5 Votes: 49
Taking a screenshot of the screen using Windows. To take a screenshot, there is a special key on the computer keyboard - PrtScr. It is usually located at the top right of the keyboard. When we press the PrtScr button, Windows loads the graphic image of the screen into a special area of \u200b\u200bmemory (clipboard).
To see this image, upload it to the Internet, etc., you need to save this image to a graphic file in BMP, .JPEG, .GIF or .TIFF format. For this we use a simple graphic editor Paint, which is included in the standard delivery of any Windows.
And now everything is in order. Take a screenshot of the screen using the PrtScr key. Then open the Paint editor.
Start - All Programs - Accessories - Paint.

In the running Paint editor, select Edit - Paste (top menu). Now we see the screen image displayed in the graphical editor. To save the result, select: File - Save As
Give the screenshot a meaningful name ("unnamed" by default), and select the image format in which we will save the screenshot. BMP, .JPEG, .GIF or .TIFF. (default ".BMP"). As BMP format gives too large image size, it is recommended to select .JPEG format. This will reduce the size of the screenshot file 10 times while maintaining good image quality. Then we press the save button, and that's it, your screenshot is ready. You can show it to friends, send it by e-mail, upload it to your website, etc.
How to take a screenshot of the active window.
Very often you need to take a snapshot of the working window of a program. To do this, it is not at all necessary to take a picture of the entire desktop, you just need to remember the key combination - Alt + PrtScr. Just hold down the Alt key, which is usually located to the left and right of the spacebar, and then without releasing it press the PrtScr button.

In this case, only the active window will be captured. If the desktop is empty, a full screenshot will be taken. How to save the resulting screenshot to a file is described above.
I wish you success in mastering the basics of Windows. Below are some answers to possible questions.
What is a screenshot? A screenshot is a graphic file that contains a complete or partial image of the Windows desktop. It displays what is happening to the user on the monitor screen.
What is it for? Someone just needs to take a picture of the game to show off to friends. Someone has an error with the program, website, network and wants to get help from the technical support service. Having provided a screenshot of the error to a specialist, you can be sure that he will see the problem literally with your eyes and will quickly help in solving it. It is often simply impossible to explain to another person, communication with whom is possible only through the network, what and how he should do. It is much easier to make and send a series of screenshots to him.
Programs for creating screenshots In order to automate the process of creating screenshots, to make it more convenient and faster, there is a special class of programs - screenshots. These programs usually sit in the tray (do not occupy the screen) and, by pressing a hotkey, take a screenshot and then save it to the computer's hard drive as a graphic file.
Hot Key Screenshot Program

A very simple and very fast program. Takes a picture and saves it in a special folder. Ideal for those who love simplicity and convenience. Has all the necessary settings for comfortable work.
You can download Hot Key Screenshot here: http://soft-arhiv.com/load/4-1-0-4
This program is absolutely free and does not require installation on a computer.
Page 2
Rating: 4.5 out of 5 Votes: 10 Paint XP - Small free program, which will help return the standard look of the tools and interface of the graphics editor Paint built into Windows 7. As you know, Microsoft is constantly improving and developing its software products. These changes were not spared by the popular paint editor, which is built into the operating room. windows system... This editor has always been distinguished by its simplicity of interface and ease of use, which made it a good alternative to professional graphics programs. FROM windows exit 7 paint program has been significantly improved in terms of interface, appearance which has become more reminiscent of Microsoft Office products. It is not known what the creators of Windows 7 were guided by, but they forgot the main rule of marketing - user friendliness. New interface Paint has become so inconvenient and incomprehensible to users moving from Windows XP to Windows 7 that it has spurred third-party developers to create alternative solutions.This is how the free Paint XP program was born, which will allow anyone windows user 7 to use the standard interface of the graphic editor Paint, to which everyone is so accustomed. Unfortunately, the program does not have a Russian-language interface, but its simplicity and convenience will not cause difficulties even for an unprepared user.
soft-arhiv.com
How to take a screenshot of the program window

Quite often there is a need to show someone a program window or save what we see on the screen. The easiest way to do this is to take a screenshot (or screenshot). However, not everyone knows exactly how to do this. This article will show you how to take a screenshot of an entire screen or active window. There are several ways to do this, depending on your operating system. Let's consider each of them in detail.
Method number 1 (for Windows)

Method number 2 (for Windows). Utility scissors 

Method number 3 (for Mac OS X)
- If you want to take a full screen photo, simultaneously press Cmd + Shift +3 on your keyboard. On this operating system, the default screenshot will be saved to your desktop in PNG format.
- If you need to take a photo of any one area of \u200b\u200bthe screen, press the Cmd + Shift + 4 keyboard shortcut. Your cursor is converted to a paint brush. They will need to trace the area of \u200b\u200bthe screen that you want to capture. The file will also be saved to your desktop in PNG format.
- If you are interested in how to take a screenshot of the program window, use the following keyboard shortcut: Cmd + Shift + 4 + Space. Your cursor is converted to a camera image. You need to point it and click on the desired program window. You can find the saved PNG screenshot on your desktop.
Method number 4 (for Mac OS X). Grab utility
- To launch the Grab utility, click at the bottom of the Applications screen, select Utilities, find Grab in the list.
- In the window that opens, click the "Capture" button.
- Next, you will see a dropdown menu. There you need to select one of 4 types of screenshots: "Area" (Selection), "Window", "Screen", "Timed Screen".
- The "Area" screenshot type allows you to take a photo of a specific part of the screen.
- The "Window" screenshot type allows you to take a screenshot of an open window.
- If you select "Screen" as a screenshot type, you will receive a full screenshot.
- Selecting the "Temporary Screen" screenshot type allows you to postpone the screenshot creation for 10 seconds.
- Next, you need to select an area for the screenshot. If you have previously selected the "Area" type, select the required area with a rectangular dotted line. After the cursor turns into a paintbrush, select the part of the screen you want to capture with it.
- Go to the File menu in the left upper corner and click "Save". The file will be automatically saved in Tiff format.
- If you need to save the screenshot to a specific folder, you can change the save location in the Save window. After that click the “Save” button. The screenshot is ready!
Method number 5 (For Mac OS X). Terminal
- To open a terminal, click at the bottom of the Applications screen, select Utilities, and find Terminal among them.
- In the window that opens, enter the following command: screencapture -iW ~ / Desktop / screen.jpg
- If you want to save the screenshot not to the desktop, but to another folder, instead of Desktop, enter the path to the required folder.
- To save the file under the desired name, enter it instead of "screen.jpg".
- Press the Enter key on your keyboard. The screenshot is ready!
Method number 6 (For Ubuntu Linux)
- If you need to take a screenshot of the entire screen, press Print Screen (or prt sc) on the keyboard.
- If you are interested in how to take a screenshot of a window, you can use the following keyboard shortcut: Alt + Print Screen.
- If there is no such button on the keyboard, refer to the information in the computer manual or the keyboard manual.
- Further, as in Windows, you need to open the program for working with images. There is no single image editor on Ubuntu Linux, so open the editor that you have installed.
- Paste the screenshot into the program. This can be done using the "Insert" button on the "File" (File) or "Edit" (Edit) menu. You can also press Ctrl + V on your keyboard.
- Click the Save button. In most editors, it is on the File menu. There you can choose "Save" or "Save as".
- In the window that opens, type the name of the file and the folder to save it, if your program allows it.
- Click on “Save”. The screenshot is ready!
Method number 7 (For Ubuntu Linux). Gnome environment
- This method only possible in the GNOME desktop environment.
- Click on the "Applications" button, select "Accessories" from them, in the list that appears, click on "Take Screenshot". You will open special utility to take screenshots.
- In the window that appears, select one of the ways to capture the image: "Grab the whole desktop", "Grab the current window", "Select area to grab" (Select area to grab). You can also enter a time interval (in seconds) if you want to postpone the screenshot.
- When you choose the Grab the whole desktop method, you will automatically take and save the entire screenshot.
- When you choose the Grab the current window method, you will automatically take and save a snapshot of one window.
- When choosing the Select area to grab method, you will be able to circle the required part of the screen with the cursor.
- If you enter a time interval, the screenshot will be taken after the specified number of seconds.
- You can add effects: display the cursor or window frame on the screenshot. To do this, check the box next to the corresponding option: "Include pointer" or "Include the window border".
- Click “Take Screenshot”. The screenshot is ready!
Method number 8 (For Ubuntu Linux). GIMP program
- Run the program. GIMP is a graphics editor that allows you to take screenshots right in it.
- Click: File - Create - Screenshot.
- In the window that opens, select the method for creating a screenshot: Take a screenshot of a single window, Take a screenshot of the entire screen, or Select a region to grab.
- If you choose the "Screenshot of one window" method, you will get a screenshot of only the active window.
- When choosing the "Screenshot of the whole screen" method, you will get a screenshot of everything that is on the screen.
- When choosing the "Select area to capture" method, you will be able to outline the area you need for the screenshot.
- Enter the time (in seconds) to delay the screen capture in the seconds field. In case you want to take a screenshot right away, enter the number 0.
- Click the Snap button. After that the dialog box will be closed and the program will take a picture according to the entered parameters.
- After you see the screenshot in GIMP, go to the File menu and click Save as.
- In the window that opens, enter the file name, file type and location to save it.
- Click the Save button. The screenshot is ready!
Additionally:
- Quite often the question arises of how to take a screenshot on a mac with windows. In this case, you must use the keyboard shortcut: Fn + Shift + F11. Next, you need to follow the instructions specified in method No. 1 or No. 2. To paste the file into the image editor, the keyboard shortcut will help: Ctrl + C.
- The clipboard is an intermediate data storage, with which you can transfer and copy data from one application to another using operations: cut, copy, paste. When you click Insert, the object is transferred to the program you are currently working with. In this case, when cutting or copying a new object, the old object is erased from the clipboard. This intermediate storage is used only for copy and paste and is not subject to direct management.