Installing and configuring programs (Windows, Linux, Apple). Automation systems for design work. Cleaning the hard drive
If you are just starting to master a computer and do not even know yet, how to install the program, then I am sure after reading this article you will not have any more questions on this topic. Installation various programs may differ, but it is almost the same everywhere, and in fact, it is much easier to install the program than some beginners think at the beginning of their journey.
In general, it is worth saying that if you do nothing, but simply follow the usual instructions in the windows when installing programs, that is, just click the available buttons: "Next", "Next" or "OK", then you can easily install the program. But we decided to learn? And we need to know what actions lead to what when installing programs.
Installing programs. Example!
Now, using the example of installing a real program, let's see how this is done correctly.
After from the Internet or from some disk, we usually have such a file on our computer.

First of all, you need to start it by double-clicking the left mouse button. The first window will open. In 99% of cases, this window " Installation wizard"Where we are welcomed. There we can see the name of the program, and sometimes we are reminded that it is advisable to close other applications before installing. In this window, we need to click the "Next" button.

Almost always when installing programs, we need to check the box " I accept the terms license agreement ", That is, it means that we agree with the terms of use of this program. Here's an example:

The next window, which is always present during installation, is the folder selection. During the installation of the program, a window should appear in which it will be indicated where the files will be copied for its full operation.
Usually the program is installed on system disk "C" to folder " Program Files ". You can of course change this path by clicking the Browse button and choosing the folder where you want install the program... I usually leave it as it is, which is the default! And all installed software is in the "Program Files" folder on the "C" drive.

Very often with installation free software , they are trying to install some additional applications for us, or change start page in the browser. Pay attention to this, and if you do not need such additions, then uncheck the extra checkboxes, and only then click "Next".

Another window that is always present, and usually after installing the program, is a window in which you must leave a checkmark in front of the items of interest to us. For example, it can be creating a shortcut on the desktop, or a program folder in the start menu, and so on. Read on and everything will be clear.

The most important stage is itself, during which the necessary files are copied.

In the last window, after everything is copied and installed, we are offered to click the "Finish" button and the program will start, if we have not removed the corresponding checkbox.

We have now described the main windows that appear when installing programs... They may differ in different cases, but the essence remains the same. There are also other points: windows with the choice of the program language, installation of an add-on, where you need to uncheck the box, etc.
After installing 5 - 10 different programs, thoughtfully and independently, you will no longer have any questions in which window what to do, and, roughly speaking, the brain itself will work out the necessary actions.
Novice users of programs developed on the 1C: Enterprise platform, coming up to the moment of buying a "box" or having already purchased it, naturally ask themselves the question: "How to install 1C Enterprise?"
In fact, the installation of 1C Enterprise is a simple process, you do not need to have any special skills and knowledge for this. In this article, we will take a closer look at the installation process and give step by step instructionsto take off everything possible questions when installing.
First of all, to install, you need to get the installation distribution of the 1C platform. This can be done in three ways:
- Take the distribution kit on disk in the same yellow box that you received when purchasing any 1C configuration. In this case, you don't even have to look for the distribution kit itself on the disk, but use autorun;
- If you have an ITS subscription, simply register on the support site users.v8.1c.ru and download the distribution kit from there.
- Again, if you have an ITS subscription, request the installation distribution from a representative of your company.
* It should be noted that regardless of where the distribution kit is from, the installation process for 1C 8 will remain unchanged.
Let's dwell in a little more detail on the first two methods of obtaining a distribution kit.
1. The box you purchased contains a disk with installation distributions for the 1C platform and configuration. To install, insert the disc and use autorun. You will see the following window (it is the same for all typical 1C configurations):
- Quick installation of 1C 8 and launch. The program itself will install the minimum set of components required for operation.
- Custom installation of 1C 8. The user independently chooses the necessary installation components.

To install the 1C platform, select "1C: Enterprise 8". ABOUT further action we will describe below, since they are the same for all points.
2. To download the distribution kit from the 1C support site, type in address bar browser address

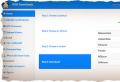
After loading the site, you will see the following:

In the text, active links are highlighted to go to the necessary sections. You will need the item "Software Updates" or "Download Updates". Clicking on any of the labels will take you to a page with a list of sections for download (of course, after entering the login and password that you specify when registering on the site).


In the list of sections, you will need the very first one, "Technology Distributions". Click on it and see the subsections. You will need one of the sections shown in the screenshot below, depending on which platform you want to install.

In our example, we will install platform version 8.3
We go into this subsection and see the available versions. We will put the latter, but if necessary, you can choose any of them.

When you click on the version you want, you are taken to the download options menu. Don't be intimidated by the abundance of points: you only need one of two things - a technology platform for 32x or 64-bit * windows versions.
* It is important to remember one nuance here: the platform for 32-bit versions works fine on 64-bit versions, but not vice versa.
After choosing a version, you will be taken to a page with a download link. Download the archive with the platform anywhere on your hard drive. After unpacking, you will receive a folder with files of the following form:

You will need a "Setup" file. It is the penultimate in the list of files. Double-click it and the installation starts.
Directly installing 1C
The process of installing 1C itself is very simple. As a rule, it is enough to agree with the suggested options during installation.


In the first window, click "Next", in the second - select the components to install. You don't have to change anything here. To work with 1C, it is enough to install a minimum set of components specified by the system by default. You can also select the folder where 1C will be installed. By default, this is drive C. Click "Next".


In the next window you will be asked to select the interface language. There are 3 options available: System settings (the default language of your Windows version), English and Russian. Choose the option you want. In the next window, the program will inform you that everything is ready for installation. Press the button "Install". We are waiting for the end of the installation and in the window that appears we see an offer to install the protection driver. If you purchased the 1C (USB) version, then do not uncheck the box. If you have version with software protectionthen you can remove it. Click Next.


In the next window, the program will inform you that the installation of 1C Enterprise is completed. Uncheck the box if you don't want to read background information and click Finish.
So we finished: we completed the installation of 1C. After that, a shortcut should appear on the desktop for quick launch programs. Ahead of you is the installation and setup of 1C - the configuration in which you have to work.
Today, not every even large organization has its own staff system Administrator, what can we say about small companies. And if a failed computer is easier to take for repair or replace with a new one, then the task of installing programs and configuring them often falls on the shoulders of ordinary employees.
As part of the current article, we will consider in detail, how to install 1C: Enterprise, what kind initial settings 1C need to produce how to add configuration 1C: Accounting into the program and finally how to create new base 1C.
1C - program structure
We have already touched on the topic of office software in the publication. The current article will also focus on a program for comfortable doing business, but its content will be more practical.
Analysis of the technical part of 1C: Enterprise is not included in the plans of this article. However, before installing the program, it is important to understand what it consists of.
- So, the main component of the package is, directly, technological platform 1C: Enterprise... This is the main shell of the product, which must be installed regardless of which of the solutions from the company Firm "1C" we need to work.
- The next part of the package is program configuration... Each configuration is a separate solution that can exist independently of the others. Typical configurations 1C are: 1c accounting, , 1C: Trade Management, 1C: Manufacturing Enterprise Management, 1C: Business Management and not so long ago, regarding the rest of the solutions, appeared 1C: Enterprise Management (ERP).
Configurations contain standard settings and templates for databases. It also stores some constant values \u200b\u200bsuch as tax rates, minimum amounts, some formulas and so on. - And the lowest level in the hierarchy of 1C: Enterprise components is Information base... All changes made by the user are saved exactly in the database. Thanks to this, when transferring a database from one computer to another or when backing it up, it is possible to save all the added information.
Below we will consider the process of installing and configuring the program For example 1C: Enterprise 8.3, and also we will analyze everything step by step stages of adding configuration 1C: Accounting and 1C: Salary and personnel management... In conclusion, we will demonstrate the process of creating a new database 1C: Accounting and its first launch.
Installation 1C: Enterprise
Installation of the 1C software platform does not require any preliminary actions. We run the installer of the program, usually this is the executable file setup.exe (may be an app with a different name). The first notification about the start of the installation will open in front of us, in which we need to click the button OK to continue

After that, the installer will carry out the necessary preparatory procedures, our participation at this stage is not required

After preparing the program files, a window will appear in front of us, warning about the protection of the product by copyright law. To continue installation, press the button Further... A window with a list of components to choose from will open.
IN this example we install the program locally on a single computer, we don't need to work on the network, so we mark only the items 1C: Enterprise and Interfaces in various languageswhere we activate Russian and English (when installing most programs, we advise you to mark English along with Russian, where possible, sometimes it is useful). Push the button Further

The next step is to choose the main language from those that were noted earlier. You can leave the option System settings for Russian versions of Windows. We press Further and we get to the final window of the installation wizard. There are no more settings here, all that remains is to click on the button Install

The installation process will now begin. We are waiting for the end. Immediately after installing the program, we will be prompted install protection driver, which is required for interaction between 1C: Enterprise and a hardware product key.
If you are using licensed product, you need to check the box and click on the button Further... Otherwise, this item must be deactivated
We just have to press the button Done... If we want to immediately start working with the program, then we can remove the checkbox from the item Open Readme file.

On this installation of the 1C: Enterprise software platform is completed... You can start installing the required configurations.

Installation of 1C: Accounting
Setting the configuration 1C: Accounting does not cause any particular difficulties. However, we need to pay attention to one of the stages of the process.
Run the file setup.exe from the directory with configuration files 1C: Accounting and press the button Further

Now we will see the only setting for setting the 1C: Enterprise configuration. Namely - choosing a directory for storing a 1C database template... The existing path does not need to be corrected, you just need to remember it, write it down, or simply copy it from the line of the installation wizard. Press again Further

After a quick copy of the files, we get to the confirmation window for setting the 1C: Accounting configuration. Click on the button Done

Installation of 1C: Salary and personnel management
The installation process for all basic configurations of the 1C: Enterprise program is similar. For example, here are screenshots installation of the package 1C: Salary and personnel management.
After starting the installer, we also get to the welcome window, from where, after clicking on the button Further, go to selection template storage directory current configuration. The path for all configurations can be left alone, files from different solutions will not get confused, because a subfolder will be created in the specified folder \\ 1s \\, which will house the individual directories. So, for example, for the configuration 1c accounting directory will be created Accounting, and for 1C: Salary and personnel management - catalog hrmcorp.

It remains only to wait until the end of the configuration installation and press the button Done

Setting up 1C: Enterprise
After installing the software platform 1C: Enterprise and the required configurations, you can run the program from the shortcut on the desktop.
Probably the first thing we will see after launch is a notification that infobase list is empty, and the offer add infobase to the list... But we won't rush while we push the button Noto preset the program.
![]()
We will get to main window of 1C program... Click on the button on the right Setting up

Before us will open 1C: Enterprise settings window... Within the framework of this article, we will touch on only one point, namely -. At the moment there are no paths in this setting, we need to fix it. Click on the green button with a plus sign

At this stage, a Windows Explorer window will open, in which we need to specify the directory with the stored database templates. We do not indicate an arbitrary folder, but exactly the one where the configuration files were installed, the very path that we memorized or wrote down. In our example, this is the following directory:
C: \\ Users \\ Apres \\ AppData \\ Roaming \\ 1C \\ 1cv8 \\ tmplts
The difficulty may arise with the fact that the directory AppData is hidden. You can access it in one of two ways:
- can be included in windows Explorer display hidden files and folders, we talked about how to do this in the article, we will not dwell on this once again.
- you can type in the top line of the address % appdata% and press the button Enter, the following folder C: \\ Users \\ Apres \\ AppData \\ Roaming \\ will immediately open in front of us
We just have to go to the catalog \\ 1C \\ 1cv8 \\ tmplts \\
After we got into the folder in one way or another tmplts, press the button Folder selection in the lower right corner

Until we hold additional settings, so in the parameters window, click on the button OK. Presetting 1C completed

Creation of 1C base
Process of creation information base under different configurations is also similar. We will no longer consider two identical examples, we will limit ourselves to adding base 1C: Accounting.
Launching 1C: Enterprise and again we get into the main window. Now click on the button on the left Add to

A window will open on the screen Adding an infobase / group... If we need download the 1C database from another computer, then at this stage we put the marker in the check-box Adding an existing infobase to the list... In this example, we will create a new base, so we put a marker in front of the item Creation of a new infobase and press the button Further

In the next window, we will be given a choice:
- Creation of an infobase from a template.
- Creation of an infobase without configuration.
The second point is presented for developers of new configurations for the needs of a particular organization, we are not interested in this in this case.
When you activate the item Creating an infobase from a template we have to choose one of the installed configurations. If the window with the choice of the installed configuration is empty, this means that the path to the templates, which we configured in the previous chapter, is incorrectly spelled out. It is necessary to close the window of the add base wizard and repeat the configuration.

If all the settings were made correctly, then we need to expand the desired configuration by the plus sign, and select the version to add the base (usually this newest version from available), and then click on the button Further.
Option Enterprise accounting (demo) serves solely to demonstrate the capabilities of the program, to get acquainted with the functionality and for self-study work in it. To get started with a new organization, the option demo don't choose.

In the following windows, base settings 1c accounting we consistently state:
- name, which will be displayed in the list of databases when you start the 1C: Enterprise program;
- catalogwhere the program database will be stored can be left by default;
- launch parameterswhich, in this case, also do not require changes.
Confirm each step by pressing a button Further, at the last stage, click Done

On this the procedure for adding a 1C: Accounting database is completed... Other bases are added by analogy. We proceed to the first launch of the program.
First launch of 1C: Accounting
Double click on the shortcut we launch the 1C: Enterprise program... We will see a window with previously added databases based on the available configurations. For daily work in the standard mode, select the database we are interested in and click on the button on the right 1C: Enterprise

If the configuration, in this case - 1c accounting, was not installed from the latest distribution, every time we start we will receive a notification about the need to update. This is important primarily due to the fact that the legislation in terms of accounting and tax accounting is constantly changing, and configuration updates allow you to keep the program settings up to date

After that it will start first launch of the program... At this stage, no action is required from the user, you just need to wait for the main working window of the program to appear

On home page 1C we will be prompted to connect the system account 1C: ITS... This step is optional, you can skip it by clicking the button Connect later.
After that, we will be greeted by the main window of work in the program. You can start filling in the details, setting up an accounting policy, filling out directories, and so on

This completes the work of installing, configuring, adding a base and launching the program. 1C: Enterprise completed.
Before, how to install the program make sure all other programs and documents are closed. The installation result is not always predictable and you need to be prepared for the unexpected.
1. It doesn't matter where and how the program came to you, try not to install it from the media on which it was recorded. Make a temporary directory on your hard disk (folder - not on the desktop) and copy the distribution there ( setup files). Install the program with hard disk... True, this is not always possible.
There are copy-protected programs that require that they be installed from the medium on which they are distributed. If you cannot install them from the hard drive, there is nothing to be done, but at least check by copying for defects in the recording to avoid incomplete installation.
2. How to install a program that came from the Internet or a collection of programs on a CD, it can be contained in a single archive file. Before installation, this file must be unzipped (unpacked). Most archives on the Internet are in ZIP format. In compilations on disks, they can be in ARJ, ZIP, RAR format. We will talk about working with archives in the following articles.
Programs can also be delivered in so-called self-extracting archives with the EXE name extension. To unpack such an archive, you just need to run (open) the file. It's good to do this in some temporary folder, for example C: \\ TEMP (or similar).
I prefer to create folders for such cases C: \\ T, C: \\ TT, C: \\ TTT etc. When the program is installed and tested, a decision is made on what to do with its temporary folder. If the program is not needed, its folder with the archive is deleted, bypassing Shopping cart (shift + del)... If the program is useful and remains on the computer, its archive is moved to the folder C: \\ DISTRIBwhere distribution copies of installed programs are stored.
3. Most modern programs include the Setup.exe file, which starts the installation. However, do not rush to do this. It's good if the program is being installed windows tools - then it will be easier to remove the program.
Application Installer Windows before launched by the command: Start\u003e Settings\u003e Add or Remove Programs. Here, on the Add / Remove tab (In Windows 7 - Start\u003e Control Panel\u003e Programs\u003e Programs and Features), there is a list of programs previously installed with the knowledge operating system... You can count on the fact that these programs will subsequently be able to be removed correctly, not all installed applications MS-DOS, some windows applications, the installation of which began by clicking on the Setup icon bypassing this window, as well as some extremely rare Windows applications for which installation is not required. They can simply be copied to the desired folder, create an icon for them and run.
Removing such applications is also extremely simple - the working directory is deleted, and that's it! Users value such friendly programs very much, but this approach requires special efforts from programmers, and not everyone's brains are tuned for the benefit of the user.
To install programs, use the Install button. It launches the Wizard, which performs the installation in unattended mode.
In Windows 7 - Start\u003e Control Panel\u003e Programs\u003e Programs and Features\u003e Program Installation, as a result, such a window opens, in which it is clearly written in detail that all actions to install programs are automatic.
1. Generally, the Installation Wizard assumes that you are installing from a floppy disk or CD. We have already mentioned that it is better to install from a hard drive. In the first wizard dialog box, simply click Next.
2. The second dialog box contains a line for entering the access path to the installation program (usually the driver of a device). Memorizing this path, and then entering it from the keyboard is a useless exercise. It's easier to use the Browse button, find desired file, click the Open button - and the path will automatically be written to the command line.
3. It remains only to click the Finish button - and the installation of the program will begin. After installation is complete, you often need to restart your computer. Since you must have all programs and documents closed, feel free to agree to a restart. If any programs are open, then first - save the data.
At this stage, you can finish the review, because now you know as right install programavoiding possible installation failures.
P.S. Like operating calendar windows systems associated with the program BIOS and what is it for CMOS memory, you can find out.
Respectfully yours, LLC "Abisab".