Windows 7 create a mirror volume. Windows Server. Setting up software RAID. How to use Disk Spaces
Read about Windows features“Disk space”. Namely, how to create a software Raid from several physical disks on your home PC, including built-in or connected via USB, using this function, and recover data from it.
The Storage Spaces feature built into Windows 10 gives the user the ability to create multiple hard drives one virtual. With its help, you can back up data by duplicating it on several disks or combine several hard or SSD drives into a single storage pool. Disk Spaces is the same as RAID, only on desktop computer and with hard drives connected to it.
Content:Windows Disk Space feature
This feature first appeared in Windows 8 and has been improved in Windows 10. Disk Spaces available in all Windows versions 8 and 10, including Home.
To create Disk Space, at least two devices must be connected to the computer. physical disk, including built-in or connected via USB.
Using the Storage Spaces feature, you can create a storage pool of two or more physical disks by grouping them together. After creating a storage pool of two or more physical disks, you can create spaces of three types of resiliency:
- Simple type. Designed to create a disk with the maximum possible volume. This type of space does not protect data in any way in the event of a possible failure or failure of one of the disks. On such a disk, Windows will save all data in one copy. If one of the physical disks fails, all data stored on it will be lost. This type of disk is convenient when you need to temporarily store large amounts of data.
- Mirror space is designed to protect data in case of possible failure of the physical disk by saving multiple copies of files. If one of the physical disks of the space fails, the data stored on it will remain accessible from the other disk on which its copy was created. This type is useful for protecting important data in the event of possible hardware failures.
- Even space- This is a cross between the simple and mirror type. Data is written in a striped manner across multiple physical disks, creating one or two copies of the parity information. However, due to the need to calculate checksums, space with parity control is noticeably slower for writing, as a result of which they are recommended for storing data archives. For example, a photo or video.
How to create disk space
Create Disk space You can use the corresponding menu in .
But before you start creating it, connect everything to your computer hard drives from which it is intended to create Disk space. After that, select / from the menu Create a new pool and disk space.

Select the disks you want to add to the pool and click the button "Create a pool".
Please note that all disk data from which disk space is created will be deleted.

After creating the pool, you need to configure the new disk space: give it a name and select a drive letter. It is with this name and letter that it will be displayed in Windows.
You can also choose the standard Windows file system - NTFS, or the new system type ReFS. If you are creating a mirror or parity space that is intended to protect data from loss, it is better to choose the type ReFS systems.

Specify the type of stability: Simple (no stability), Two way mirror, Three way mirror, Parity.
To create a large storage pool without disk failure protection, select a type Simple(without stability). A two-way mirror involves storing two copies of data on disk, and Tripartite– three. Disk space with type Parity will protect in case of failure of one of the disks, and will have larger size than a two- or three-way mirror, but will be significantly slower.
Depending on the selected type of stability, the wizard will set the maximum available to at the moment disk space size. However, you can set a larger data pool size. This is intended for the event that the available space of the connected physical disks becomes full. So that the user can connect another drive without having to make changes to the disk space configuration.
After that click "Create disk space".
How to use Disk Spaces
The created disk space will appear as another disk in the folder "This Computer". Such a disk will have the name and letter that you assigned to it when creating it and will not be visually different from other disks.

With this disk you can do everything the same as with another regular disk. Even encrypt it with Bitlocker.

How to manage storage spaces
After creating the disk space, you can go to Control Panel to control or configure it.

You can create another disk space. Their number is limited only by the number of physical disks connected to the computer. You can add disks or rename the storage pool.
You can change the name or letter of the disk space by clicking the menu "Change" in the subsection.

To add drives to your existing storage space, select Add Drives and select the drives you want to add. By selecting the Optimize Disk Usage menu, Windows will redistribute existing data evenly across all drives.

If the existing disk space consists of three or more physical disks, then one of them can be removed. To do this, expand the physical disks menu and select the link "Prepare for deletion", next to the drive you want to remove. In our case, there is no such link, since the disk space consists of two disks.
After this, the system will transfer the data from the removed disk to two (or more) other physical disks of the disk space. The result is a link "Prepare for deletion" will change to "Delete".

A physical disk removed from disk space will become available in Disk Manager. To be able to work further, you may need to create a new section and format it.

In disk space management, the user also has access to the function of deleting the disk space itself (to the right of the disk space name, subsection). Just keep in mind that all data on the deleted disk space will be deleted.
If disk space is deleted, a menu will become available "Delete pool", by selecting which you can completely delete the storage pool.

How to recover data from a Storage Space drive or mirrored volume
What to do if you lose data from disk space? Is it possible to restore them?
If one or more disks of a disk space fail, the process of recovering data from it becomes very complex and cannot be reduced to scanning each disk individually with a data recovery program. In this case, the data will not be restored or will be restored damaged.
The only exception is the mirrored disk space, which is created as RAID-1. Since in this type of disk space a copy of the data is created on each of the disks.

To do this, just scan the logical drive, in which the disk space is displayed, using Hetman Partition Recovery. Then find and recover lost files or folders in the same way as from any other disk.

How to create a mirrored, striped, or spanned volume in Windows 7 or older versions
As mentioned at the beginning of the article, the Disk Spaces feature appeared in Windows starting with version 8. But before that, the system also provided the ability to create disk spaces. You can create a mirrored, striped, or spanned volume in Windows 7 or older versions using the Disk Management menu.
Because Disk management is also present in Windows 8/10, then you can create disk space in the same way in latest versions systems.
To create disk space using Disk Management, you need two or more disks connected to the computer that will not be allocated. If a partition is created on the disk from which you plan to create a mirrored volume, delete it. To do this, click on it right click mouse and select "Delete volume...". Keep in mind that this will erase all data from the drive.

After this, right-click again on the disk from which you intend to create the disk space, and depending on the task at hand, select the type of volume to be created. They are somewhat similar to the Storage Spaces resiliency types that were described in the first part of this article.

So, Simple Volume is a part of a physical disk that functions as a separate physical block. This is nothing more than a regular logical partition of a physical disk. It is not disk space in the sense that we are talking about in this article.
Split Volume connects areas free space two or more physical hard drives into one logical drive. It consists of at least two unmarked parts on two hard drives x, which when created are combined into one common one. If you create a spanned volume that includes 150 GB from one and 250 GB from the other hard drive, then in the This computer folder will appear local disk at 400 GB. The performance of a spanned volume is higher than that of a simple volume, and the fault tolerance is the same. Creating a spanned volume is suitable for solving the issue of local disk space.
Striped volume is a non-redundant array configuration. Information is divided into data blocks and written to several disks simultaneously. The failure of any disk leads to the destruction of the entire array. Since the array is not redundant, there is no recovery procedure if one physical disk fails. Reliability depends on the reliability of each drive. The array is not designed for reliable data storage, but to improve performance.

Mirror Volume– this is the same as mirror space. It is designed to protect data in case of possible physical disk failure by saving multiple copies of files. If one of the physical disks of the space fails, the data stored on it will remain accessible from the other disk on which its copy was created. This type is useful for protecting important data in the event of possible hardware failures.

RAID-5 volume, just like even space, something between simple and mirror types. Data is written in a striped manner across multiple physical disks, creating one or two copies of the parity information. However, due to the need to calculate checksums, space with parity control is noticeably slower to write, as a result of which they are recommended for storing data archives. For example, a photo or video. To create it you need three or more disks.

I choose " Create a mirror volume..." and in the image creation wizard that appears, I click "Next".

Select the disk that you want to add before the mirrored volume (other than the one you initially right-clicked on) and click "Add" / "Next".

Assign a drive letter.

Give the volume a name and format it.

Before formatting begins, the system will warn you that it will convert the basic disks selected to create a mirrored volume into dynamic ones.

After this, formatting and conversion of the disks into a mirrored volume will begin. In the Disk Management window, the disks of the mirrored volume will appear brown, and in the This Computer folder, as one of the local disks.

Hello friends! If you look at reader comments on our website in the section on hard drive repair, you will be amazed at how many people were not prepared for the fact that their storage device suddenly failed and that’s it. important files: projects, plans, diplomas, drawings, calculations, on which a person worked for several months in a row, simply disappeared into nowhere. It’s difficult even for a professional repairman, let alone an ordinary user. Therefore, eIf personal data is important to you, then be sure to read today’s article. In it we will show you how to createRAID-1 array of two HDDsV latest Windows 10 Fall Creators Update. This is very easy to do, because technology« disk mirroring» built into the operating system.
This article differs from because "Mirror» we will create directly for the system drive (C:) and directly in running Windows 10!
At the beginning of the article, let me remind you, that a RAID array or “Disk Mirroring” is the parallel recording of data on two hard drives. If one breaks down HDD all information remains safe and sound on another hard drive. That's the whole secret!To better assimilate the information, let’s look at everything using a specific practical example, so you will understand everything much better than if I were to tell you the theory now.
Creating a RAID array or Mirroring disks in the latest Windows 10 Fall Creators Update
Let's take regular computer in the organization where I work.
Right-click on the Start menu and select "Disk Management".
In this window, you can see two hard drives connected to the PC.

The first disk (Disk 0) contains two partitions: (C:) and (D:). On disk (C:) Windows 10 installed. The OS desktop contains important work folders. If the folders disappear for some reason, the work of the entire organization will stop for several days and I’m even afraid to imagine all the consequences. On disk(D:) there is no serious information, only movies and photographs. Therefore, I will create a mirror for one system partition(C:).
The second hard drive (Disk 1) is absolutely blank and contains no partitions, its entire area is unallocated. It is on this that we will create a disk mirror (C:). All recorded on system disk the information will also be duplicated on the mirror disk.

It is important that the HDD from which we want to create a mirror has no partitions and is no smaller in size than the original disk on which the operating system is installed. In our case, both hard drives are absolutely identical.
Right-click on the drive (C:) and select “Add mirror...”

Windows 10 will prompt you to select the disk that we want to use as a mirror. Left-click on blank Disk 1 and click« Add a mirrored volume».

A warning appears about that now the disks will be converted to dynamic ones and if you have several installed on your PC operating systems, then after conversion you will only be able to boot the current operating system. I'll explain.
Tune RAID-1 array or “Disk Mirroring” is better only if you have one operating system installed on your computer that has one bootloader. If you have several operating systems installed on your PC, for example, Windows 8.1 and Windows 10, then you can mirror disks in the Windows that was installed last. That is, you have installedWindows 8.1, then Windows 10, in this case we configure RAID-1 array in Windows 10 and after that only Windows 10 will boot on the computer. If you configure RAID-1 array in Windows 8.1, then no Windows will load on the PC at all. This problem is connected with the peculiarity of the operation of dynamic disks, which would be a good idea to write a separate article about, but we still don’t get around to it.
There is only one OS installed on my computer. I press “Yes.”

The process of disk resynchronization begins when a mirror is created. In simple words, Windows 10 creates an exact copy of the drive (C:) on the second hard drive (Disk 1).You can create a partition from the unallocated space and use it without any problems.

The resynchronization process is completed and the OS is ready for use.
There are situations when hard drive fails (due to voltage problems, physical wear and so on) and it turns out that the information accumulated over the years is irretrievably lost (you can turn to data recovery specialists, but as a rule it costs a lot of money and it’s not a fact that the information will be obtained restore) and therefore, in order to rid myself of such fears, I decided to set up a RAID1 mirror backup system, which I will talk about in this video tutorial.
In general, I will devote 2 lessons to this topic, in this one we will look at setting up RAID1 through the BIOS, and in the next one setting up RAID1 programmatically using Windows 7.
And so, what exactly is RAID? The acronym itself stands for an independent array of inexpensive disks and in general there are quite a few types of RAIDs, these are RAID 0,1,5,10, but in this video we will analyze the most common RAID1 or mirror RAID.
What is the essence of RAID1, let's say you have 2 identical hard drives, they are combined into RAID1, and the operating system sees these two drives as one physical one and when you write any information to this disk it is duplicated on both disks, so it looks like a mirror image of the information on both disks.
And if one of them fails, all information is stored on the second disk and by replacing the failed disk with a similar one, the mirror backup system is restored.
I would like to say right away that configuration via BIOS is more reliable, but also more complex and is perhaps suitable for configuration on backup servers; at home it will be enough to configure mirrors programmatically.
Well, now let's move on to the direct configuration of RAID1 through the BIOS, since it will not be possible to record this video from the screen, the configuration is not done through Windows, then some screenshots will be of poor quality, but the point here is not the quality but the usefulness of this information.
First, let's go to the BIOS, for me it looks like this. IN various models Motherboard settings may differ, but the principle is the same. We need to find the configuration menu for SATA or IDE devices, for me this menu is located in Advanced \ SATA Configuration \ Here in the menu SATA mode, select RAID, save the changes and exit the BIOS.
The computer reboots and at startup, before attempting to load the operating system, a message appears, for me it is Press Ctrl+I to enter the RAID configuration utility, launch the utility.
This window displays the following information
The presence of a RAID - since I have not created it yet, therefore the inscription here is not defined, i.e. No RAID
Serial number of the device, I have 2 of them
Hard drive model (it is advisable to use drives from the same manufacturer and brand so that they are absolutely identical)
The volume of each disk (the volume must be the same on both disks, otherwise creating a mirrored RAID will not work)
And the status, since the RAID has not yet been created, the status is not in a RAID array
In addition to the status table, there is also a menu that consists of the following items:
Creating a RAID array
Removing a RAID array
Resetting all disks to a non-RAID state (if there are several RAIDs, then all RAIDs will be deleted)
The following other points on at this stage I haven't used them, so I can't say anything about them.
We enter the name of the RAID, I will call it Mirror, which means mirror, then in the device manager it is under this name that this disk drive will be displayed.
Now in the information about RAID arrays there is a RAID with the name Mirror, Type RAID1, capacity 931.5 GB, the status is normal and it can be bootable.
If you want it to have an operating system, then install the OS on it. Moreover, when I was experimenting, my operating system was on another disk, and after creating a mirrored RAID array, the operating system stopped loading. Those. crashed when loading blue screen, so if you have the OS on another drive, you should first create a RAID and then install the OS so that all drivers are installed correctly!
After starting the OS, go to Device Manager\Disk Drives and see the Mirror storage device there, i.e. this is the RAID1 mirror disk.
After one of the disks is disconnected, the following message appears during boot with the RAID status Degraded (Degraded, i.e. one of the disks is missing in the RAID), but regardless of this, the operating system continues to load.
Now I booted from a faulty RAID, this can be seen using a special program that comes with the drivers for motherboard.
Now I reconnect the disk and the RAID state goes into Rebuild (reconstruction, in this state, data from the mirror is copied to the connected disk in order to restore the functionality of the RAID, depending on the size of the disk, this process can take a lot of time)
We load the OS and again look through the program to see what is happening with the RAID, everything is OK, the raid is restored, and installed disk reconstruction is in progress. After completion this process, everything will work as before.
Again, before experimenting with RAID, it is better to save important information to another medium, just in case!
As for the advantages and disadvantages of this system:
The cost of 1 GB is 2 times higher (since to store the same amount of information you will need to purchase 2 disks)
High fault tolerance (although there are failures in which all the hardware burns out, but there is no way to protect yourself, except perhaps by storing a copy of the documents on a dedicated server) But, again, if the system is implemented on a backup server, then if everything burns out, then in any case, copies of documents should remain on the workstations, well, unless all the computers in the J office burned down
Hardware RAID (software RAID is created using a program, and no program is protected from glitches, therefore RAID through BIOS is more reliable)
Disk Mirroring in Windows 8 and Windows 7
Hard drives are the main storage devices for information on a computer. But, unfortunately, they do not last forever. And it’s very annoying one day to realize that “what you’ve accumulated through back-breaking labor” suddenly disappears due to disk failure. In some cases, data can be recovered. But usually only partially. And that's not always the case.
How to protect yourself from data loss on hard drives? There are several options to solve this problem.
The simplest one is to periodically dump important data onto external media: DVD/Blu-ray discs, flash drives, external hard drives. The option is generally quite reliable, but not entirely convenient: you need to remember and find time for backup data, in addition, the data from the last copy to the disk failure will still be lost.
So as not to bother with external media, you can install another HDD in your computer and periodically copy data to it. It would be even better if this was done automatically.
This kind of automation has been in use for a long time and is expressed in so-called RAID arrays. These are arrays of hard drives combined in a special way. There are several types of RAIDs, the most popular of which are “RAID-0” - 2 disks are connected in series for faster reading and writing of data, and “RAID-1” - 2 disks are connected in parallel for simultaneous writing of data to both HDDs at once. If one of the disks fails, there is another disk with a mirror copy of the data, and the likelihood of two disks failing at the same time is very small. RAID-1 is usually called a “mirror”, and the parallel connection of several disks is called “mirroring”.
For implementation disk array The computer must have a RAID controller installed. It can be built into the motherboard or installed separately.
My personal experience working with RAID controllers built into the motherboard is quite deplorable. As a rule, manufacturers, in order to reduce the price of the product, use inexpensive controllers, the reliability of which leaves much to be desired. Individual controllers good quality cost at least a hundred dollars.
In this regard, recently the so-called “software RAIDs” have become increasingly popular, i.e. parallel recording of data on 2 disks is performed not at the hardware level, but at the software level. Special program monitors all data writes to a specific disk and writes the same data to another disk.
In operating rooms Windows systems 7 and Windows 8, the developers built software RAID into the OS itself, i.e. You can implement data mirroring using Windows tools.
I would like to make a reservation right away that this functionality is not suitable for those who like to install several operating systems on one computer. In the end, only the OS that was used for mirroring will remain working. And if you perform the steps incorrectly, then there will not be a single working OS left. Later in the article I will pay attention to these points and tell you how to avoid such mistakes.
If your computer has only one operating system, you can safely use everything described below; your Windows is not in danger.
So, in order to see all the pitfalls of data mirroring using OS tools, I use a computer with 2 operating systems installed - Windows 7 and Windows 8. Windows 7 was installed first, and then Windows 8 was installed on another logical drive. We will perform the mirroring itself in Windows 8.
What is needed for this? The computer must have 2 physical hard drives. It cannot be otherwise - copying disk data onto the disk itself makes no sense, since when the disk is erased, we will lose both the data and their copy at the same time. The advantage of software RAID is that, unlike hardware RAID, it can be configured for individual logical drives, and not just for the entire physical drive as a whole.
To create a mirror, you must enter Disk Management. To do this, go to the Control Panel and select “Administration”.

Administration section in Control Panel
In Administration we find “Computer Management”.

Administration Tools
In the Computer Management window on the left, select "Disk Management".

Disk management
From the figure you can see that the computer has 2 physical disks - “Disk 0” and “Disk 1”. We will create a mirror for logical drive F ( New volume), located on Disk 0. The volume of this partition is 10GB. We have a second HDD (Disk 1), with a capacity of 12GB, which we use as a mirror. The second disk must have unallocated free space, the volume of which is not less than the volume of the mirrored disk. We have 12GB of unallocated space on Disk 1, i.e. there are no logical drives in this space.
Right click on the right section and in context menu select "Add mirror".

Adding a mirror
The system will prompt you to select a disk that will be used as a mirror.

Selecting a disk to create a mirror
Choose required disk from the list and click "Add mirrored volume". Here's an interesting warning:

OS warning about the impossibility of running other versions of Windows
We are warned that the disks will be converted to dynamic ones and if several operating systems are installed on the computer, then after performing this operation only the currently running OS will remain working. Let's check this later. Click "Yes".
The process of creating a mirror will begin - if there is any data on the F drive, it will be copied to the mirror disk.

Synchronizing disks when creating a mirror
After completing all the processes, we get this picture.

Result of creating a disk mirror
As you can see, the system took space from the second disk, the volume of which is equal to the volume of the mirrored disk. The rest of the space on the second disk remains unallocated and can be used at your discretion, for example, to create another logical disk there.
Let's check if we can now boot the second OS installed on the computer. Let me remind you that in my case, Windows 7 and Windows 8 are installed, we performed all the steps under Windows 8. Let's try to load Windows 7.
We reboot the computer and get a list of OS selections.

Selecting the boot OS
We select Windows 7, the boot process begins and... we get this.

Error Windows boot 7
Now about the pitfalls that I mentioned at the beginning of the article. It’s not for nothing that I said there that Windows 8 was installed after Windows 7. What does this affect? The fact is that a computer can only have one OS boot loader. And the bootloader is always the bootloader of the last installed operating system - it overwrites the previous bootloader found on the disk. But at the same time, during the installation process, Windows, having found previously installed operating systems on the computer, configures its boot loader in such a way that it provides the user with a list of installed operating systems at startup. From this list we select which OS we want to run now. In my case it starts Windows boot loader 8, which was installed last, and offers a list of operating systems found. Now let's imagine that I configured mirroring not in Windows 8, but in Windows 7. In this case, Windows 8 would become inoperable. And along with it, its bootloader would cease to function and I would lose the opportunity to launch any OS on my computer at all - this has been verified by experience. The only solution to this problem is to reinstall Windows.
Thus, if your computer has several operating systems installed, you can configure mirroring only in the last installed OS, while all other operating systems will automatically become inoperable and it will be impossible to bring them back to life- we'll see this later .
I repeat once again, if you only have one operating system, everything we are talking about will not cause the slightest harm to it or the computer as a whole.
So, the mirror is configured, now all data written to the disk will be automatically written to another disk. How to check that it works?
Let's open a list of computer drives through Explorer.

Computer disks after setting up a mirror
In Explorer we see the “New Volume F” disk; its mirror is not here and should not be, since everything happens at a level invisible to the user. Let's try to write some data on disk F. I'll just create a folder and a text file in it.

Folder and file on disk
If everything works correctly, the same folder and file should have been created on another disk - a mirror. To clarify this, let’s “disassemble” the mirror.
Again, go to disk management, right-click on any of the 2 mirror disks and select “Split mirrored volume.”

Splitting a mirrored volume
Windows will warn us that after this action, data storage reliability will no longer be at this level. high level. We agree.

Windows warning when splitting a mirrored volume
As a result, we will get two separate logical drive. The system immediately assigned the letter G to the new disk (former mirror).

Mirror split result
Now in Explorer, in addition to the F drive, we will also see the created G drive.

Computer disks after splitting the mirror
And on both previously mirrored disks we will see the folder we created, and inside it a file.

Result of data mirroring
We made sure that the mirror works and, if necessary, we can “disassemble” it without any data loss.
Will we be able to boot a second OS after splitting the mirror? We try and as a result we get this again.

Error loading second computer OS
Thus, by setting up mirroring, you will forever lose the ability to run other installed Windows operating systems on your computer.
The downside of disk mirroring is the loss of space - we use two disks as one. But information costs more than disks. If you still need additional disk space, the mirror can be divided, as shown above - in this case we will get 2 disks with the same data, or simply remove one of the disks from the mirror - then we will get one disk with data and a second disk with unallocated region.
To remove a disk from a mirror, just right-click on one of the mirrored disks in the disk management window and select "Remove mirror".

Removing a disk from a mirror

Selecting a disk to remove from the mirror
Click “Delete mirror” and we get this picture.

Disks after removing the mirror
The disk from which the mirror was removed returned to initial state- it is no longer dynamic, but again basic, but Disk 0 remains dynamic, which means we still won’t launch the second OS from it.
And one more subtlety is that if we remove the mirror from Disk 0, it will not become basic, but will remain dynamic.

The system disk remains dynamic after removing the mirror
Thus, by creating a mirror, we deprive ourselves of any chance of using a second OS on the computer.
But it’s not so often that at home you have to install several operating systems on one computer, but almost everyone needs data backup. Therefore, this opportunity is very useful and I advise you to use it. All that is needed for this is installed on Windows computer 7 or Windows 8, as well as availability extra hard disk of the required size.
I have 2 disks of the same size, one has a win7 system, now it’s done as in the screenshot, but what confuses me is that the 100MB area is not mirrored.
How to mirror system partition so that if you physically remove 1 disk (when it fails) win7 can boot just as easily?
Something terrible happened, after I shut down normally (but apparently the disks did not finish resynchronizing), the computer did not want to boot and hangs on “Verifying DMI pool data.”
I tried to disconnect 1 disk alternately, in one case it also writes.
I tried explicitly selecting the boot disk through F12.
I tried to restore Windows from a flash drive (I installed win7). 

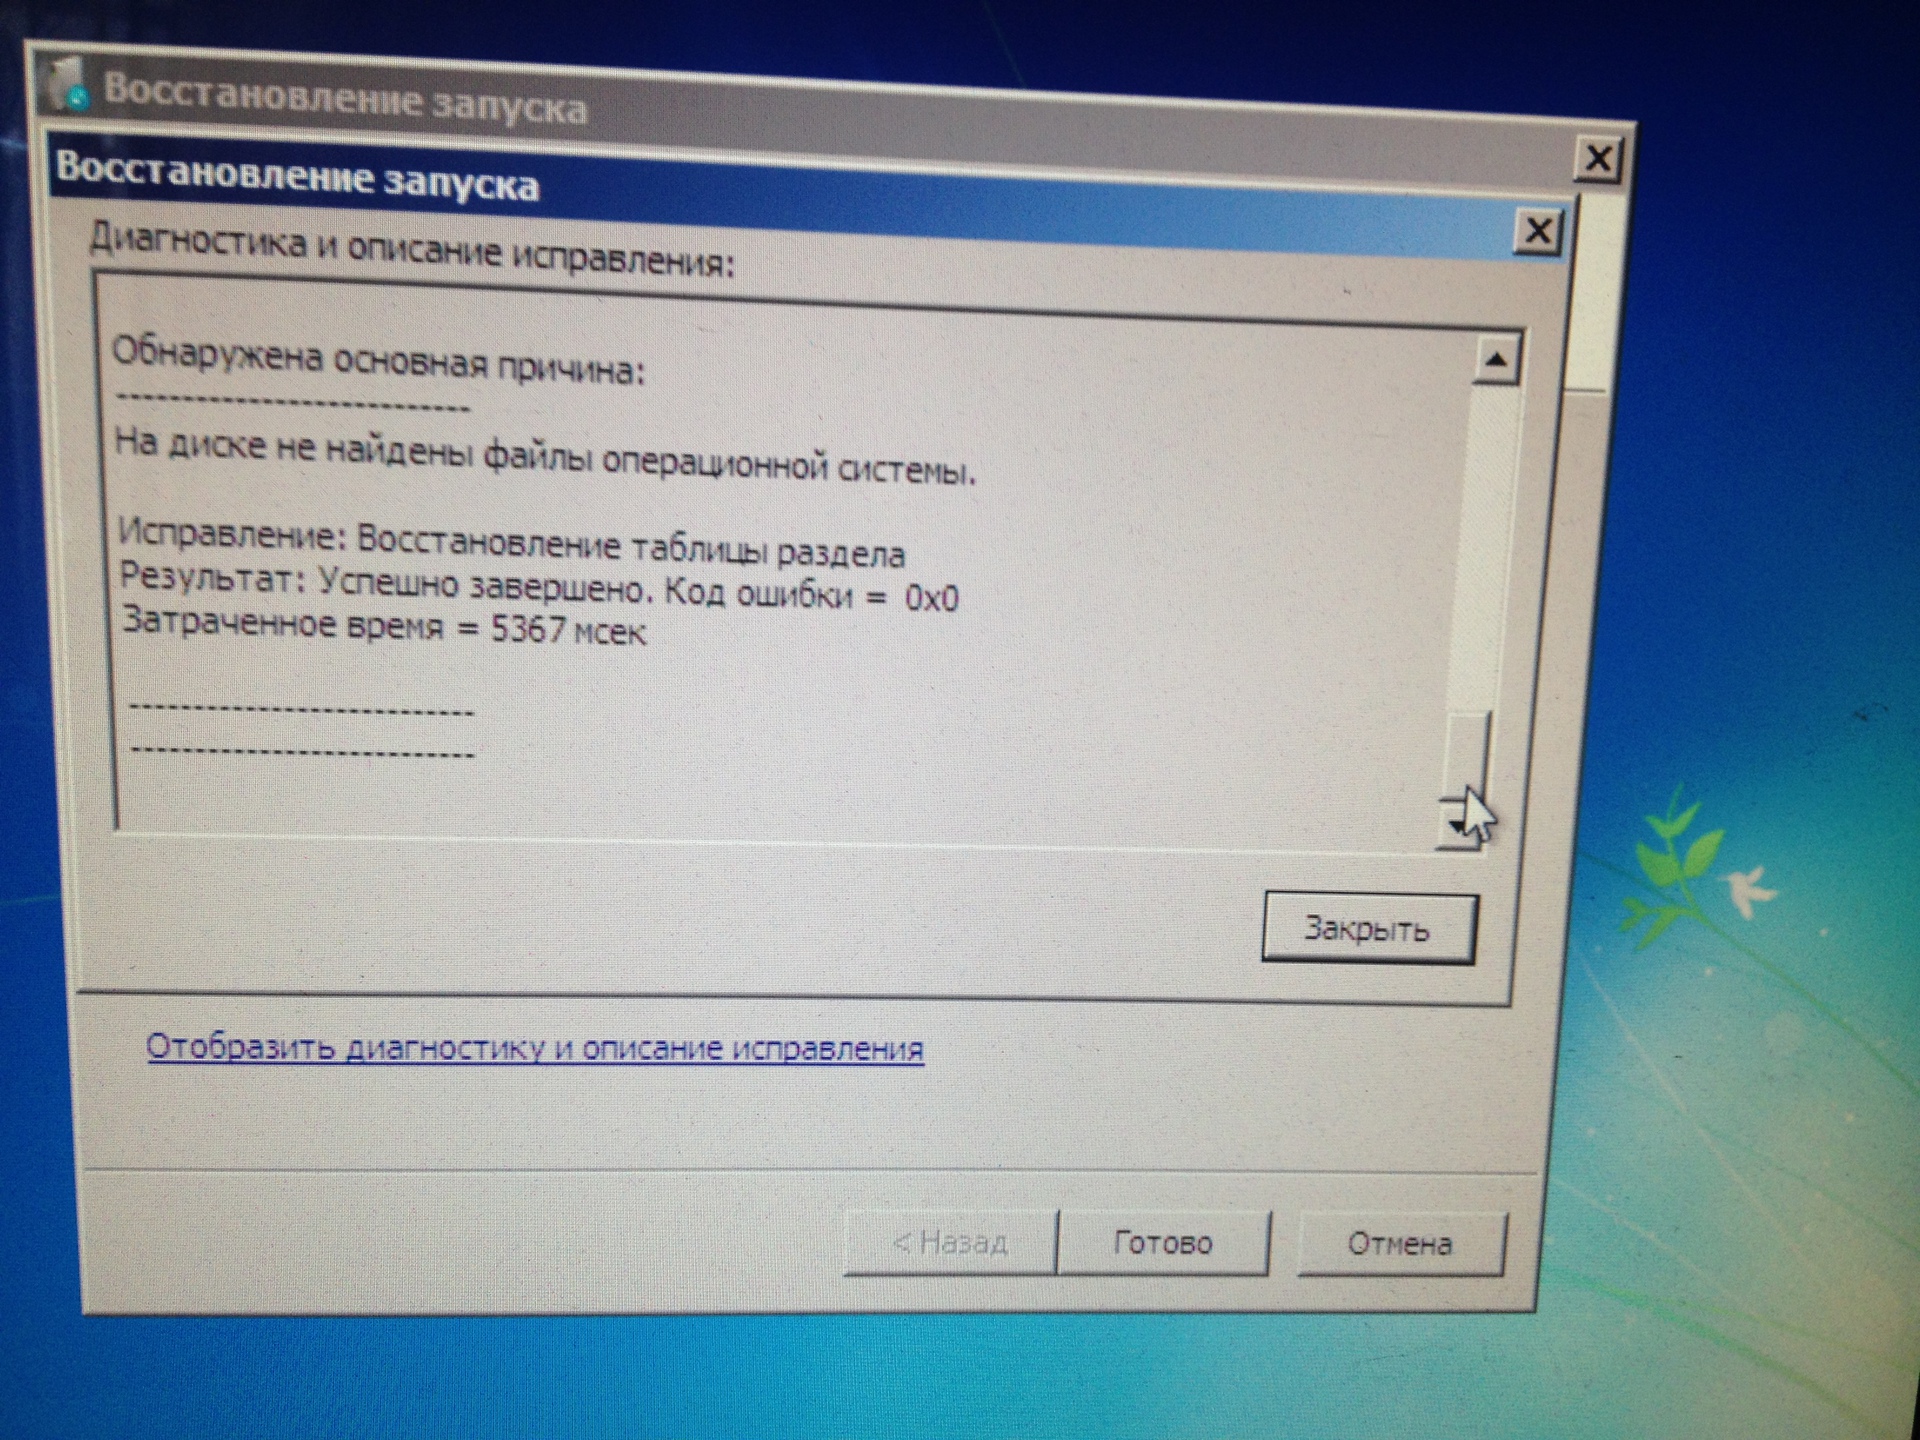
And nothing helped, despite the fact that it was written that the partition table had been restored.
This is what it shows with boot disk if you look through command line using diskpart 
Moreover, ubuntu and win7 load normally from other separate physical test disks.
Related posts:
 High magnification monoculars - features and benefits Monocular magnification 50
 World of Tanks crashes on startup - fixing errors World of tanks crashes after every battle
 Server key 1c over the network
 How to turn on WiFi on laptops Add a new wireless network to a laptop
 How to find out iPhone serial number?


