Download programs for treating CDs and DVDs. How to recover data from a DVD disc
Utility CD Recovery Toolbox specially designed to recover damaged files from various discs: CD, DVD, HD DVD, Blu-Ray, etc. With its help, you can bring back to life information lost due to mechanical damage to the media (scratches, chips, various marks on their surface), as well as in case of incorrect recording. Thus, the program is able to recover data that is considered lost. The CD Recovery Toolbox Free utility scans any CD and DVD discs and finds the folders and files located on them. It is worth noting that not all information originally present on the media can be detected. Some files and folders (depending on the extent and location of the disk damage) cannot be found. Therefore, when scanning, CD Recovery Toolbox Free detects the maximum possible information. After which a list of files and folders available for recovery is displayed on the screen. Next, the user has the opportunity to independently select only the files and folders he needs. It is they who will be restored, and everyone else will be ignored. The program restores as much information as possible in damaged files. This can significantly reduce the risk of data loss.
Program features:
- Recovering information from any CD and DVD drives
- Recovering files larger than 4 GB
- Determining potential shortages free space on your hard drive for recovered files
Program CD Recovery Toolbox Free differs not only in its complete set functionality on information recovery, but also on ease of use. The utility interface is completely English. However, this will not be an obstacle even for those people who do not know English at all. The fact is that the interface is designed as a step-by-step wizard, at each stage of which the user must perform only one action. This greatly facilitates the use of the utility, making it accessible even to novice computer users.
It is especially worth noting that CD Recovery Toolbox Free is absolutely free. Anyone can install it on their computer and use it for any length of time. This is one of its main advantages over its competitors. Moreover, in functional terms, it is not inferior to most paid programs.
Well, there is probably no doubt that a program for recovering information from CDs and DVDs is needed by almost every computer user. After all, these computer storage media are the most common today. They are quite roomy, versatile, durable and, importantly, cheap. But they cannot be called particularly reliable. A small scratch may make it impossible to read the information on the disc. It can appear very easily, for example, as a result of the carrier falling and careless handling.
Requirements:
- Windows 98/Me/2000/XP/Vista/7/8/10 or Windows Server 2003/2008/2012/2016 and above
In this article, I briefly described steps that can help recover data in the most common cases of loss on CD and DVD drives.
So, let’s assume that you recorded photos from your summer vacation in the Maldives on a DVD, put it on a shelf, and after half a year/year you decided to refresh your memory of this wonderful event by reviewing the pictures with your friends. You insert the disc into the DVD-ROM, the light blinks, the disc gains and loses speed, but you can’t open its contents in Explorer. Or the content is visible, but the necessary files cannot be copied.
What could lead to such a situation, and what courses of action are possible?
Option zero, the carrier has nothing to do with it
The issue could be the drive itself, the operating system, or viruses. DVD drives differ in the quality of their optics and the capabilities of their correction algorithms. In addition, dust and dirt may have settled on the lens, which prevents the disc from being read. Different drives may differ in the range of supported rotation speeds, and the lower the rotation speed the drive is capable of creating when trying to read the TOC of the disc (the table of contents of the disk recorded in the Lead-in area), the root directory and the data area, the higher the likelihood of successful correction of media reading errors .
Therefore, the first thing you need to try to do with an unreadable or hard-to-read CD or DVD disc is to try to read it on another accessible computer or laptop. For the purity of the experiment, it’s better to use more than one. There is a non-zero chance that a disk that refused to be read on your computer will be recognized and read on another.
You can also try special utilities, which take on the function of determining the rotational speed of the blank in the drive. It happens that the standard firmware does not cope with this quite correctly and manual speed control can improve unstable or poor disk reading. Moreover, the lowest rotation speed will not always be the best for reading - here you need to experiment with the values. In each specific case, the approach to choosing the optimal reading speed may vary. The most common and easy-to-use utility for this purpose is CDSlow.
CDSlow program window
Option one, also the most common, surface contamination
Dirt, dust and fingerprints on the surface of the disc are easy to deal with. Using a special damp cloth for cleaning office equipment, carefully remove dirt, paying attention not to scratch the coating. Then we carefully wipe the disk with a dry cloth and you can insert it into the drive and try to read it.
You should wipe from the center to the edge, never in a circular motion. If a grain of sand suddenly gets under the napkin and scratches the disk, a radial scratch will cause much less damage than a concentric one.
Do not use acetone, nail polish thinner, kerosene, gasoline or other petroleum-based solvents. If you need to use a solvent to remove dirt from a disc, it is better to use alcohol-based solvents.
Option two, scratches
This also includes various forms of thermal damage.
Two ways to classify scratches come to mind:
- According to the integrity of the reflective layer:
- The scratch did not affect the reflective coating, only the polycarbonate backing was damaged.
- The reflective coating is damaged.
- By width and location:
- Narrow scratches. Due to the redundancy of stored information and the use of various corrective algorithms by the drive, they are not very dangerous.
- Wide scratches. Besides more damaged data, additional problems are added, for example, the drive in this place may “lose” a track and continue reading the adjacent one. Successful reading in such cases largely depends on the perfection of the drive.
- Concentric scratches are the worst type of damage. Not only do corrective algorithms no longer help in this case, because... the entire sector is damaged, along with redundant information, which also confuses the positioning system.
Particularly severe damage is clearly visible against the light of the CD, as in this photo:

Scratches on the polycarbonate coating interfere with the laser beam of the drive to read data from the working surface, due to the fact that they introduce distortions into focusing. As a result, the laser beam either hits the wrong place, or after reflection does not return to the reading element of the head.
Such damage can be repaired by polishing.
Eat different ways polishing Starting from filling scratches with special pastes with a refractive index close to that of polycarbonate, and ending with removing or smoothing the damaged top layer by heating. The methods used in polishing lenses and other optics are quite applicable.
You can polish manually, or use homemade polishing devices made on the basis of an electric razor with a linear drive, or use specialized tools, which are offered in variety on e-bay.
Successfully performing the above steps, in addition to having special tools and materials, requires considerable experience. Therefore, if the information on the problematic media is important to you, I advise you to entrust this work to data recovery specialists. Or use the tips below, limiting yourself to wiping the disc.
On the Internet you can find descriptions of various “shamanic” methods, such as boiling a blank, freezing it, heating it over a gas burner or an incandescent lamp. All methods are designed to melt the polycarbonate so that the scratches are smoothed out or eliminated. Since these techniques have a high risk of having a destructive, irreversible effect on the host, I do not recommend them.
So, if, after dealing with scratches using the methods available to you, the data is still not readable, go to
Option three, crack on the disk
There are two types of cracks - those running from the center of the disk to the edge, and vice versa, from the edges to the center. Cracks from the center are formed from microdamages that occur on the inner radius of the disk due to careless handling or due to defects in the blanks, and then transform into cracks on high speeds rotation. Edge cracks are usually caused by rough handling but will get worse, especially on poorly balanced rims.
To recover data from such damaged media, it is first necessary to take measures to prevent the crack from growing, which can lead to irreversible data loss and even rupture of the disk in the drive. At a minimum, you should reduce the disk rotation speed to the minimum.
Methods for preventing crack growth are similar to those used in auto glass repair. First, the crack needs to be “drilled out.” It is best to use a thin needle heated over a fire for this purpose. Using a magnifying glass, see the end of the crack and make a puncture in the plastic a fraction of a millimeter further. It is best to do this not on one side, piercing the disk all the way through, but on both sides, inserting the needle into the plastic about half the thickness of the disk.
After this, it is advisable to glue the crack along its maximum length. To do this, you can slightly spread the edges of the crack and carefully coat it with a thin layer of superglue, in a minimal amount, so that there is no excess on the surface. Then bring the edges together and press them together. Make sure that the surface of the seam is smooth, without protrusions that could damage the drive optics.
Further actions are similar to working with scratched discs - if it is not readable,
Option four, damage to the substrate due to the poor quality of the media chosen for storing information or non-compliance with the storage conditions of the DVD or CD disc
According to GOST R 7.0.2-2006 for the preservation of documents on compact discs, the discs must be stored each in a separate box at a temperature of 10-20 degrees Celsius, humidity 20-65% and in diffuse light without ultraviolet radiation. If you believe this regulatory document, then by adhering to the above rules, CDs will live happily ever after. However, the choice of a disc as a future carrier of your important data is no less important. Many reviews have been written on this topic. I just want to highlight the most important points.
High-quality discs must be varnished at the ends, unlike their low-quality counterparts. If the end of the CD is not varnished, over time moisture will get between the polycarbonate coating and the substrate, which will lead to oxidation of the layer carrying information, and the data in such damaged areas will be irretrievably lost.

The same effect can occur if the protective coating of the CD or DVD disc has been seriously damaged. Atmospheric moisture that gets onto the substrate will also corrode everything around the damage site.


Methods and approaches to data recovery in case of such damage are also not original, the same
Option five, recording failure or unsuccessful attempt to add to the RW disk
In this case, problems with reading user data are logical in nature. It is difficult to give general recommendations, because failures caused by errors in software or user actions lead to a wide variety of consequences. The most universal method is to deceive the drive microprocessor.
If the error is due to attempts to add a session to multi-session media or an error in recording the current session, then you can try to access previous sessions using a program that can list previous sessions and extract the contents of the selected disc session and burn it to an ISO image. This function is also available in the “folk” Nero Burning Rom and in many other DVD burning managers, for example in Roxio Easy CD DVD Creator.

Option six, the rewritable disc has been erased or overwritten
If a so-called quick erase was performed, an analogue of a quick format on a hard drive, when only the TOC - file system of the disk is deleted, then the data can be restored. Needed with
If a quick erase was applied to the disk, and then new information was written on top, then you can only restore what was not overwritten. We take a full dump of the entire available maximum capacity, then cut off the excess and perform a recovery using the specified file headers in the remaining part.
If a hard wipe has been applied to the disk, then data recovery is not possible. In this case, a high-power laser pulse passed over the entire surface of the disk and heated the amorphous substance (recording material) to a temperature below the melting temperature, but above the crystallization temperature. The change of amorphous and crystalline areas, which were recognized by the drive as logical 0 and 1, disappeared. The entire layer, after complete erasure, crystallizes and is ready for re-writing.
The last option, there is nothing written on the disk at all
Oddly enough, data recovery specialists encounter a similar situation quite regularly. For example, many users, especially inexperienced ones, use operating system tools (read Windows) to record information on DVDs or CDs not with specialized software. Select the required files and folders with the mouse, right click select the option to send to disk drive, see a window in which the files “fly” to their destination and calm down. In fact, after such an operation, the files are copied not to the disk, but to a special temporary folder, and after this operation you need to call an additional Windows wizard, which will carry out the last stage during which, in fact, writing to the media will occur.
These are, perhaps, all the most common options for data loss on CD and DVD drives that users encounter. In conclusion, I would like to once again advise the following - if the lost information is of high value, leave experiments until better times, entrust data recovery to professionals.
Application zero. Copying and reconstruction methods
The following options are possible:
- Damage allows the drive to read the TOC and the directory tree (the contents of the disk are visible), but the necessary folders and files cannot be read. To copy them, you can use programs that allow you to read the disk sector by sector, ignoring or intelligently processing read errors that are not corrected by the drive. The most useful programs are described in the corresponding applications.
- The disk is detected by the drive, but trying to view the content using the OS results in a freeze or an error message. I am not aware of any free software that can effectively recover data in such situations, so please refer to using
- The drive is not recognized by the drive. The drive tries to read the disk at different speeds, the activity indicator blinks, after a number of unsuccessful attempts to read the table of contents at different speeds, the spindle stops. It is necessary to first make a sector-by-sector copy on a drive specially prepared for this purpose. Then we analyze the resulting image
Application one. Hot swap
If the damage is such that the TOC cannot be read and the disk is not recognized by the drive, you need to resort to the “hot swap” procedure of the disk, the so-called “hot-swap” method. The thing is that the drive really only needs three main TOC fields: the address of the output area of the disk (analogous to MAX LBA on the HDD), the starting address of the first track (0 LBA) and the address of the next session of the disk (if a multi-session disk was recorded). The starting address for all disks is the same - 00:02:00 (which corresponds to a zero LBA address). Lead-Out depends on the disk size (typical CD approximately 700 Mb, typical DVD 4.4 Gb).
The trick is that you take a blank disk of a similar type and size, CD or DVD, and write one file on it for the entire logical volume - either a movie, or an image file (unpacked), or some kind of archive. Next, the housing is prepared in a special way, disassembled, or the eject signal and drive are blocked.
For a hot swap operation of a CD, the drive must use the same type of donor disc as the unreadable one. Those. If you need to recover information from a DVD-RW disc, then to prepare a donor disc, whose TOC will be written into the drive’s RAM, you need to take a similar DVD-RW blank. If the disc is DVD+R, then the disc should not be a “minus track” or RW, but rather a “plus” one. The same applies to mini-disks; it is better not to use a full-size disk for hot-swap.
The front panel is removed from the drive selected for the hot-swap operation, and the screws holding the top cover are unscrewed. In general, all conditions are prepared for replacing a disk without extending the tray. You need to understand that if your drive is under warranty, then after this procedure warranty conditions will be violated.

Compact hot-swappable drive

Hot swapping of a disk in a drive
In the picture, the top cover of the drive contains a plastic clamping ring with a magnet, which must secure the CD in the reader. Therefore, after replacing the media with the required one, the cover must be returned to its place.
We insert a new disk with the entire recorded file into the drive, wait until the disk is recognized and the TOC is read and placed in the cache, after which we either wait for the disk to stop due to a timeout, or we spin down programmatically and change the new disk to an unreadable one. Now you can run and subtract the entire available LBA volume into a dump. Then we parse the contents of the dump using the same programs. If there are a large number of errors, the process can take quite a long time.
Some specialists, to recover data from disks that have problems with TOC, use drives with modified firmware that allows you to bypass TOC initialization and gain direct access to the user area. In addition, proprietary software is used that allows you to change the reading direction (from the beginning of the disk, from the end, from any LBA) and intelligently handle read error situations (read repeats, skipping specified areas, etc.), which allows you to significantly improve results for recovering information from disks containing multiple read errors.
Appendix two. Commercial programs for data recovery from DVDs, CDs
How to use ISOBuster
– a popular and richly available utility for working with disk images and restoring information on CD/DVD media. The program allows you to view and extract files, tracks and sessions from CD-i, CD-Text, VCD, SVCD, CD-ROM, CD-ROM XA, DVD and DVCD discs.
ISOBuster supports ISO9660, Joliet, Romeo, Little Endian and Big Endian byte order, all types of UDF (UDF 2.01/UDF 1.02, UDF 1.5), Rock Ridge (Commodore), short and long file names. To recover data from damaged media, the program has a valuable option - the ability to re-read it many times bad sectors, which increases the chance of correctly subtracting a particular problem sector.
The start window consists of two panels - on the left is a window for selecting images, sessions, disks and folders, and on the right is Explorer. After launching the program, the tracks and sessions that the utility was able to identify will appear in the left panel, and the files and directories found as a result of a quick preliminary scan will appear in the right panel. If necessary, you can run an extended scan, the so-called. "Search for missing files and folders."

Data recovery can be performed for the entire disk as a whole, or for individual folders and files. To do this, you should select what needs to be read from the damaged media and use the “Extract” command.
If, during copying, a bad sector is encountered on the media, the user is presented with a window asking him to try to read this sector again or skip it. Repeated re-reading of the bad sector is sometimes successful and its contents are read successfully.
When scanning the contents of optical drives is started and completed, the program displays in a drop-down menu all available sessions that were recorded on the disc. If there was a failure in one of the last sessions, ISO Buster allows you to work with a separately selected session and extract its contents as a RAW data array (in the form of an image for subsequent parsing by headers), or work with the selected session in Explorer mode.
ISO Buster allows you to generate a variety of reports on the directory tree, including taking into account unreadable content (data containing unread sectors).

If you are working with a disk using the hot swap method, when the TOC in the drive memory does not correspond to the original one, you can set the range to be copied from the selected LBA to the selected one.

At the stage of reading data into an image file, you can specify the use of intelligent filtering if the type of data on the recovered media (Video CD, Audio CD) is known in advance. In this case, ISOBuster will filter out sectors that meet the selected criterion.
Further parsing of the image file and data recovery from it is carried out similarly to working with a regular damaged CD. To do this, you need to first open the image file File->open image file.
How to use WinHex
– popular multifunctional program for working with various media. It can work with CDs both at the logical (in the OS sense) and physical (in the same sense) level.

WinHEX program window
With Winhex you can remove a sector-by-sector image from a damaged disk, save the resulting dump to a file, and then parse it into its components or use the data recovery function using file signatures. Unlike hard drives, there is no fragmentation on CD and DVD media, which significantly complicates such recovery methods.
Through the Tools->Open Disk menu item, the user is taken to a window with options for selecting physical or logical drive for work. If the drive does not recognize the presence of a disk in the tray (before the operation), then when you try to access an item in the list of logical drives, an error message “the device is not ready” will be displayed.

and when trying to contact physical disk the program will display an error message “no access to device”.

After this is done correctly, access to the LBA of the disk becomes available and you can proceed to the sector-by-sector copy operation: Tools->Disk Tools->Clone Disk. Here you have options for cloning to a separate medium or to a file of the entire available surface or any area, selecting the starting sector for the source disk and for the destination disk (if copying is not done to a file), choosing a filler pattern for unread sectors and the jump size when unread is detected sectors (if you want to speed up copying on a disk with numerous uncorrectable read errors).

In our case, we need to select copying to a file and specify the path where to save it. We set zero as the starting sector; specifying some other number only makes sense if we can guess the number of unreadable sectors at the beginning of the disk. Having put all the necessary marks, you can start copying. The program saves a report on unread sectors in a separate log file.
From the image obtained after reading, it is now necessary to restore the necessary data. To do this, you will have to use the so-called RAW Recovery function or recovery by file signatures. What does it mean? The vast majority of file types have unique character sequences, so-called. signatures that can be used to uniquely determine the file type. As a rule, it is convenient to take a few characters at the beginning of the file as a signature. By setting the required signature as a selection criterion, you can recover all files of one type or another from the resulting image.
File header using JPEG as an example
During the search process, the following algorithm is used: the software finds the selected file header and saves the entire data array until the next similar header found, considering that it exists single file, or from the found header, a data array of the volume specified in the settings is saved (you can specify “with a reserve”).
Of course, in this case the file names and directory structure will not be preserved, but it is better to receive the data in this form than not to receive it at all. The main problem that may arise when restoring information using the RAW recovery method is fragmented data, when part of the file is located in one place and the other part(s) in another. But in the case of restoring files from an image read from a CD\DVD, this does not happen, since the data is written linearly.
Restoring files by header in WinHex is available from the menu Tools->Disk Tools->File recovery by type. First, open the resulting image File->Open, select “recovery by file type”. The program displays a window reminding you that the data needs to be saved not where everything is restored from, but in another place (if you are working with an image file, you don’t have to worry about this) and reminds you that this option will give good results for unfragmented data.

The signature recovery settings window prompts you to select the type of files that you plan to extract from the image, the maximum expected file size, the directory in which to save everything, and the search algorithm: Extensive byte-level search (the slowest and most advanced, I recommend using it), Search at sector boundaries (search from the sector boundaries) and Search at cluster boundaries, if possible (search from the cluster boundaries, if possible).

If files of rare types that are not described in the “Select file type(s)” directory were recorded on the disk, then by clicking on the Signatures button, you will launch the system spreadsheet editor(type Microsoft Excel), in which you can add the desired title manually.

After all the manipulations done, all that remains is to click on the “Ok” button and wait for the result. All files that meet the specified conditions will be saved to the selected directory.
Appendix three. Free programs for data recovery from DVDs, CDs
- the most functional, from my point of view, of the free programs. It is positioned as software that can also work with flash drives and hard drives. During the installation process, it installs its own libraries into the system, which help the program to better handle emergency situations with problematic storage media. After installation, a system reboot is required.
The program window is divided into two parts: where to copy from (top) and where to copy (bottom). To start copying, you need to drag the files from above with the mouse or go to the folder that you want to copy completely and click “Copy”. The copying algorithm can be configured by selecting the “Settings” sub-item of the “View” main menu. I will not dwell on configuration issues in more detail, since the program contains quite detailed reference information.


Separately, I would like to draw your attention to the fact that the utility has an EXTRA mode, which should start automatically when errors in reading CD or DVD discs are detected.
Recovery Toolbox for CD Free
Recovery Toolbox for CD Free– a utility from the well-known company Recovery Toolbox, which specializes in creating utilities for recovering data from damaged files of all types, from doc and xls to registry files and exotic databases. The only free program mentioned here that does not have a Russian interface. The copying algorithm is not configurable.
When you start the program, you are asked to select the drive from which the recovery will be made, as well as the path where you want to save the subtracted data. After reading the TOC, the utility prompts you to mark necessary directories and files, and the saving process begins. If unreadable sectors are encountered during the copying process, the user is prompted to reread or skip the sector (file). At the end of the process, you can save a report of the work completed.
DeadDiscDoctor
DeadDiscDoctor– has a minimalistic interface with beautiful pictures. Uses an original copying algorithm, the settings of which cannot be changed. We choose what to copy, choose where to copy, start the process.
Non-Stop Copy
Non-Stop Copy– the interface is similar to DeadDiscDoctor. The downside is that there is no way to select more than one file to copy at a time. There are minimal algorithm settings.
Reprinting or quoting is permitted provided that a direct link is maintained, data recovery from DVD CD to our website.
They brought a DVD from the kindergarten with a recording of the matinee. Which, as luck would have it, but why be surprised, almost immediately began to “stutter” in several places. It was Friday evening, so there was no one to quarrel with or sort things out with. I really wanted to watch the matinee, but I had no desire to wait for Monday.
The topic of restoring scratched and/or unreadable disks is not new and has been relevant since their inception. But over the past three years, CDs and DVDs have almost completely gone out of use. The Internet and flash drives did their job. Therefore, I had to practically rediscover the world of everything related to optical storage media.
So, what do we have? DVD-R Printable with the UDF file system on which information is recorded in DVD video format.
Which “stutters” at certain time intervals when played on a DVD player and completely refuses to be copied through the computer’s DVD drive. A quick glance at the work surface showed several scratches. Which most likely led to such sad results.
Differences in the principles of reading a DVD player and a computer
The player must produce a time-stable picture. And therefore it “swallows” faulty areas. That is, if something is not readable, then the player moves on. Therefore, on “worn out” discs, an unstable, crumbling picture and missing sound are possible. It is believed that a short-term loss of image or sound quality is less evil than a complete stop in the video presentation. That is, you as a viewer will not lose the essence.
The computer reads the disk not as a stream of information, but absolutely down to every byte. And the loss of any byte is critical for it and is considered an error. Which of course is true for programs and databases. But for images and sound this is not always possible. After all, even if there is no sound in the film for a couple of seconds, you most likely will not notice anything. And if you notice, it is unlikely to spoil the overall viewing experience.
Mechanical and software method of data recovery
The mechanical method involves influencing the media itself, that is, the CD. As a rule, this is grinding the surface to hide scratches and restore the correct angle of laser reflection. I myself witnessed how a “stuttering” disk, after washing in warm water, began to work like new. I will not dwell on this method in detail, since I have never resorted to it, and I have nothing to recommend. Let me just say that this method of restoring disk performance is a temporary phenomenon. Therefore, immediately after sanding it is necessary to create a backup copy.
The software method is more suitable for recovering data from music and video discs. When 100% reliability is not important. And it is produced with the help of programs and utilities that read the disk using special algorithms, trying to extract as much information as possible from it.
Ideally, both methods should be used. Software from the beginning. If it didn’t work out 100%, then mechanical and again software.
Programs for reading bad CDs
In this article I will only talk about free solutions. Since for one damaged DVD there is no point in buying paid program. And free solutions may be less convenient and less functional, but for one-time recovery they bring the same result. Which is exactly what I need.
Recovery ToolBox for CD Free
The Recovery Toolbox for CD Free utility (official website) is designed to recover data from damaged media of the most common types today: CD, DVD, HD-DVD, Blu-Ray, etc. The program allows you to recover files of any type. The utility performs full scan damaged disks and saves as much information as possible. In progress Recovery Toolbox for CD Free uses a large number of different algorithms, which significantly increases the quantity and quality of recovered data. And most importantly, the program is completely free!
Insert the CD and launch the program Recovery Toolbox for CD Free and we see the interface for housewives. Which is undoubtedly a plus, since everything is clear and understandable without words. First of all, select a drive with an unreadable disk.
Next, select a location on the computer’s hard drive where we will copy data from the optical drive. 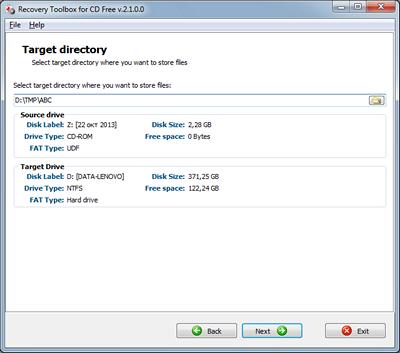
Now select the folders and files that need to be copied from the DVD. In my case, select all, since I need to copy the entire disk. Click the “Save” button... 
And the copying process itself will begin, which can last for long time, up to several hours. 
When the utility finishes running in the destination folder on your hard drive, you will get the maximum of what you were able to copy from the CD. 
Non-Stop Copy
Non-Stop Copy is a utility for copying files from any damaged media. The program allows you to copy damaged files from any media, and information from unreadable sectors is replaced with zero bytes. It also tries to read information from poorly readable sectors in several attempts.
The program does not use any low-level methods for reading information, and thanks to this it works correctly on any type of media and on any file systems supported operating system.
The latest version is dated 2006. But don’t be scared and look for something fresher. And now in 2013 she is doing an excellent job with her tasks. The Non-Stop Copy utility was tested by me personally on Lenovo laptop from the operating room Windows system 7 Ultimate x32 and showed excellent results.
You can download the program from the official website. There's also detailed instructions on its application. I noticed only one drawback in the interface functionality: you can only copy one file at a time. But this misunderstanding is easily resolved batch file, which the author provides as part of the program distribution. By the way, the program does not require installation and, accordingly, does not damage the operating system.
We launch the program and select the unreadable file and the location where we will save it. Then press the “Start” button. 
At first, the program performs a quick copy of the entire file, without stopping at problem areas. Approximately the same way we do a DVD player. The picture below clearly shows the unreadable data. 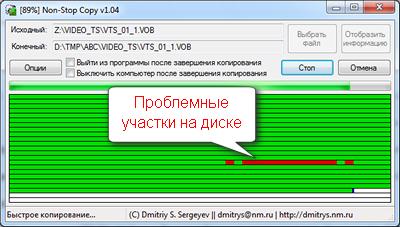
Then all the computing power of the program's algorithms is turned on to minimize the presence of red sectors. This process can take several hours and in the end you will get something like the following picture. 
As you can see, instead of solid red fields, there are only lonely red lines. That is, data loss is quite insignificant and quite acceptable when copying video data.
I would especially like to dwell on the program control buttons. During the copying process, two buttons become available to you: “Stop” and “Cancel”. The functionality is not entirely clear from their name. The “Stop” button completely stops the copying process, while all data about the state of the process at the time the copying is stopped is saved. The final file after stopping is the same size as the original file. It contains everything that was copied, and parts of the file that were not copied or that could not be copied are replaced with zero bytes.
The “Cancel” button completely cancels the copying process, and everything that was copied is deleted. In general, this button is provided in case you need to quickly stop the process and at the same time you are no longer interested in its result. For example, pressing the “Stop” button at the very beginning of copying a fairly large file can lead to some delay in stopping, due to the “overwriting” of the uncopied part of the file with zero bytes. The “Cancel” button in this case will stop the process immediately.
That is, if you are tired of waiting, but you need the data, then click “Stop”, and if you don’t need it, then “Cancel”. And the best part is, if you click “Stop”, you can subsequently continue copying from the same place.
Free disk recovery program
created specifically to help with the loss of digital information. Thanks to a variety of software, you can easily and without additional investments copy data from any unreadable formats laser discs. Often, standard settings optical drive desktop computer is not enough for the system to read information located on unstable flexible devices such as CDs, DVDs and Blu-ray discs. In this case you can no problem download disk recovery program for free
.
CDCheck. CD Check 3.1.14.0 is designed to recover data primarily on optical CDs.CDCheck can handle any of your damaged CDs and DVDs.
1.5 MB
. CD Recovery toolbox (portable) is free program recovering information from the most common types of disk media. Most often we have to deal with the loss of information on Blu-Ray discs, DVDs, CDs, etc.
500 KB
. File Salvage is a miniature program measuring 217 Kb. Its scope of activity includes emergency copying of data from a problematic optical disk to hard drive PC.
200 KB
. Non Stop Copy v 1.04 is one of the most productive software tools for recovering files from a wide variety of laser discs.
126 KB
. IsoBuster pro is wonderful mobile instrument, the main task of which is to recover information from optical storage media using various methods.
3.5 MB
. This professional product for backing up data from unreadable CDs and DVDs.Sector-by-sector reading of information written to the disk allows deaddiscdoctor to cope with its task perfectly.
1.7 MB
. Diskinternals cd dvd recovery is a professional utility for resuscitating deleted files. The main working platform of this program is optical media data formats DVD, DVD-R, DVD-RW, CD-R, CD-RW, etc.
7.4 MB
. This is a small application that can copy music from laser CDs to other disk devices.
6.1 MB
. The CDRoller utility has ample hardware capabilities for working with data from problematic old-style laser discs. Using this program, you can recover various files from hard-to-read DVD and CD discs.
5.3 MB
. Super Copy is a time-tested tiny piece of software whose main task is to copy digital data from problematic disk drives.
223 KB
. Unstoppable copier is an indispensable assistant when recovering information from unstable storage media. It is designed to make copies digital files, located on problematic disk drives.
390 KB
. The compact AnyReader software has all the necessary powers to create copies of files from unstable digital storage media.
3 MB
. DiskDigger is a compact software application that allows you to copy digital files from problematic sources. This software is ready to restore access to lost information on hard drives, optical discs, memory cards, USB flash drives, etc.
370 KB
. The AKOL utility is a recognized leader in the field of emergency copying of digital files from unstable storage media. The AKOL program supports many such disk devices, ranging from hard drives to laser disks.
950 KB
Related posts:
 High magnification monoculars - features and benefits Monocular magnification 50
 World of Tanks crashes on startup - fixing errors World of tanks crashes after every battle
 Server key 1c over the network
 How to turn on WiFi on laptops Add a new wireless network to a laptop
 How to find out iPhone serial number?


