Repeater to increase the wifi coverage area. WiFi coverage area. - location of the router or access point
If you need to connect more computers or other devices to your home or small corporate network, but you have no available ports, try adding another router. In addition to expanding network resources to increase wireless coverage, the second router can also be installed in areas where the signal is blocked (basements or rooms with concrete walls). Learn how to install an additional router in your home or small corporate network.
Necessary equipment
Identify the routers you will be working with. In the context of this tutorial, we will call a router with Internet access "Router 1", and new router - "Router 2".
- Free your computer to connect to routers. To set up routers, you need to connect them to your computer via a twisted pair cable or Wi-Fi network. It doesn't matter what operating system is on the computer.
- If you use a wireless network to connect to routers, write down the wireless network and the encryption key. Without them, you will not be able to connect to routers via wireless network.
- Take out one twisted pair ( network cable) for each device. If you are going to connect computers and other devices over a wireless network, you will need to get a twisted pair cable for each device.
- For example, you need one twisted pair to connect Router 1 to Router 2.
- To connect two more computers to the network, prepare one twisted pair cable for each device (unless you intend to connect them via Wi-Fi).
- Make sure you have enough power outlets to connect two routers and additional devices.
- Turn off the power on both routers. Before proceeding with the laying of the network, it is necessary to turn off all equipment.
Installing Router 1
- Connect one end of the twisted pair to the WAN port of Router 1 and the other to the WAN / Internet port of your high speed modem. If Router 1 is your high speed modem, you can skip this step.
- The WAN port can be labeled "Internet".
- Use another twisted pair to connect one of the LAN ports of Router 1 to a port on your computer.
- If you want to connect your computer to the router wirelessly, use your router's user manual for this.
- Turn on your modem and router. Wait until they turn on completely.
- Launch your web browser. To access the Router 1 administration menu, you need a web browser.
- To connect to Router 1, enter it. This address should be printed somewhere on Router 1.
- Below are some of the standard IP addresses of the most common router manufacturers:
- 2Wire: 192.168.1.1, 192.168.0.1, 192.168.1.254, 10.0.0.138
- Apple: 10.0.0.1
- Belkin: 192.168.1.1, 192.168.2.1, 10.0.0.2, 10.1.1.1
- Dlink: 192.168.1.1, 192.168.0.1, 192.168.0.101, 192.168.0.30, 192.168.0.50, 192.168.15.1, 192.168.254.254, 192.168.1.254, 192.168.0.10, 192.168.15.1, 10.0.0.1, 10.0.0.2, 10.1.1.1, 10.90.90.90,
- Netgear: 192.168.0.1, 192.168.0.227
- Below are some of the standard IP addresses of the most common router manufacturers:
- Enter the menu by entering the administrator login and password. They, like the IP address, must be located on Router 1.
- If the administrator's login and password are printed on your router, type in the browser's search engine: "default password is router [brand of your router]".
- If you entered the correct password but still cannot log in, reset the router to factory defaults by inserting the end of a paper clip into the Reset slot.
- Make sure the protocol is enabled on Router 1. This will allow Router 1 to assign IP addresses to all devices on the network.
- Not all routers have DHCP settings in the same location, but you can usually find them under "Network settings" or "LAN settings" local network).
- Most often, DHCP is enabled by default.
- Check your network and internet connection. Try visiting a website to determine if you have Internet access. Also make sure that there is at least one free LAN port on Router 1.
- Remove the twisted pair cable connecting Router 1 and the computer. Leave the rest as is.
Installing Router 2
- Connect Router 2 and then turn it on. Now we need to configure Router 2 as the second router on the same subnet. Thus, all devices on the network will have access to each other.
- Connect the computer to the LAN port of Router 2 using a twisted pair cable.
- Enter the router administration menu from the browser. Similar to how you logged into Router 1 as an administrator, you need to do the same with Router 2. Use the password and administrator login to log into the modem. Find out the IP address of your router. The default addresses for most routers are 192.168.0.1, 192.168.1.1, or 10.0.0.1.
- Disable DHCP on Router 2. You are already using Router 1 to assign IP addresses. Find the DHCP settings (just like you did for Router 1) and disable DHCP.
- Assign a new IP address to Router 2. Most likely, currently Routers 1 and 2 have the same IP address. This needs to be fixed.
- On the router's page, open a tab named "LAN" or "Local Network". One of the fields must contain the current IP address (the one that you entered into the browser).
- Enter the new IP address to replace the old one. New address must be on the same subnet as Router 1, which means that the first three sets of numbers (of four) must be the same as those of Router 1. Also, the address must not be the same as the address of another device.
- If Router 1's IP address is 192.168.0.1, then Router 2 can be set to 192.168.0.100. Since the computer is the only device on the network, the chance of an IP address conflict is minimal.
- Set the same wireless network names and passwords for Router 2 and Router 1. If Router 2 is not a wireless router, you can skip this part. Otherwise, give it the same SSID (Wi-Fi hotspot name) and password as Router 1.
- All the necessary settings can be found in the menu called "Wireless" or "Wi-Fi setup".
- If you forget the SSID and password of Router 1, they should be printed on the device.
Network launch
- Turn off the power to Router 2. Now that you're done configuring Router 2, it's a good idea to restart it, but leave it turned off for now.
- Connect the twisted pair cable to the LAN port on Router 1 and to the first LAN port on Router 2. Make sure this is not a WAN port (they look the same).
- Turn on Router 2. As a result of your manipulations, it should now be located at the IP address you specified. As long as Router 1 has access to the Internet, Router 2 will also have access to the world network.
- Restart the computer connected to Router 2.
- Connect all other computers and devices via a wireless network or twisted pair cable to the LAN ports on one of the routers. Router 1 via DHCP will automatically assign each device its own IP address on this current subnet. Enjoy the benefits of an extended network!
- Write down the IP addresses of your modem, routers, and all connected PCs. This will allow you to later identify and fix any network problems.
- For an extra layer of security, consider purchasing a third (NAT) router. If you decide to connect a third router (Router 3), run the twisted pair cable from its WAN port to the LAN port of one of the remaining two routers. Then enable DHCP on Router 2 and put it on a different subnet from the main network.

Each of the owners of mobile devices is familiar with the difficulties of connection, network reliability, stability of operation and transmission speed in Wi-Fi networks: smartphones, tablets, laptops, TVs and other household appliances. And indeed, "wireless freedom", and this is how the abbreviation Wireless Fidelity stands, seems to be as it is, but it seems as if it is not there. When you are in the Wi-Fi coverage area, you are suddenly surprised by the amazingly low data transfer rate over the network, frequent drops and other things that are just annoying. And especially nervous people, tired of a terrible connection, ready to gouge their device in a fit of rage.
And everyone blames the Wi-Fi connection, and absolutely does not take into account the problems with the local or backbone provider. They are partly right. All the advantages of Wi-Fi can be canceled out just by poor communication, interference on the air, obstacles in the path of the radio signal. And here the question arises in general about the performance of Wi-Fi, and one can only dream of a "gigabit network over the air". Below I will try to explain why there are problems with Wi-Fi communication and how you can deal with them using the example of expanding the area of \u200b\u200bstable reception of a Wi-Fi signal in everyday life at a specific facility. And at the same time, in some places, I will present the theory of Wi-Fi networks in an understandable form and a brief summary.
What is preventing good wireless network reception?
The first thing that comes to mind is distance. Indeed, the further the receiver is from the source, and in our case, from the access point or router, the weaker the signal. And the weaker it is, the worse the reception, at least in the general case, this statement is true. Distance is not the only thing that affects reception. Radio waves, including Wi-Fi signals, travel from a single source, which must be picked up by the receiver. In other words, the radiated wave must pass through the receiver antenna. What if there are various objects on the way between the receiver, your mobile, and the transmitter, your router? In this case, the wave can: go around the object, pass through the object, reflect from other objects and reach the receiver in the reflected form. But the frequency of Wi-Fi is too high to bend around any large objects on the way, so there are only two options: to reflect off objects and pass through them.
And here it should be remembered that nowadays WI-Fi operates in two radio bands. The first and most massive 2.4 GHz, and the second, the newfangled 5 GHz (although there is a standard for a higher frequency, for example, ad, it operates at 60 GHz and is intended for communication at a distance of no more than 10 meters and only with line of sight) ... The 2.4GHz frequency passes through objects better, and 5GHz reflects better from them. Therefore, if you have the task of "punching" two concrete walls from the kitchen, where your Wi-Fi source is installed, to the living room, then Wi-Fi will work better at 2.4 GHz than at 5 GHz. On the other hand, if your task is to cover only one room with access or a labyrinth made of metal, then it is better to think about a 5 GHz network.
In addition to items that interfere with reception, you should always remember about interference. For radio networks, interference can come from nowhere and disappear into nowhere, more precisely from the most unexpected sources, but they are especially susceptible to interference with networks with frequencies of 2.4 GHz, since 5 GHz waves pass through objects worse, and an ordinary room in an ordinary house is already quite good at isolating your access point from pernicious influence interference. The source of interference can be both faulty microwave ovens and other electrical equipment operating in an extraordinary mode. But the biggest obstacle that awaits any city dweller is the Wi-Fi network of neighbors. In urban areas, especially in residential areas, the density of Wi-Fi networks is so high that sometimes, during peak download hours, wireless mice and Bluetooth headsets stop working. The 2.4 GHz broadcast can be so busy that radio communication is no longer reliable. The mouse starts bouncing around the screen, and the headset experiences constant sound distortion. I described the situation in detail in my article about the "eccentricities" of MGTS, which decided to install a Wi-Fi router in each apartment.
The power of your Wi-Fi router or Wi-Fi access point can also seriously affect the quality of service of that Wi-Fi. Signal transmission wirelessly involves not only processing it when receiving or transmitting, but also encryption. Both operations, coupled with error removal, is a non-trivial task and does not require hefty computational resources. Now imagine that you have loaded your access point by downloading the next series through the Torrent network, and at the same time someone else is trying to play online games or watch YouTube. With such a load, a High-End household router of five or seven years ago is not doing very well, and here the load is also increased due to the need to use radio signal processing. In such cases, the device may simply freeze or overheat to a significant temperature and automatically reduce performance to avoid damage to the equipment.
I vividly remember the groaning of a small hotel owner in Italy who spent 12,000 euros to set up a wireless network in his hotel with five floors and twelve small rooms. Yes, he bought professional equipment, yes, everything was set up for him, and his system issued individual passwords to each of the guests in the form of a check. But on the whole, the system worked very badly. One of the access points hung, while others were overloaded. In general, the guests' dissatisfaction was expressed only with the quality of Wi-Fi, but their dissatisfaction significantly reduced the rating of the hotel itself. So even professional solutions are not always able to provide high-quality Wi-Fi coverage, let alone household devices.
So what, then, should an ordinary man in the street do? My advice is to use only and exclusively a wired connection whenever possible. And what to do when Wi-Fi is required and without it, read below.
Solution options
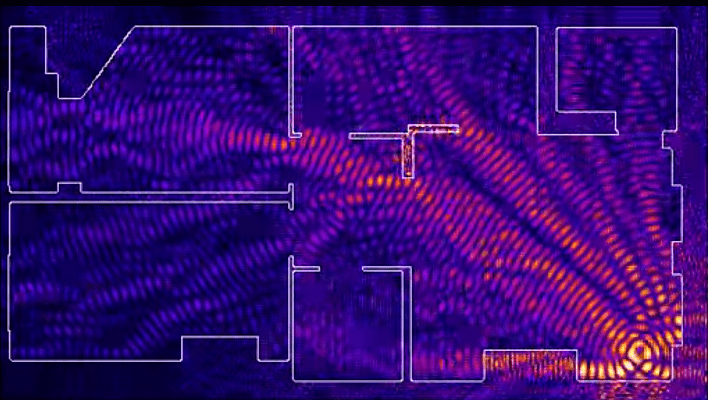
I try to follow my advice and use a wired LAN connection where possible. But the number of mobile electronics, numerous smartphones, smartwatches, tablets and other devices, are steadily creeping into life and in a village house with two floors the problem with Wi-Fi coverage has grown in full growth. The first floor of the house is built of stone with reinforced concrete ceilings, and the second is wooden. The entire structure is crowned with a roof made of popular metal tiles. The ZyXEL Giga II access point is installed on the second floor in the geometric center of the building and at a height of about 40 centimeters from the floor slab. The chosen place for installation is optimal, throughout the inhabited area of \u200b\u200bthe building, Wi-Fi coverage is present at an acceptable level. Moreover, those parts of the infield that are not shielded by a roof also allow the use of mobile devices with a Wi-Fi connection.
But despite the successful location of the access point, there are blind spots in the house, which are very annoying. There are many places in the garage where the Wi-Fi signal is formally caught, but you cannot check your mail or open a page there. Too many mistakes. In the street gazebo, too, not everything is in order. There is a signal there, but it is possible to work in the network only in strictly defined places, a step aside and communication becomes impossible. You have to do something about this, as there is nothing more discouraging and frustrating than an unreliable Internet connection.
Polarization
Surprisingly, few Wi-Fi users, when trying to improve the signal quality, remember about signal polarization. But Wi-Fi has it. Household routers and access points mainly use vertical signal polarization. Industrial, designed for professional use, operate with two polarizations at once: vertical and horizontal.
It is important that both the transmitter and receiver have the same polarization. If your router produces vertical polarization, and your mobile uses only one antenna and it is located horizontally, then the signal will be weak and errors will constantly appear. It is enough to turn the mobile back to normal and the situation is immediately corrected. To combat the plague of incorrect polarization, manufacturers of good mobile devices use several antennas at once located at different angles, which minimizes the problem of orientation in space. However, you should still check your device's antennas, if available, and set them up vertically as directed by the manufacturer. And if the antennas used on the device are removable, then check the quality of their attachment to the case. Sometimes it happens that they are simply stuck into the nests and forget to screw.
Yes, don't forget about the antenna pattern. Not everyone has it in the form of a sphere, the position of the antenna in this case greatly affects the signal level.
Change location
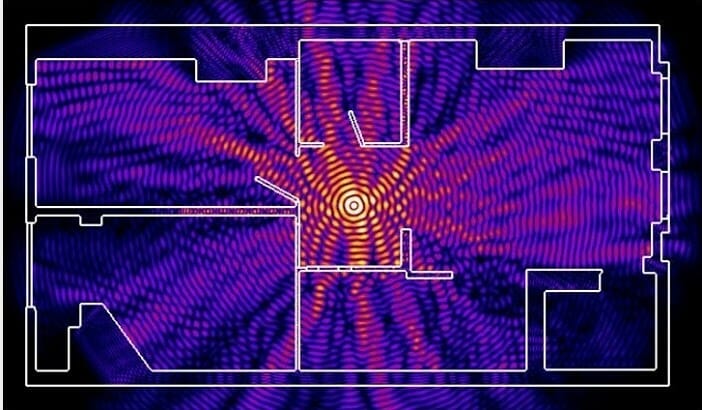
If we are already talking about the location of antennas and devices, then it would not be bad to mention the location of the source of Wi-Fi radio waves itself. It is desirable that nothing touches the antennas. Do not close the router in a metal safe, it is advisable to put it in the center of the covered area. If your floor plan resembles the letter "W", then a router with Wi-Fi is better place everything in the aisle near the center leg, and not in the geometric center. This will give the radio signal a better chance of passing through reflection rather than penetrating reinforced concrete.
In other words, it is worthwhile to approach the choice of the location of the router creatively and meaningfully, and sometimes it is better to spend a little time on test installations of the router in different places, checking the reception quality in all corners. Please note that the shorter the path to each of the points in your room and the fewer obstacles in the path of the radio signal, the better the signal and the quality of Wi-Fi. And do not forget that Wi-Fi involves the exchange of radio signals in both directions, so the location of your mobile devices matters too. Sometimes it is easier to move with your favorite tablet to the side by half a meter than to fence many technical devices in order to improve the quality of signal reception at a specific point in the room.
Change channel or go to high frequency
At the moment, most types of Wi-Fi equipment, one way or another, operate at 2.4 GHz. This is due to the greater penetration of this frequency. But the air at 2.4 GHz is very much clogged with both household equipment and Wi-Fi access points. Many manufacturers of access points and routers implement in their devices the function of automatically switching to the most suitable channel for work. Those. the channel on which the least number of other access points are registered. But this algorithm does not always work out as required and Wi-Fi is distributed exclusively and exclusively on the 1st channel. And if a dozen more networks operate on the same channel in the nearest district, then you won't have to wait for a stable connection with good bandwidth. The fact is that often the channel selection algorithm is triggered only at the moment of initialization of the access point and does not at all track the changes that occur on the air after a week or a month of operation.
Therefore, it is recommended to analyze the air traffic congestion at a time when you feel discomfort in the Wi-Fi network. And try to look for a free channel. The best choices are channels 1.6 and 11. Since they do not overlap in frequency with neighboring channels, an access point operating on this channel will be able to deliver full speed. Nevertheless, if someone already works on these channels in large numbers, then it makes sense to choose the least loaded channel. Yes, most likely, it will overlap with other neighboring networks, but in general the situation will be better than trying to work on a channel in which other networks are already "sitting".
You can use a regular smartphone as a device for analyzing the channel load, just install the appropriate program on it. In some cases, a similar study can be carried out using the access point itself. The channel is configured on an access point or in a Wi-Fi router by changing the corresponding setting in the Wi-Fi settings section.
But if there are very few free channels, especially when there are no channels at all, which is quite consistent with reality in large metropolitan areas, then a network at a frequency of 5 GHz can come to the rescue. Firstly, the penetration capacity of the 5 GHz frequency is noticeably lower than that of 2.4 GHz, which means that even if the neighbors are hung with 5 GHz access points, then their signal will most likely not reach your reinforced concrete cage. And secondly, there are much more channels at 5 GHz than at 2.4 GHz. But for successful use it is 5 GHz and the access point and terminal equipment must be able to work on it. And there should be no reinforced concrete obstacles between the receiver and the transmitter, otherwise the increased frequency will not give any advantage.
Other antennas
Characters unfamiliar with radio amateurism, at the first opportunity, will try to screw more powerful and larger antennas to their access point, in the hope of improving the signal situation. But no, I checked the theory of antenna replacement in real conditions and came to the conclusion that an improved antenna with a normal standard one will not give any advantage. The thing is that manufacturers are also not fools and calculate their standard antennas based on the frequencies used and the powers of the transmitter and receiver at the access point. And a simple increase in size is not enough. Only antennas calculated in advance and coordinated with the transmitter will save the needy in this case.
However, the reception quality situation can still be improved by replacing the antennas. For example, changing the type of antenna and carefully calculating the new antenna for those operating frequencies, including even the channel on which it is planned to use it. The antennas can be spaced farther away, thereby trying to get rid of the obstacles blocking the signal. But not everything is so smooth here either. The cables leading to the antennas will "eat" part useful power and as a result, it may turn out that it has only gotten worse, not better. But the use of directional antennas can save the situation. In such antennas, all power is directed in exactly one direction and the use of such an antenna will improve the situation with sites remote from the access point, but only when located strictly in the antenna beam. Roughly speaking, a directional antenna is useful if you want to connect two local networks located at some distance from each other and without using wires. For example, if you suddenly have a desire, reinforced by "Yaroslavl" or "Bolshoi Theater" in a month, feed your neighbor on the next site with the Internet. By the way, you can look for antennas not only from cunning Chinese, domestic manufacturers are also engaged in the production of quite adequate devices.
But playing with the power of the transmitter is not worth it. Our radio air is not free. All of its frequencies are highly regulated and require a license and permission from the competent authorities to use them. For private traders and organizations, concessions have been made, but only when using strictly defined frequencies and transmitter powers. Some crazy pens may want to assemble a unique amplifier or buy a ready-made one. You can collect and buy something, but the use of such a miracle can threaten with minor troubles, ranging from a fine to the seizure of equipment.
MIMO
MIMO (Multiple Input Multiple Output) technology, based on the use of adaptive antenna arrays, entered the commercial market not so long ago, but was not somehow promoted by marketers and did not enter the heads of ordinary users with a jagged harpoon. The technology is designed to increase the bandwidth of a wireless transmission network through the use of multiple antennas. In addition to increasing the throughput, due to the diversity of antennas in space, the quality of reception is also improved.
But MIMO works only starting from the Wi-Fi n standard. And it is not enough to use only an access point with MIMO, the terminal equipment must be able to work with MIMO technology in the same way, otherwise the transmission speed will be only 150 Mbps. Yes, that's right, as they write on the boxes of modern routers. 150 Mbps with one antenna, 300 with two, and so on, depending on the manufacturer's imagination. But such a channel speed can only be achieved with the appropriate equipment on the receive side.
And I wrote about channel speed for a reason. The numbers that are written on the boxes by manufacturers do not mean at all that at such a speed you will have files flying over the network. No, this is the speed of the physical channel, into which everything contained in the Wi-Fi protocol is crammed, and then everything from all subsequent layers, ending with the file exchange protocol. Yes, the copy speed will be slower than the channel speed, even in ideal reception conditions. In general, the use of MIMO to improve coverage will bring little benefit, although some therapeutic effect from the technology will be observed.
Repeater and WDS
With the help of additional equipment, you can increase the Wi-Fi coverage. This is done in the most competent way with the help of specialized Wi-Fi points access connecting to a local network via Ethernet or any other cable technology. These access points are a professional solution for covering large areas in offices and enterprises. But they also cost accordingly, so we will not consider them further at all, since the budget for the deployment of such systems clearly goes beyond the limits available to the average consumer. Even in spite of the fact that such points are capable of seamless client switching between points, we will still leave them outside the scope of the study due to the excessively high cost. And back to what is available to the layman.
And for the average consumer, there are already two ways to increase the zone of reliable Wi-Fi network coverage easily and without unnecessary wires. We are talking about Wi-Fi repeaters (Repeater) and Wi-Fi repeaters WDS (Wireless Distribution System). And here on the usual, not savvy in the networks and network technologies, a burgher piles on a whole heap of incomprehensible terms and explanations of insecure specialists. Basically, both options do the same thing:
- They connect to the main router via a Wi-Fi network.
- Share Wi-Fi using their hotspot.
And it would seem that there is no difference between the two methods. Nevertheless, it is present, albeit very fragile. Initially, it was understood that a regular repeater can only connect to the main router, otherwise, if it connects to another repeater (or repeater), then it will not be able to correctly route outward to access the Internet. But in practice, clients still go online, even if there are a number of intermediate repeaters between them. Further, the repeater cannot issue internal network addresses. For the main router, it looks like a simple client, and no one gives out several addresses at once to a simple client. But in practice, addresses are issued, and in some cases, repeater clients are full-fledged members of the local network with normal addresses of this network. To solve the above two problems, the concept of WDS was created (not to be confused with WPS). But WDS, due to the lack of a single standard, normally only works in the ecosystem of one manufacturer, so an attempt to connect TP-Link to D-Link using WDS may fail. Plus, WDS requires the same encryption and the same session key on all access points connected to the network using WDS. But the network name (SSID) can be different, as in the case of the repeater.
Some time ago, I described a simple case of increasing network coverage through a TP-Link repeater. The manufacturer does not indicate anywhere whether its device supports connection via WDS or not, although such an item is present in the settings. Apparently all because of some problems in the compatibility of the WDS implementation in equipment from different manufacturers. In any case, even if WDS does not start, there will still be access to the network, since the Repeater mode will remain.
In general, using both the function of a repeater and a repeater with WDS technology is the prerogative of not only specialized Wi-Fi Extenders, all more or less modern routers with Wi-Fi already support the functions of not only a simple repeater, but also a WDS repeater (not to mention others modes such as Access Point or Bridge). This happens for the reason that a modern router is a computer on which a certain and specific software... This software works, in most cases, under the control of a slightly modified Linux system, which opens ample opportunities migration of software modules not only between models of the same manufacturer, but even between devices from different manufacturers. A striking example of this polymorphism is the OpenWRT project. In general, the use of Wi-Fi Extenders is quite justified where it is required to increase the coverage area of \u200b\u200ba Wi-Fi network at no extra cost, although instead of a conventional extender, you can take an inexpensive router with the Repeater or Repeater WDS function.
But each barrel of honey has its own spoon of cranberries. In household devices, routers or Wi-Fi Extenders (extenders or "amplifiers" of a Wi-Fi signal), only one Wi-Fi interface is used. More precisely, only one chip is installed there, capable of operating only on one channel of the same range (2.4 GHz or 5 GHz) at a time. And any attempt to use such devices to increase the Wi-Fi coverage will lead to an increase in the load on the air on the working channel and an overall decrease in the Wi-Fi speed. After all, all data, from the router to the extender and from the extender to the consumer, is transmitted over the same channel. And Wi-Fi can serve only one request at a time. Either receive data from the router, or transmit it to the client. The drop in network performance in this case can be 50 percent or more, it all depends on the network load, the number of clients and the number of extenders between the client and the root router. All of the above is also true for routers acting as an extender, the technology does not change depending on the type of equipment.
To normalize the performance situation, you can use extenders with two chips and capable of operating in the same range on several channels at once (see the option with channel spacing) or dual-band devices that are trained to communicate with a router at a frequency of 5 GHz, and increase coverage at a frequency of 2.4 GHz or vice versa. In this case, a catastrophic drop in performance will not be observed, only the performance of the extender would be enough to service all requests passing through it.
So, as you wirelessly increase your coverage, expect a general decrease in Wi-Fi performance and disconnects when reconnecting from one point to another. Although the last point is highly dependent on the client. Some clients can switch very quickly between points, while others will cling to the old one with their last bit of strength and desperately blunt when trying to connect to a new one. The tears themselves are not so bad, though, as the client software designed to run on mobile devices, and you won't move others back and forth, was designed to work with unreliable media, and hence there is always buffering in them.
Wired AccessPoint
But the best way expanding network coverage I can call using a wired connection of all access points. A cable Ethernet connection is pulled from the main router to all wireless access points. The result is a network with a developed topology and without performance degradation in the Wi-Fi zone. But in order to avoid a drop in performance, and in general, work in a Wi-Fi network was comfortable, you need to follow these simple recommendations.
The signal overlap of access points should be about 30 percent so that there are no problem areas where there is no signal at all. But at the same time, there should be no zones where the signal strength from two or more access points is too high. In such zones, some, not the most reasonable, Wi-Fi clients may not really work at all, they will continuously connect to one access point then to another. You can find out the signal levels using an ordinary smartphone with an installed application that displays the signal level, or with a laptop and the ping command launched in a loop on the gateway of your network. And you can adjust the coverage either by moving the access points relative to each other, or by changing their power, if such a function is available.
It is recommended to separate neighboring points into different channels so that mutual interference does not occur. If the territories served by the access points are small and consist of single rooms, then it makes sense to think about access points operating only at 5 GHz. Of course, all clients must be able to operate on this frequency.
To facilitate switching between access points when moving between them, it is recommended to also set the same SSID of access points, the same passphrase and encryption types. Otherwise, switching may take longer than if the specified conditions are met.
Yes, you will have to pull a separate cable to each access point. Yes, these are additional costs, and yes, in some cases, it is completely impossible to run the cable to the place of installation of the access point. But only using a wired access point will allow you to get as close as possible to the professional result of increasing Wi-Fi coverage. Although, in especially difficult conditions, it is quite acceptable to combine wired and wireless methods to increase coverage.
Switch to AC
Some experts from networks do not forget to mention the transition to a relatively fresh Wi-Fi standard described by IEEE 802.11ac. Say in this standard there is a so-called beamforming or spatial filtering. But regardless of the name, the essence of this technology is to change the power emitted in different directions.
A conventional Wi-Fi antenna installed on a router emits a signal in all directions with a uniform power. And in the ac standard, it became possible to change the power directivity pattern depending on the need. So, for example, if a Wi-Fi client is located in some specific side of the router, and there is no one in other directions, then it makes sense to redirect all the power exactly in the direction where the client is located. This increases the reliable coverage of ac-standard Wi-Fi.
But here it should be borne in mind that beamforming appeared for the n standard (beamforming occurs on an array of MIMO antennas). However, it has not been standardized and in practice there is incompatibility between devices from different manufacturers. Moreover, the beamforming technology only works at 5 GHz, which severely limits its use for directly increasing coverage.
The switch to the ac standard, of course, is worth it, but you will not expect much increase in coverage from it. And not all clients are supported by the latest trends.
Trying in practice
After getting a little familiar with the theory, it's time to move on to practice. In my country house, one Wi-Fi Extender already works, which acts as a wireless adapter and feeds the Internet to a smart TV from LG. It's not that LG's technology is not at all able to get the Internet out of thin air, but it does it in a completely unprepossessing way. Therefore, connecting smart TVs from LG to your network is only and exclusively via cable. At least with the use of a Wi-Fi extender operating in the wireless Wi-Fi adapter mode.
It remains to solve the problem of stable reception in the garage and in the gazebo. The problem with the garage is due to the fact that it is quite long and like a house with a metal roof. In order for the signal from the router from the second floor to reach the garage, it needs to pierce one, and in some moments even two, reinforced concrete floors and masonry. In some corners of the garage, the signal from the router is extinguished until the network is completely inoperable.
With the gazebo, the situation is slightly different. The metal roof of the house descends slightly below the overlap between the first and second floors. And even if you install the router on the floor of the second floor, it still reliably blocks the signal towards the gazebo. The layout does not allow installing a router on the first floor, and after all, a few more twisted pair cables will need to be brought to the router to connect other equipment, which will cause even more problems due to the cable laying in the stone part of the house, where the cables will have to be routed in an unknown manner.
Therefore, I chose the option of increasing the coverage and improving its quality using wired access points. To do this, a separate twisted pair was connected to the garage, from the nearest switch (switch), and from the garage, one more end of the twisted pair was laid underground to the gazebo. Accordingly, I had two points for installing wired access points: a garage and a gazebo. Moreover, the garage is not heated and is heated only by the heat of a gas boiler, and the gazebo is generally considered open air.
We implement on Tenda
Initially, I had my eye on Tenda N301 routers due to their unique low cost. Each of the two copies cost me about $ 12. Even if nothing of my idea would work, it would not be so sorry. Each N301 router is cheaper than other Wi-Fi extenders and routers from other manufacturers. And all this is in full compliance with local legislation and without the need to wait a month until the device arrives from the Middle Kingdom.
The N301 is uniquely simple. On board it has two interestingly shaped antennas, one WAN port with a speed of up to 100 Mbps and three LAN ports with the same performance. The body of the device is miniaturized, and does not get warm at all in operation. The manufacturer promises a maximum Wi-Fi transmission speed of 300 Mbps with support for the n protocol, it is obvious that this speed is achieved using MIMO technology. The device is assembled around a SoC (System on Crystal) chip from Broadcom BCM5357. The chip was specially made for the production of various routers and compatible devices and contains almost everything that is required for the operation of a router. The manufacturer can only think of a case, solder LED indicators, and upgrade the firmware for himself. And that's it! By the way, similar chips are used not only by Tenda, but also by other manufacturers (Belkin, Netgear, Asus, D-Link) for their devices in the lower price range.
That's just a little puzzling, what will the router distribute at a speed of 300 Mbit / s over the radio channel if any of the wired ports gives out a maximum of 100 Mbit / s? Waste money again? In addition, Tenda positions its device as very easy to set up. Well, let's see. The specifications of the router state that it supports WDS and it does support it. But our task is to turn Tenda N301 into a wired access point, and not to force the broadcast with unnecessary traffic.
Due to the simplification of the router configuration, the manufacturer simply threw out everything that does not belong to the declared characteristics. It does not have a separate bridge mode or access point. Therefore, I had to go around a little bit to turn the Chinese miracle into what was required of it.
So. Initially, we configure the access point. We set the SSID of the network, the type of encryption, and the passphrase in exact accordance with what is set on the main router. Then we stay at the fork. Since the n301 does not have an access point function, it can work in two modes: a regular router or a switch. To work as a regular router, we connect an Ethernet cable from the main router to the WAN port. In this case, all clients connected to the n301 will find themselves in a separate, isolated from the main network. Yes, they will be able to access the Internet, but they will not be able to connect to devices on the n301 network from the rest of the local network. For me, this turned out to be a significant disadvantage, and I tried to implement another option.
To enable switch mode, and unmanaged, but distributing Wi-Fi, you need to turn off the internal DHCP client in the Tenda settings and connect the Ethernet cable from the main router to port 1 (not to be confused with the WAN port). In this case, the device starts working exactly as required. It acts as a wired access point as well as a three-port unmanaged switch. Clients connected via cable or Wi-Fi to the n301 are accessible from the rest of the network and can access the Internet themselves.
But this solution has a small drawback. The router turns into an uncontrollable piece of plastic, silicon, copper and hot melt glue. It is no longer possible to connect to it, it is not visible on the network, it does not receive an IP address and does not exist at all. But it works nonetheless. It works until you need to change the passphrase or perform some other action that requires you to change the settings to Tenda. Such a turn did not suit me, and I turned towards the devices from ZyXEL.
We implement on Zyxel
In the line of routers from ZuXEL, there are also inexpensive routers, which, of course, are more expensive than Tenda N301, but still cheaper than individual wired access points and Wi-Fi Extenders. Moreover, buying a full-fledged router and turning it into a wired access point, along the way, you also get a switch for several ports. But my head router is ZyXEL, the famous Giga II. So the choice of the second reincarnation fell on the ZuXEL brand for a reason.
The Taiwanese company Zyxel was born already in 1989, and since 1992 it has had an official representative office in Russia. Therefore, the company's specialists are familiar with domestic specifics firsthand. Many more eminent manufacturers will envy the support service from the Russian division of the company. So, to expand the network, I chose ZyXEL Keenetic Start and ZyXEL Keenetic Start II. The layman will note that Start and Start II differ, the number of antennas, the maximum transmission speed over Wi-Fi, for Start II it is 300 Mbit / s, versus 150 Mbit / s for just Start, and the number of wired ports, 5 for just Start and 2 at Start II, and there and there the network is purely 100 Mbps. And again we are faced with a situation where the wired interface of the Start II is three times "slower" than the wireless one. Marketing is a great force, although, most likely, when connected to Start II, you will be able to swing the transmission up to network 100 Mbps. If you dig a little deeper, then the devices also differ in the filling, they have different processors and different amounts of memory. In general, Start II will be more powerful than Start. But for my purposes, Start is ideal for installation in a garage, and Start II for a gazebo.
Both devices run the proprietary NDM operating system and are configured identically. True, the sturgeon with Start will have to be cut, all modules simply do not fit into it due to the modest amount of memory, although we only need repeater modules and support for cloud connections. The latter is needed to remotely control a router with mobile phone... Many parameters cannot be controlled through the application, and even when switching to the wired access point mode, the ability to control the router from the application, when connected not through it, disappears. Nevertheless, cloud management does not take up a lot of memory and will not be superfluous.
So, the first step is to update the firmware in the router. This simple procedure is performed directly from the web interface. It is advisable to install the latest stable version and not forget about the access point module. Then, if desired, we connect cloud management, bind your smartphone with the installed application to the router. Next, switch the router to access point mode. After that, we set up Wi-Fi, not forgetting about the SSID, the channel (different from the channel on the router), we select the signal strength. At the output, we get a managed switch with five ports with a managed access point. We connect the Ethernet cable from the main router to any port of the newly created access point, but I used the WAN port so as not to get confused later.
In operation, the resulting network is much softer than using Tenda. Well, firstly, you can go to Keenetic Start, the access point is assigned a separate IP address, moreover, it can be seen as a link and in the interface of the main router. Second, switching to an access point is faster. With the Tenda option, I had to go to the farthest corner of the garage and only then did my smartphone switch to Tenda, and so it tried to keep in touch with the main router.
That's all, actually. I cannot say that I did not like the Tenda N301 routers. But still, working with ZyXEL is much more pleasant. I have no doubt about the reliability of both those and other routers, because modern electronics, especially such a simple one as a router, is very, very reliable. Firmware in routers contains much more errors than glitches in hardware.
Conclusion
And in conclusion, a few words about the environment in which the routers have to work. I already mentioned that one router will be installed in a garage without heating, and another one on the street altogether. All household routers are declared to work at temperatures not lower than 0 degrees, and not higher than 40. But in reality, the critical parameter here is not temperature, but humidity. When the router is working, it heats up slightly and in some cases moisture may condense on the board. Which leads, sooner or later, to the failure of the router. Therefore, in conditions of high humidity, for example, outdoors, where the relative humidity is often under 100 percent, the router must be installed in a plastic box or box. I know of cases where routers have been working for years on the street, being installed in a cardboard box, pasted over with tape. Remember, any shelter that protects from rain, more or less sealed and with the lowest power source of heat inside, will create a sufficient microclimate for the safe operation of the router. As for the garage, the humidity there is regulated by the heat from the working boiler, and it never exceeds dangerous limits. Moisture does not condense.
Another risk factor is electromagnetic impulses from lightning discharges. Lightning striking nearby leads to the shutdown of some RCDs, since the electromagnetic pulse can be so strong that it will induce a current in the wiring to the level of operation of the RCD. Household routers, as a rule, are not equipped with protection against lightning discharges and lightning can cause "burnout" of both individual sections of the network and all network equipment. Alas, even disconnecting from the high voltage network will not help here, since dangerous voltage can appear, hover, in Ethernet cables. This is especially important given the length of data transmission networks. And even a cable buried in the ground may not help. But in this case, when a dangerous voltage arises in the Ethernet cable from a lightning discharge that can damage the network equipment, then other electrical equipment is guaranteed to suffer, since the power circuits will turn up no less electromagnetic shock than the data cable.
To protect against thunderstorm effects, it is reasonable to apply various types of protection for data transmission networks, this is especially true for overhead lines. It is also reasonable to use a shielded cable, securely covered with a metal sheath, which must not be forgotten to be grounded, which protects against the induction of currents in the data conductors. Protection against electrical storms will also be useful. It is advisable to use at least a conventional UZM capable of disconnecting consumers from the network when the threshold voltage is exceeded. By the way, not only thunderstorms are dangerous for overhead lines, but also weather conditions that can electrify the cable with the accumulation of a significant electrostatic charge on it. Such conditions include dry snow or a dust storm, when individual particles rub against the cable, like a woolen scarf against an ebony stick.
But I consider it necessary to expand this topic. Often, we buy expensive wi-fi routers, hoping for decent performance, but the quality of the wireless home network still leaves much to be desired. We need to make some transformations that will help increase the range wifi network and signal strength.
The problems of optimizing wireless networks are especially relevant now, when most modern devices offer support for wireless communications: smartphones, tablets, TVs and laptops. After all, they all can simultaneously connect to the home wi-fi network, so it should work stably and quickly. Many older wireless routers are unable to provide an acceptable connection quality because of their limited capabilities. This article will tell you about methods and special equipment to ensure reliable reception of a wi-fi router at a distance of up to 100 m and more.
The first thing to take care of is choosing the right place for the location of the wi-fi router and other devices on the network... This is an important measure when setting up a wireless network at home. To begin with, find the optimal placement point for your wireless router in an apartment or house and check that all network clients can confidently receive a signal, since the effectiveness of any wireless connection will always match the level of the weakest link in the chain. Do not ignore the possibility of using additional devices, as they can expand the boundaries of the network wirelessly or wired. This is especially true if your apartment (house) has thick walls or you need distribute wireless internet to several floors.
There is also a pretty simple way assemble a directional antenna for a wi-fi router with your own hands... Such an antenna is capable of increase the range of the wi-fi network... If from the proposed options nothing is suitable or did not help, for example, you want to use the Internet in the courtyard of a country house, then we will consider the option with microwave antennas. Their application allows solving many problems related to the range of a wi-fi networkbecause the wireless signal spreads evenly in all directions and attenuates in proportion to the square of the distance.

Briefly about the principle of operation of such antennas
Radio relay antennas collect the signal into a beam and radiate it in one direction, so the wireless network works stably even at a decent distance.
1. Finding the best place to install a wi-fi router
To achieve reliable wireless performance, you need to find the correct mounting locations for all components and select a channel that is not susceptible to interference.
Selecting a free channel for a wi-fi network. Wireless interference
Extraneous radio signals, which may be from a neighbor's router or baby sitter, are background noise for our wireless network, which it constantly fights against. Wi-fi routers of neighbors are especially often causing problems with a wireless network.
The solution to the problem with a neighbor's router is simple:
- Select the channel (frequency range) with the least amount of interference using the inSSIDer program.
- Click on the 2.4 GHz Channels tab to find out which channels are occupied by devices.
- Select the channel with the least interference in your wireless router settings.
Attention! If the router and all receiving devices support the 5 GHz frequency band, switch to it and check the wireless connection.
Note that there is less interference at this frequency, but sometimes you have to put up with a slightly shorter signal range and a worse ability to pass through walls. I note right away that this feature is not true for all routers that support 5GHz.
Placement of the router: put in the center
The best option for creating a reliable wireless network is to connect all devices to the router directly, without intermediaries. To achieve this, place the router in the center (if possible, with some errors relative to the geometric center). Thus, it will be surrounded by all clients that will be connected to the router.
Be sure to consider walls, furniture, and other obstructions. In open space, the signal is practically not exposed to negative effects, but it weakens strongly, passing through them. Therefore, you need to install the router closer to the devices behind the wall. To obtain the largest radius wifi signal router, it should be in an elevated place. Choosing too low a position, you will jam the signal with various kinds of obstacles.
Weak link network testing to verify
After you have taken the aforementioned optimization measures, I recommend testing the operation with a device that is farthest in the house or behind several walls, and also has a small antenna. In this case, the rule applies: the higher the receiving antenna is, the more efficient the communication with the router .
Direction of antennas of wireless devices
Antennas emit a signal in circles that are oriented in space perpendicular to the axis of the antennas. The optimal location to achieve good coverage is multidirectional - for devices with 2 or more antennas. In general, try to rotate the antenna so that its axis is perpendicular to the direction of the client device with the worst reception quality. If the antennas are built into the router, try turning or moving the device a few centimeters to the side, while checking the result.
Optimization of wi-fi connection
As I said above, the reception quality can change dramatically if you move or unfold the router or wi-fi adapter (card) that is responsible for reception a little. Even a slight twist or shift of your router, laptop, or other receiving device can dramatically increase or decrease the signal quality. You can measure the speed of the wireless network using the JPerl program. You need to run it on a computer connected with a LAN cable, and on wireless device (for example, a laptop) acting as a client, measure the connection speed after each change.
Replacing an old router with a new one
Upgrading your wi-fi router will not be superfluous if your wireless router only supports 802.11g, as it makes sense to purchase a more powerful 802.11n-compatible router.
If you are using a DSL Internet connection, it is worth purchasing the model with a built-in DSL modem. In this case, you only need to enter your data for Internet access, issued by your provider, as a result, the device will automatically connect to the Internet. An old 802.11g router comes in handy too; it can be used as a repeater.
Let's say you bought a new wi-fi router. Now you need to configure it, 2 articles that I indicated at the very beginning of this material will help you with this. If you saved money and bought a router without a DSL modem, then the modem role can be transferred to an old device. To do this, configure it to work as a modem, according to the user manual. After that, connect the WAN connector (connector for connecting to the Internet access channel) of the new router with the LAN port of the old one.
Using an old router as a repeater
If your new 802.11n router has a built-in modem, then I recommend using the DD-WRT firmware developed by the Open Source community, you can tune old router as a repeater (repeater)... Check this page to see if support for your model is available. There you will find the firmware suitable for your device, as well as installation recommendations. In most cases, to install DD-WRT firmware on the router, use the update item provided by the original firmware.
After installing the firmware and rebooting the router, enter its web interface.
- In the login field enter: root
- In the password field, enter: admin.
Configuring Repeater Bridge Mode on a Router
Connect the old wi-fi router with the installed DD-WRT firmware with a LAN cable to the computer. In the future, the extender will connect to the wireless network of the main router as a client and redirect the signal via wired or wireless connection to other client devices. To implement this, in the Wireless / Basic Settings section you need 0 configure the "Repeater Bridge" mode... All network settings, such as network mode, network name and wireless channel must be the same as those of the main router. In the "Virtual Interfaces" section, add one more wireless network under a different name (for example, by inserting. Repeater at the end of the name) and then configure it.
How to increase the range of a wi-fi router
Choosing a place to install the repeater (repeater)
The easiest way increase wireless coverage - using a wireless repeater or repeater, especially if it is offered by the same manufacturer as the router. Place it in such a way that it is located in the area where the router's signal can be received. The setup includes only a few simple operations. The disadvantage is that the maximum bandwidth of a router operating in repeater mode is halved.
Powerline adapters
In order for the router to cover other floors in your house, I recommend using a network extender based on Powerline adapters that transmit the network signal through the wiring. You can use the dLAN 200 AV Wireless Nvon devolo model. Connection: connect one adapter to the LAN port of the router, and the other with the wireless access point function connects to any outlet in the house. You can read more about Powerline adapters for a wired network (without access point function).
Network Extender Configuration: You can use the supplied software to configure the basic parameters of a set of Powerline adapters. If you need to change the wireless settings, open the adapter web interface using the program.
Attention! When increasing the transmission power through the web interface of the router, do it in stages, as this may affect the signal quality.
Choosing the correct position for receiving devices
Besides choosing the optimal position of the router, do not forget about the device that receives the signal. After all, even small changes in position can significantly affect the result. Take a laptop for example. Position the laptop so that the display cover that houses the antenna is facing the wireless source. Then move or rotate the device slowly, this way you recognize how to find the optimal signal reception area... You can also check the result using the inSSIDer program (link above).
Using a USB extension cable
A long antenna cable can negatively affect the quality of reception, while a USB cable up to 5m long will not cause such problems. Therefore, it makes sense to place the wireless USB adapter within the wireless coverage area using a long USB cable. With the holder that comes with many USB adapters, the device can be fixed at a specific height to get more reliable reception from the router. Using a USB extension cable will be a good option for a room remote from the router. For example, I used it in my bedroom for a mini-ITX computer.
Internal cards for connecting a PC to a wireless network
It's no secret that for desktop computers Expansion boards with a Wi-Fi module are available, however, due to their internal location, antennas, as a rule, are hidden under the table or behind the wall of the cabinet. In my HTPC, I used this option, since there was no back wall in the shelf under the equipment. If the antennas cannot be removed, then a more effective and affordable solution would be USB wireless adapter. A good model is TP-Link TL-WN822N, since its antennas can be deployed in the desired direction, and placed not only behind your system unit.
In this section, we will talk about small hand-made devices and not only, which you can significantly increase the range of your wireless network.
DIY parabolic mirror... As you already know, the antennas of the router radiate a signal in uniform circles, and the parabolic mirror will collect this signal into a beam and transmit it in a certain direction. All you need is scissors, foil, paper and glue. The mirror must be put on one of the antennas of your router and turned towards the receiving device.
Using an optional antenna
Now it is easy to find special antennas in computer stores, which, due to their size and shape, are capable of providing a higher quality signal transmission than antennas built into a wi-fi router.
Their main advantage is that the cable allows one or more antennas to be placed at an elevated point.
Installing an external wireless antenna
For owners of country houses who spend a long time in the yard and want to use wireless Internet, an external antenna will come to the rescue. A good option is TP-Link TL-ANT2409B, which can improve signal reception. You will need to fix the antenna on an external wall, connect it to your wi-fi router. Remember that the antenna should be directed in the direction where you want to ensure reliable reception, so if possible, fix it on an elevated point.
When purchasing an antenna, pay attention to cable shielding, as the signals transmitted through the antenna cable are subject to interference. The quality of the cable can be determined by the attenuation ratio, measured in dB. Good cable length 5m should not have an attenuation coefficient of more than 3dB.
Using a Wi-Fi Parabolic Antenna
Parabolic antennas are designed to transmit a wireless network signal between two similar antennas over a distance of several kilometers. If you need to transmit a signal over a distance of more than 100 m, then this is the solution to your problem.
Directional parabolic antennasit is used to connect client Wi-Fi devices located at an average and long distance from the central access point, or to build Wi-Fi connections point-to-point type. As a rule, such an antenna has a gain of 24 dB in the frequency range 2.4 - 2.5 GHz and is used for receiving and transmitting electromagnetic waves with vertical or horizontal polarization. Parabolic Wi-Fi Antenna Designconsists of a log-periodic feed in a robust housing, which is attached to a reflector with a mesh structure (to reduce windage and the total weight of the antenna). As standard, the antenna has a 1 meter microwave cable with a connector N-type (N type female).
We analyze the question as with our own hands strengthen the signal of the routerand thereby increase radius of action networks and wifi range... Sooner or later, he begins to bother everyone who is faced with the organization of a wireless connection in the apartment. The problem of extending the Wi-Fi reception distance is especially acute when, even at the stage of creating a local network at home, you spared money for a high-quality router with a large wifi range, with a powerful transmitter and antennas. Or they did not think over the place of its installation in your house or apartment.
Available ways to strengthen the signal of a wi-fi router at home
In fact, it is very simple and easy to amplify a wifi signal from a router. And it doesn't matter which manufacturer - Zyxel Keenetic, TP-Link, Asus, D-Link and so on.
There are several of the most popular ways:
- Buy a router with a more powerful built-in antenna,
- Place it somewhere in the hallway in the center of the apartment,
- Use one of the means of amplifying the wifi signal - the second router, external antenna, repeater.
Many, during repairs in an apartment, determine the location of the router somewhere in a special server room, either in a dressing room or in an electrical panel. In short, out of sight. But the configuration of the layout of the apartment is often such that the wireless signal from the router does not finish up to the rooms remote from the installation site. Or, the range of wifi is not sufficient to get any acceptable speed on it.
Today we'll talk about ways to strengthen the signal and increase the range of a wifi router at home. And also about the required technical characteristics of the main devices for organizing a wireless network - a router and a receiver - which should be paid attention first of all when purchasing them.
Increase the range of the signal of the wifi router and adapter
For stable network operation in a standard city apartment, the simplest router and an adapter built into a laptop are quite enough. However, there are many side factors due to which you have to amplify the signal to increase the signal radius. I talked about the main reasons that can affect the speed. Let's not repeat ourselves, but imagine that we have ideal conditions in our house for the propagation of a wireless radio signal. That is, there is no interference from neighboring routers and other active frequency emitters, such as a microwave. Under these conditions, the main function of signal absorption is taken over by the distance and obstacles on the way from the source to the receiver.
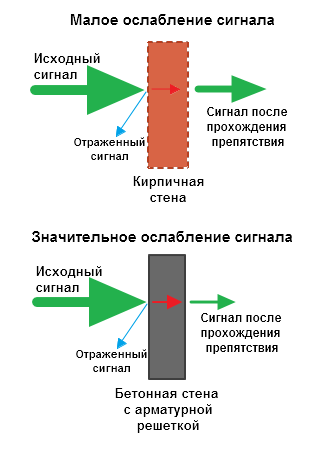
This table clearly demonstrates how much the signal quality will be lost depending on the types of obstacles in its path. For example, let's take an abstract router, which in the best conditions and without interference and obstacles will actually transmit a signal over 100 meters. It is under such conditions that manufacturers indicate the "firing" range of their devices on beautiful boxes and in advertising brochures.
And let's take a typical three-room apartment, where the router is installed in one room. At the same time, there is one load-bearing concrete wall and one interior wall to the farthest from it. Accordingly, we take 10% of our 100 meters - we get 10 meters. That is, through the main wall, the signal will be enough for 10 meters from the router. But we also have an interior wall - so we take our 10 meters and calculate 15% of them - we get 1.5 meters. This means that even in ideal conditions, the signal from such a router is clearly not enough for the whole apartment. Add to this the interference from devices and other wireless networks on the same frequency, and we get a completely sad picture.
We also bear in mind that the antennas on the router are omnidirectional, that is, the signal from them goes in a circle at an equal distance.
Strengthening a wifi signal from a router using an antenna
So, we found out that for good reception, the router should be located in the center of the apartment, next to the receiving device and, if possible, away from devices that create interference. But like any electronic device, each model has its own characteristics that can affect the operation, in our case, the “firing range”. As a rule, the specifications for each product indicate what range it is designed for in an open space under ideal conditions. But these data - reading theory, but in real life they are simply unattainable.
The easiest way to determine signal quality is by looking at the antenna characteristics of the devices. One for transmission, one for reception. Antennas can be either hidden, built-in, or external, screwed onto the device itself. Antenna power is measured in DBI. The higher the value, the more powerful the antenna.
Below is a sample of the USB receiver adapter with the supplied external antenna.

If you paid attention, there are models of routers and adapters that have several antennas - two or even three. Using a few pieces, you can significantly improve the reception quality of the wifi adapter and increase the distance from the router. That is, a router equipped with one 8 dbi antenna will relay weaker than a model more high level and cost equipped with 2 or 3 antennas of 8 dbi.

When choosing a receiver, also look at the values \u200b\u200bof the “Receiving mode” parameter - the higher it is, the better the reception.
However, even this will not be enough if we are talking about a decent distance of up to 100-150, or even 500 meters. In this case, it will help us to provide the desired radius of the wifi signal, which works directed to a certain sector.
Increasing the radius of the wi-fi signal with a second router, repeater or access point without an antenna
- Another proven method to improve reception quality is to use a separate special device called a repeater. It is a signal amplifier based on the repeater principle that allows you to expand your existing network. It receives the signal and transmits it further, expanding the coverage area by 15-20 meters.
- Another option is to put a more expensive one. It is installed outdoors or indoors and provides a wifi coverage radius of up to 100 meters. Able to provide coverage both inside the building and a small area nearby. There are also models that work in a narrowly targeted way to expand the area not inside an apartment or house, but to create a rather large wireless bridge between different buildings.
- Alternatively, you can use. For example, if you have additional devicelying idle, it is advisable to use it as a repeater so as not to buy new equipment. In this case, this repeater mode must be present in the firmware on the other router.
Adjusting the range of the wifi signal in the router settings
And one more little secret. In the control panel of some modifications of routers, there is a separate adjustment of the power of the wifi signal relay. By setting it to the highest, you will get the most out of your router. The minimum value will provide high-quality reception no further than inside one room. Read more about this. And now I will quickly show you with a few examples how it looks for different brands.
Strengthening wifi signal on TP-Link router
To set the signal strength on the TP-Link router, you need to go to "Advanced settings" in the section on wireless mode. There are three grades here - low, medium and high.

Asus
On Asus routers, you can adjust the power very finely - it is called "TX Power Power Control" and is set manually in a numerical value not exceeding 200.

Zyxel Keenetic
For Zyxel Keenetic routers, the transmitter power setting is divided into fixed positions, but there are more of them than for TP-Link. Denoted as a percentage of total strength wifi repeater... AT old version the admin area is in the wifi network configurations.

And this is how everything looks in the new Keenetic panel - you need to go to the "Home network"
Tenda

These are the main effective ways to improve the WiFi signal and, as a result, expand the coverage area of \u200b\u200bthe wireless network. Many craftsmen manage to strengthen the router using a regular tin foil can, which is put on the antenna. However, I am still an adherent of more traditional methods. Practice has shown that the best results are achieved when a combination of several techniques is used. That is, the choice of devices with best performance antennas plus their good location, planned at the stage of renovation of the premises. Try it, experiment, and you will succeed!
A weak WiFi signal is an urgent problem for residents of apartments, country houses and office workers. Dead zones in the WiFi network are characteristic of both large rooms and small-sized apartments, the area of \u200b\u200bwhich is theoretically capable of covering even a budget access point.
Radius wiFi actions a router is a characteristic that manufacturers cannot clearly indicate on the box: the WiFi range is affected by many factors that depend not only on the technical specifications of the device.
This article presents 10 practical tips to help eliminate the physical causes of poor coverage and optimize the range of a WiFi router, it's easy to do it yourself.
The radiation of the access point in space is not a sphere, but a donut-shaped toroidal field. For WiFi coverage within one floor to be optimal, radio waves must propagate in a horizontal plane - parallel to the floor. For this, the antenna can be tilted.

The antenna is the "donut" axis. The angle of signal propagation depends on its slope.

When the antenna is tilted relative to the horizon, part of the radiation is directed outside the room: dead zones are formed under the plane of the "donut".

A vertically installed antenna radiates horizontally: indoor coverage is maximized.
On practice: Place the antenna vertically - the simplest way optimize indoor WiFi coverage.
Place the router closer to the center of the room
Another reason for the occurrence of dead zones is the poor location of the access point. The antenna emits radio waves in all directions. In this case, the radiation intensity is maximum near the router and decreases as it approaches the edge of the coverage area. If you install the access point in the center of the house, then the signal is distributed among rooms more efficiently.
A router installed in a corner gives off some of the power outside the house, and distant rooms are at the edge of the coverage area.
Installing in the center of the house allows for an even distribution of signal in all rooms and minimizes dead zones.
In practice: Installing an access point in the "center" of the house is far from always feasible due to complex layout, lack of outlets in the right place or the need to lay a cable.
Provide line of sight between the router and clients
WiFi signal frequency is 2.4 GHz. These are decimeter radio waves that poorly bend around obstacles and have low penetrating power. Therefore, the range and stability of the signal directly depend on the number and structure of obstacles between the access point and clients.

Passing through a wall or ceiling, an electromagnetic wave loses some of its energy.
The amount of signal attenuation depends on the material that the radio waves travel through.

* Effective distance is a value that determines how the radius of a wireless network changes compared to an open area when a wave passes an obstacle.
Calculation example: A WiFi 802.11n signal propagates in line-of-sight conditions over 400 meters. After overcoming the non-capital wall between the rooms, the signal strength decreases to 400 m * 15% \u003d 60 m.The second wall of the same kind will make the signal even weaker: 60 m * 15% \u003d 9 m.The third wall makes signal reception almost impossible: 9 m * 15 % \u003d 1.35 m.
Such calculations will help to calculate the dead zones that arise from the absorption of radio waves by walls.
The next problem in the path of radio waves: mirrors and metal structures. Unlike walls, they do not attenuate, but reflect the signal, scattering it in arbitrary directions.

Mirrors and metal structures reflect and scatter the signal, creating dead zones behind them.

If you move the interior elements that reflect the signal, you can eliminate the dead zones.
In practice: It is extremely rare to achieve ideal conditions when all gadgets are in line of sight with a router. Therefore, in a real home, you will have to work separately to eliminate each dead zone:
- find out what interferes with the signal (absorption or reflection);
- think over where to move the router (or interior item).
Place the router away from sources of interference
The 2.4 GHz band does not require licensing and therefore is used for the operation of consumer radio standards: WiFi and Bluetooth. Despite its low bandwidth, Bluetooth can still interfere with the router.

Green areas - stream from WiFi router. Red dots - bluetooth data... The proximity of two radio standards in the same band causes interference, reducing the range of the wireless network.
The magnetron of the microwave oven emits in the same frequency range. The radiation intensity of this device is so great that even through the protective screen of the oven, the magnetron radiation is capable of “illuminating” the WiFi router's radio beam.

Microwave oven magnetron radiation causes interference on almost all WiFi channels.
On practice :
- When using Bluetooth accessories near the router, turn on the AFH parameter in the settings of the latter.
- The microwave is a powerful source of interference, but it is not used as often. Therefore, if it is not possible to move the router, then it will simply not be possible to make a Skype call while making breakfast.
Disable support for 802.11 b / g modes
WiFi devices of three specifications operate in the 2.4 GHz band: 802.11 b / g / n. N is the latest standard and offers greater speed and range than B and G.

The 802.11n (2.4 GHz) specification provides longer range than the legacy B and G standards.
802.11n routers support previous WiFi standards, but the mechanics of backward compatibility are such that when a B / G device, such as an old phone or a neighbor's router, appears in the range of an N router, the entire network is switched to B / G mode. Physically, the modulation algorithm changes, which leads to a drop in the speed and range of the router.
In practice: Switching the router to “pure 802.11n” mode will definitely have a positive effect on the quality of the coverage and throughput of the wireless network.
However, B / G devices will not be able to connect via WiFi. If it's a laptop or TV, they can be easily connected to the router via Ethernet.
Choose the optimal WiFi channel in the settings
Almost every apartment today has a WiFi router, so the network density in the city is very high. Signals from neighboring access points overlap each other, draining energy from the radio path and greatly reducing its efficiency.

Neighboring networks operating at the same frequency create mutual interference, like circles on water.
Wireless networks operate within range on different channels. There are 13 such channels (in Russia) and the router switches between them automatically.
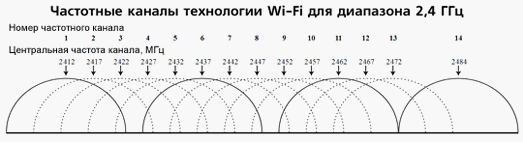
To minimize interference, you need to understand which channels the neighboring networks operate on and switch to a less loaded one.
Detailed instructions for setting up a channel are presented.

In practice: Selecting the least loaded channel - effective method expand the coverage area relevant for residents of an apartment building.
But in some cases, there are so many networks on the air that no channel gives a tangible increase in speed and wiFi range... Then it makes sense to turn to method number 2 and place the router away from the walls bordering the neighboring apartments. If this does not bring results, then you should think about switching to the 5 GHz range (method no. 10).
Adjust the transmitter power of the router
The transmitter power determines the energy of the radio path and directly affects the range of the access point: the more powerful the beam, the farther it hits. But this principle is useless in the case of omnidirectional antennas for household routers: wireless transmission there is a two-way data exchange and not only clients must “hear” the router, but vice versa.
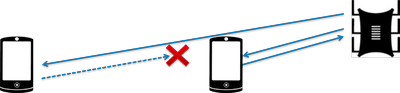
Asymmetry: the router "reaches" mobile device in the back room, but does not receive a response from him due to the low power of the smartphone's WiFi module. The connection is not established.
In practice: The recommended value for the transmitter power is 75%. It should be increased only in extreme cases: the power turned 100% not only does not improve the signal quality in distant rooms, but even worsens the stability of reception near the router, since its powerful radio stream “clogs up” the weak response signal from the smartphone.
Replace the original antenna with a more powerful one
Most routers are equipped with standard antennas with a gain of 2 - 3 dBi. The antenna is a passive element of the radio system and is not able to increase the flow power. However, increasing the gain allows you to refocus the radio signal by changing the radiation pattern.
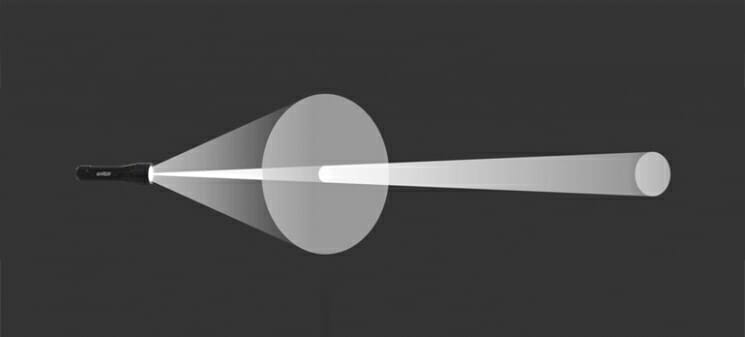
The higher the antenna gain, the further the radio signal propagates. In this case, the narrower stream becomes not like a "donut", but like a flat disc.

There is a large selection of antennas for routers with a universal SMA connector on the market.


In practice: Using a high gain antenna is an effective way to expand the coverage area, because simultaneously with the signal amplification, the antenna sensitivity increases, which means the router begins to “hear” remote devices. But due to the narrowing of the radio beam from the antenna, dead zones arise near the floor and ceiling.
Use signal repeaters
In rooms with a complex layout and multi-storey buildings, it is effective to use repeaters - devices that repeat the signal of the main router.


The simplest solution is to use an old router as a repeater. The disadvantage of this scheme is half the throughput of the child network, since along with the client data, the WDS access point aggregates the upstream from the upstream router.
Detailed instructions for configuring the WDS bridge are presented.

Dedicated repeaters are free from bandwidth cuts and are equipped with additional functionality... For example, some models of Asus repeaters support the roaming function.

In practice: No matter how complex the layout is, repeaters will help you deploy a WiFi network. But any repeater is a source of interference. With free air, repeaters do their job well, but with a high density of neighboring networks, the use of repeater equipment in the 2.4 GHz band is impractical.
Use 5 GHz band
Budget WiFi devices operate at 2.4GHz, so the 5GHz band is relatively free and has little interference.

5 GHz is a promising range. It works with gigabit streams and has an increased capacity compared to 2.4 GHz.
In practice: “Moving” to new frequency - a radical option that requires the purchase of an expensive dual-band router and imposes restrictions on client devices: only the latest models of gadgets work in the 5 GHz band.
The problem with the quality of the WiFi signal is not always related to the actual range of the access point, and its solution in general terms boils down to two scenarios:
- In a country house, it is most often required in free air conditions to cover an area that exceeds the effective range of the router.
- For a city apartment, the range of a router is usually sufficient, and the main difficulty lies in eliminating dead zones and interference interference.
The methods presented in this material will help to identify the causes of poor reception and optimize the wireless network without resorting to replacing the router or the services of paid specialists.
Found a typo? Select the text and press Ctrl + Enter


