Distribute Wi-Fi on a windows 7 laptop. How to distribute WiFi from a laptop: instructions from A to Z. Possible difficulties when creating a Wi-Fi access point
You can easily connect your phone, tablet or other device to the high-speed internet connected to your home through a Wi-Fi router (router). However, such a device is not always at hand (for example, you went to the country house, taking a laptop with you and wireless USB modem). In such cases, you can use the Internet on a mobile gadget through a laptop, entrusting it with the functions of a router. Let's consider how to make a laptop a Wifi access point.
Ways to create a wireless access point
Any modern laptop is equipped with wireless adapter, which can be used as a Wi-Fi router. To do this, you need to create a kind of virtual bridge connecting network equipment (Wi-Fi adapter and network card).
To get this routing, you can use the following tools:
- standard Windows OS tools ( graphics application "Network Control Center ...", command line or bat-file);
- additional software.
Whichever method is chosen, you need to ensure compliance with the following conditions:
Creating a wireless access point using the Windows menu
The easiest way to create a virtual router is to use the "Network Control Center ..." function built into the OS. This requires:

After the virtual router is created, in order to successfully use the Internet through it, you may additionally need to enable public access. This is done as follows:

After all the steps have been completed, we turn on the Wi-Fi on the mobile gadget and start the search for available networks. In the drop-down list, select the network name that was specified when creating the virtual Wi-Fi router, and specify the specified key.
Creating Wi-Fi access via the command line
You can also use the command line to connect your phone to the Internet via a laptop, that is, using a virtual router. This procedure an inexperienced user may find it difficult, however, by following the instructions exactly, you will be able to turn on the wi-fi point in just a few minutes.
To start distributing wifi from laptop to phone, you need:

To distribute the Internet via a laptop to a phone or other device, you need to enable sharing to the newly created Wi-Fi point. To do this, go to the "Network Connections" section and call the properties of the network through which the Internet is connected to the laptop. After that, in the "Advanced" tab, put a "bird" opposite the corresponding item, and in the drop-down list, select the name of the created virtual router. 
Using a bat file
Creating a Wi-Fi access point via the command line is inconvenient because every time you turn off the PC, you need to re-write all the commands. therefore this way turning a laptop into a router can only be used for a one-time Internet connection to the phone.
The execution of the above commands can be fully automated... To do this, you need the standard text editor Windows write a small script, and then save the document on the laptop desktop under any name in the .bat format. To start distributing Wi-Fi using a virtual router to your phone, you just need to run this document with administrator rights. An example script is shown in the figure, where YourSSID and YourPassword are the name of the wireless connection and the access key to it. 
Creation of a virtual router through additional software
If none of the above methods helped to activate the distribution of the Internet on the phone, you can try to create a virtual Wi-Fi router using special software. There are a lot of such utilities on the network, but among them the most convenient are:
- MyPublicWiFi;
- Connectify.
Sharing Wi-Fi with MyPublicWiFi
This application is absolutely free and has a user-friendly interface, although on foreign language... With it, you can make a Wi-Fi access point with just a few clicks:

Creating a WiFi hotspot via Connectify
The MyPublicWiFi utility may experience problems if the Internet to the laptop is not connected via a cable, but via a USB modem. In this case, it's better to use the Connectify app. There is a paid and free version of this program. For periodic use, the second option is sufficient. To enable the distribution of Wi-Fi from PC to phone using Connectify, you must:

Possible difficulties when creating a Wi-Fi hotspot
When creating a new Wi-Fi access point, users often encounter minor difficulties. The table shows the most frequent problemsthat can interfere with the distribution of the Internet from a laptop, and possible solutions.
| The essence of the problem | The reason behind this | Possible Solution |
| The phone cannot track the Wi-Fi network even though it is running | Blocking a connection by an installed antivirus or firewall | Temporarily disable your firewall or antivirus software |
| The Internet does not work on the phone, although the Wi-Fi is connected | User forgot to enable sharing during setup | Log in to the "Network Control Center and general access"And enable sharing |
| The connection is blocked by a firewall or antivirus | Disable online protection temporarily | |
| The message "Failed to start the network" pops up | The wireless adapter is disabled on the laptop | Turn on Wi-Fi in laptop settings |
| Drivers for the adapter are not working correctly | Update drivers using the disc that came with your PC or the Internet |
Nowadays, not a single person can do without the Internet. There is cable Internet in almost every apartment. However, it is convenient to use it on desktop computer or on a laptop. However, what to do if there are others in the house mobile devicessuch as tablet, smartphone and so on? mobile Internet is quite expensive, and the speed is lower. Because of this, the question arises, how to distribute the Internet via WiFi on a computer with windows 7?
It should be noted that the easiest way to create a virtual WiFi network is to purchase a wireless router, but what if you don't have one? Everything is very simple.
How to share WiFi using a laptop
First of all, it should be said that today there are two ways how to distribute WiFi Internet from a computer with windows 7:
- Using built-in windows.
- Using special software.
It should be noted that creating a virtual WiFi group using the built-in tools of the operating system can be done in two ways:
Read also
- Using the Network and Sharing Center.
- With help command line.
We will consider all these methods in detail.
How to share WiFi in windows 7: Video
Setting up a network environment for distributing WiFi from a computer
It should be noted that any modern laptop supports the Virtual WiFi function, which makes it possible to distribute the Internet via WiFi. But now let's look at how to organize the distribution of the Internet by setting up the network environment (Network and Sharing Center).

To do this, go to the "Start" menu and launch the "Control Panel". In the window that appears, you need to launch "Network and Internet", then go to the "Network and Sharing Center" section. Or click on the network connection icon in the tray and launch the Network Control Center.

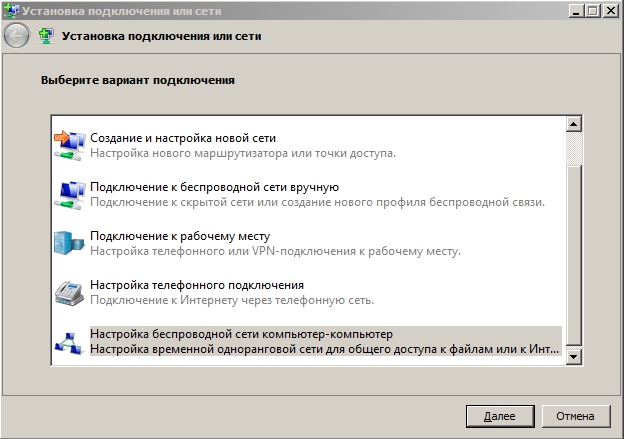
Here you should start the "New connection or network settings", then click the "Computer-to-computer setup" button and click "Next" and "Next" again. In the window that appears, fill in all the fields and save the settings.


Fill in the fields for configuring the virtual network:
- Name wireless network: can be anything you want (you can use letters and numbers, as well as their combination).
- Password: can also be anything you want. It is required to connect to a group.
- Security Type: It is recommended to select "WPA2-Personal" here.
After filling in all the fields, you must check the box "Save this network parameters" and click "Next". After that, the system will create virtual network... In the window that appears, you need to click "Enable Internet Connection Sharing". Close all windows.
Read also

- In the "Network and Sharing Center" menu, select "Change adapter settings". Here you need to find the connection through which the computer gains access to the Internet, and click on the shortcut right click mice. In the window that appears, select "Properties". Next, you need to go to the "General" tab. Here you need to check the box "Allow other users to use this computer's Internet connection", and below select "wireless network connection 2 "(this is the created virtual network) and click the" Ok "button;
- After that, you should return to the "Network and Sharing Center";
- Next, select "Change advanced sharing options";
- In the window that appears, check "Enable network discovery", as well as "Enable file and printer sharing";
- After that press the button "Save changes".
Related Articles


This completes the setup of the distribution of the Internet via WiFi in windows 7. If everything is done correctly, then other devices will be able to connect to the virtual network and will have access to the Internet.
Configuring WiFi sharing using the command line
First of all, it must be said that this method is only suitable if the driver of the wireless adapter supports the Virtual WiFi function.
You can create a virtual WiFi network using the command line. To do this, start a notepad and write the following line in it: netsh wlan set hostednetwork mode \u003d allow ssid \u003d My_virtual_WiFi key \u003d 12345678 keyUsage \u003d persistent.
Here ssid is the group name and key is the password. That is, in the example, the group name is My virtual WiFi, and the password for the connection is 12345678. Any password can be used. After that, the file must be saved. Next, you need to change the extension and file name.
To do this, you need to right-click on the saved file and select “Rename file”. It is recommended that you name the file the same as you named your network. After the name of the file, put a period, and after the period, instead of .txt, write .bat. Next, you should run the file with administrator rights. To do this, click again on the file with the right mouse button and select the "Run as administrator" item.
All the above described actions can be performed on the command line itself. You can do it like this. In the "Start" menu in the search, write "Command line" and run it as administrator by right-clicking. A command line will appear in which you need to write netsh wlan set hostednetwork mode \u003d allow ssid \u003d My_virtual_WiFi key \u003d 12345678 keyUsage \u003d persistent as shown in the photo.


This will cause the system to install this command. It should be noted that new hardware should appear in the task manager. It's easy to check. In point " Network adapters”A device named“ Microsoft Virtual WiFi Mini Port Adapter ”should appear.

Next, you need to go to the "Network and Sharing Center" and select "Change adapter settings". A shortcut should appear here titled “Wireless Network Connection 2”. The label should show the status “No connection” as shown in the picture.

The next step is to launch the network. To do this, we call the command line again and write in it:. This will launch the created network. In this case, a virtual access point (SoftAP) should work. In this case, the “Wireless Network Connection 2” label will change its status to “My virtual WiFi”.


In order to provide other members of the group with the opportunity to access the Internet, follow these steps:
- Go to the Network and Sharing Center.
- Go to the item "Changing adapter parameters".
- and find the connection through which the computer (or laptop) is connected to the Internet, right-click on it and select “Properties”;
- Here, in the "Access" tab, do the following:
- In the “Home network connection” item, select the created virtual group (in our case, “Wireless network connection 2”).
- After that, check the box "Allow other network users to use the Internet connection of this computer."
- Click "Ok" and that's it. The network is fully configured and ready to use.

To manage a virtual group, there is a set of simple commands that must be written in the command line:
Read also
- Allow or deny network usage - netsh wlan set hostednetwork allow | disallow.
- Group setting - netsh wlan set hostednetwork persistent | temporary. Instead of the words "passphrase" you enter your password, and instead of "SSID" you write the name of your group (in our case, My virtual WiFi).
- Group properties and state - netsh wlan show settings.
- Virtual group security settings - netsh wlan show hostednetwork setting \u003d security.
- Start the virtual group - netsh wlan start hostednetwork.
- Stop virtual group - netsh wlan stop hostednetwork.
As you can see, distributing the Internet over WiFi from a computer with windows 7 using the command line is quite real. Moreover, everything is quite easy and simple. The main thing is to carefully prescribe the commands.
How to Share WiFi on Laptop Using the Command Line: Video
Sharing WiFi from a computer using special software
The easiest and simplest method of distributing Internet via WiFi from a computer is to use a third-party software.
There are a lot of such programs. They can be paid or free. At the same time, setting up all these programs comes down to three main parameters - the name of the network, the password, and the choice of the connection through which the computer gains access to the Internet. Moreover, you must come up with a name and password yourself. After making these simple settings, you should click the "Start Hotspot" button.
Some of the most popular programs are:
- Connectify.
- My Public WiFi.
- mHotSpot.
- Virtual Router Plus.
How to share WiFi in windows 7 using Conectify Hotspot: Video
Which of the above WiFi distribution methods to use is up to you. Of course, third party programs much easier to configure, but the built-in tools are more stable.
How to distribute Wi-Fi from a computer without a router
How to share Wi-Fi from a laptop on windows 7
How to distribute Yota over Wi-Fi with windows 7
How to share Wi-Fi from a windows XP laptop
bezprovodoff.com
Configuring the distribution of WiFi from a computer windows 7 and XP
- 1 Laptop as a router on an old OS
- 2 Settings on the current OS
It is not necessary to buy a router to have WiFi in the house. A laptop, to which an Ethernet cable is connected, can also distribute the Internet around the apartment. There are enough instructions on the network on how to do this on windows 7 and older, but if you have XP, do not rush to do it complete reinstallation operating system.
Laptop as a router on an old OS
For any operating system from Microsoft, the distribution of the Internet via WiFi can be organized both by built-in tools and by third-party utilities. But why clutter hDD unnecessary programs? On windows XP, follow these steps step by step:
- Open “Start” and go to “My Computer”.
- In the left pane select “My Network Places”.
- Next, go to the "Display network connections" section.
- Right click on the “Wireless Connections” shortcut and open the “Properties” item.
- Then go to the address "Wireless networks" - "Advanced".
- Here select the "Computer-to-computer" option and confirm your choice.
- Click “Add” and enter the details of the created network (name, password, encryption method) and confirm.
- Next, open the "General" tab and highlight the IPv4 item, click on the "Properties" button.
- In this window, set the indicator to the item "Use the following IP ..." and enter the following data:
IP - 192.168.1.1
Subnet mask - 255.255.255.0
The distribution has been created, it remains only to enable the ability to connect to it from other devices that are within the range of the wireless network. To do this, go back to the window network connections and by right-clicking on the local connection, open its properties. You need to put an indicator in front of the item "Allow other network users ...".
The WaiFai distribution should now be fully functional.
Settings on the current OS
Similar actions can be done with windows 7. To distribute Wi-Fi from a computer or laptop, you can, as in the previous example, create a new virtual network step by step. The only difference is in some steps.
- You need to look at the "Network and Sharing Center".
- Run “Setting up a new connection…”.
See also: Windows 7 computer does not restart
- Then go to "Configuring the wireless network" Computer-Computer "and click" Next ".

As you can see, the steps are similar. In the new window, enter the network name, encryption type and password. Save changes and click "Next". The only thing left to do here is to apply the “Enable Sharing…” setting.
But that's not all. So that you can connect to WiFi from other devices, return to the “Network and Sharing Center” and on the left side of the window, find the line “Change advanced settings…”.
After opening this menu, make the items highlighted in the screenshot active:
Done! But windows 7 offers another, more advanced and simpler way to organize the distribution of WiFi from a computer or laptop equipped with a wireless adapter. This is command line usage. Find it in the list of all windows programs and open it with administrator rights (right-click on the shortcut and select the appropriate item).
In the window that opens, enter a command of this type:
netsh wlan set hostednetwork mode \u003d allow ssid \u003d "new network name (at least 8 characters)" key \u003d "password"
and press Enter. it quick creation distribution, and for the Internet to begin to be distributed from the laptop, use the command:
netsh wlan start hostednetwork
It remains only to go to the "Network Control Center ..." - Properties of the Local Connection (the one that is the wire through which the Internet "enters" the apartment). Open the "Access" tab and check both boxes. Now WiFi sharing is working.
(Visited 15,041 times, 42 visits today)
windowsprofi.ru
How to distribute Wi-Fi from computer to phone? | Your setevok
Connecting your phone to a computer via wifi will significantly save expensive 3G traffic and create your own wireless network even without access to a router. And in this article we will look at how to distribute wifi from a computer to a phone, and also touch technical features such a non-standard Wi-Fi network.
So, among the most common ways to connect a phone to a computer via wifi is the creation of a wi-fi connection. windows tools and using the command line. By the way, the computer here acts not only as an access point, but also as a repeater.
How to distribute wi-fi from computer to phone via Windows 7 interface?
To begin with, let's analyze the option with a Wi-Fi connection using windows 7: this is the simplest and universal way creating a network between the computer and the phone.
Please note that the names of folders and files for other versions of windows may differ slightly.
- - To transfer files from computer to phone via wifi, the PC must have active connection to the Internet;
- - Create a new connection "Wireless network computer-computer";

- - Fill in the network name (for example, let's call it "MyNewNetwork"), security type (WPA2 - PSK) and key (create a password) for the created network, and click "Save settings" - "Next";
- - Click "Enable Connection Sharing". This completes the transformation of the computer into an access point. In the "Sharing Options" section, set "enable" on all required items

Now, from your phone, search for available wifi points, find the network you created ("MyNewNetwork") and connect to it by entering the security key.
How to distribute wi-fi from computer to phone via the command line?
To distribute the Internet from computer to phone via wifi:
Open "Command Prompt";

Enter "netsh wlan set hostednetwork mode \u003d allow ssid \u003d wifi phone key \u003d 000000 keyUsage \u003d persistent" (accordingly, all commands are entered without quotes);

- - a notification will appear about the successful placement of the network you created (“MyNewNetwork”);
- - in the "Device Manager" ("My Computer" - "Control") a device named "Microsoft Virtual WiFi Mini-Port Adapter" will appear;
- - click on the created connection and open "Property" - "Access";
- - set both options for sharing and select a new connection from the list.

To enable the network, open Command Prompt again and enter “netsh wlan start hostednetwork”.
This command must be entered every time the computer is turned on - this way you determine when to grant access to your network.
To disable - "netsh wlan stop hostednetwork".
To change the name or password - "netsh wlan set hostednetwork mode \u003d allow ssid \u003d" WifiNewName "key \u003d" New password "keyUsage \u003d persistent".
For password recovery - "netsh wlan show hostednetwork setting \u003d security".
In addition, to make it easier to connect your phone via wifi to a computer, you can make a mini-utility that will contain a command to start the network:
Open Notepad or Notepad ++ editor enter command to start the network;
Save the file with the .bat extension in the "File name" column, for example - new-wifi.bat;

After saving the program, to start the network, just open this file.
The .bat files, and especially the .vbs files, require an enabled English keyboard layout.
However, such a network has a significant drawback: the computer will distribute Wi-Fi to the phone and other devices only in the "active" mode of operation, but the network will become unavailable even if the PC simply goes to sleep. Therefore, it is recommended to immediately disable the "Hibernation" mode.
How to connect a phone to a computer via wifi: automatic network operation
You can also customize automatic switching on and turning off the network if the Internet needs to be distributed for a limited time.
Create 2. bat filea: one with an on command, and the other, respectively, with an off. For this:
- - "Start" - "Control Panel" - "System and its maintenance" - "Administrative Tools" - "Task Scheduler" (or maybe "Scheduled Tasks");
- - Set your task for each file (enable / disable): let's say that you will have Internet distribution every day from 12:00, and the second file with a shutdown will start every day at 16:00.
Sometimes the error "Failed to connect to the network ..." appears, or there is simply a "permanent" receipt of an IP address without access to the Internet.
The reason that wi-fi does not work on the phone (but on the computer does) may be:
Connection blocking " Windows firewall»

Antivirus blocking the connection.
tvoi-setevichok.ru
How to distribute the Internet from a computer via Wi-Fi? detailed instructions
windows can turn your computer or laptop into a wireless hotspot if you allow it to share the internet over Wi-Fi. Configuring the distribution of the Internet on windows 7, 8 and 10 is somewhat different from each other. Therefore, to install the distribution of the Internet via Wi-Fi, we will consider for each windows operating system separate instructions... Go.
Opportunity sharing wired internet connection of your computer or laptop to connect wireless devices is available in windows 7, 8 and 10 without installing any additional components. Creating such connections, which are an example of peer-to-peer networks, is a snap. In general, a classic example of a peer-to-peer network is a computer-switch-computer network, and computers have the same rights in this network. And in our case, the Wi-Fi wireless network interface will be responsible for the role of a switch.
Please note that when setting up a peer-to-peer network using the Wi-Fi adapter of your computer to distribute the Internet via Wi-Fi, the current Wi-Fi connectionif present will be disabled. Since the Wi-Fi adapter will be used to distribute the Internet and it will no longer be able to receive it.
I want to inform you that here I do not give how, after all the settings, to find the resulting access point on a smartphone or laptop and connect to it. Due to the flourishing of the smartphone market, I think that everyone can connect to a Wi-Fi network.
How to distribute the Internet from windows 10
1. Start the Parameters in any way convenient for you: by pressing + I on the keyboard, through the START menu, clicking on the icon. On home page settings, click the Network & Internet button.


4. In the Change Network Information window, provide a name for the network and enter your password, at least 8 characters long.

That's all you need to do in windows 10 to share the Internet from your computer via Wi-Fi. This is one of best features jubilee windows updates 10.
We distribute the Internet via Wi-Fi from a laptop or computer in windows 8
Unfortunately, windows 8 does not have a graphical interface for configuring a peer-to-peer network, so we will use the command line in some steps to configure the Internet via Wi-Fi.
It must be said that this method of distributing the Internet via Wi-Fi, described for windows8, without any additions is suitable for windows 7. All steps are completely identical.
1. Open Network Connections in a convenient way for you, for example, by pressing the + R combination on the keyboard and typing in the Run command ncpa.cpl, click OK.


3. Switch to the Access tab and enable the Allow other network users to use this computer's Internet connection option. If the second option is Allow other network users to control the sharing of your Internet connection. Then click the OK button.

4. Next, you need to run the command line with administrator rights. Open the START menu and type cmd. In the search results, on the Command Prompt bar, right-click and select in context menu Run as administrator.

5. At a command prompt with administrator privileges, enter:
Netsh wlan set hostednetwork mode \u003d allow ssid \u003d "" key \u003d ""
Where is the name of your network and the password for connecting to the network, which will need to be entered to connect to the access point. In this case, the connection will be based on WPA2-PSK (AES) encryption.
Netsh wlan start hostednetwork
From this moment on, your computer or laptop is ready to distribute the Internet via Wi-Fi.
7. At any time you can view the connection information, where you can find out which channel your connection is using, the access point name, the type of authentication, the type of Wi-Fi and the number of clients connected to the network.
Netsh wlan show hostednetwork
8. You can stop broadcasting the distribution of Wi-Fi Internet with the following command:
Netsh wlan stop hostednetwork
Sharing the Internet via Wi-Fi in windows 7
As mentioned earlier, you can configure the distribution of the Internet in a way that is suitable for windows 8. But we will consider using a computer-to-computer network (Ad-hoc) to distribute the Internet via Wi-Fi. This method is interesting in that you do not need to use the command line to configure the distribution.
1. Open the Network and Sharing Center in the Control Panel. In the Change network settings section, click on Set up a new connection or network.

2. Then, in the window that opens, select Computer-to-computer wireless network settings and click Next.

- Network name - come up with your taste;
- Security type - choose WPA2-ptrsonal;
- Security key - set a password that will need to be entered to connect to the network.

4. The system will automatically configure the distribution of the Internet via WiFi and show the window of ready connection to wi-Fi networks with the specified parameters. In the window that appears, click Turn on Internet Connection Sharing.

We distribute wired Internet through the application

Install, run, specify the network name (SSID), set the desired password, and select our wireless connection that we want to distribute. Click the Start Virtual Router button and you're done. Below you can see a list of connected devices. It couldn't be easier.
Setting up Internet sharing over Wi-Fi may seem like a hassle to some people, but it's actually not that difficult. It all depends on what windows version You're using. In addition, you can always use a third-party application, working with which comes down to even more easy way make an access point from your computer or laptop.
Now you can always use this article to distribute your Internet channel via Wi-Fi, even if you don't have a Wi-Fi router at hand.
userello.ru
How to distribute Wi-Fi from a computer - without a router, to any device

Many of us, now at home, have not only a TV and a computer, but also a telephone, tablet and other electronic devices. And there is only one internet connection. In this regard, the following questions arise: How to distribute Wi-Fi from a computer without a router? Is it possible and how to distribute the Internet from a computer to a phone and other devices?
How to make it so that you can go online from all devices that we have at home? How to distribute Wi-Fi from a computer? How to make Wi-Fi on a computer without a router?
You answer that the distribution of wifi from a computer (laptop) is possible only thanks to a router? Then this post is for you. But is it possible to make a computer or laptop distribute wifi without a router, can a computer distribute wifi without a router. Of course !!!
Most likely you know what sharing wifi is, so we will not describe it in detail, but we will answer the above questions.
How to share wi-fi with windows computer 7, 8, 10, without a router for any device?
Today we'll talk about how to distribute the Internet via Wi-Fi from a laptop or from a computer that has an appropriate wireless adapter. What is it for? For example, you purchased a tablet or phone and would like to access the Internet from it at home using any browser for example Google chrome (see the article Google Chrome Secrets) without purchasing a router. In this case, you can distribute Wi-Fi from a laptop that is connected to the network both wired and wirelessly. Let's take a look at how to do this. In this case, we will consider at once two ways of making a laptop a router. Ways of distributing Wi-Fi from a laptop are considered for Windows 7, Windows 8, they are also suitable for Windows 10. If you prefer non-standard, or do not like to install additional programs - then especially for you the way in which the implementation of distribution over Wi-Fi will be organized using the Windows command line.
So let's get started
When the list of network connections opens, right-click on the wireless connection and select "Properties"

Switch to the "Access" tab, check the box next to "Allow other network users to use this computer's Internet connection", then - "OK".


Run the command netsh wlan show drivers (complete list of CMD commands) and see what it says about hosted network support. If supported, then you can continue. If not, then most likely you have not installed original driver to a Wi-Fi adapter (install from the manufacturer's website), or a really very old device.

The first command that we need to enter in order to make a router out of a laptop looks like this (you can change the SSID to your network name, and also set your password, in the example below the ParolNaWiFi password):
netsh wlan set hostednetwork mode \u003d allow ssid \u003d "password" key \u003d "Parol"

After entering the command, you should see a confirmation that all operations have been performed: wireless access is allowed, the SSID has been changed, the wireless network key has also been changed. Enter the following command
Netsh wlan start hostednetwork

After this input, you should see a message that "Hosted network is running". And the last command that you may need and which is useful in order to find out the status of your wireless network, the number of connected clients or the Wi-Fi channel:

Done. Now you can connect via Wi-Fi to your laptop, enter the specified password and use the Internet. To stop the distribution, use the command
Netsh wlan stop hostednetwork
Unfortunately, when using this method, the distribution of the Internet via Wi-Fi stops after each restart of the laptop. One of the solutions is to create a bat file with all the commands in order - see how to do this in the video under the material (one command per line) and either add it to startup or run it yourself when necessary.
Using a computer-to-computer network (Ad-hoc) to distribute the Internet via Wi-Fi from a laptop in Windows 7 without programs
In Windows 7, the method described above can be implemented without resorting to the command line, and it is quite simple. To do this, go to the Network and Sharing Center (you can through the control panel or by clicking on the connection icon in the notification area), and there click "Set up a new connection or network".

Select the option "Set up a wireless network computer-to-computer" and click "Next".

In the next step, you will need to set the network SSID, security type and security key (password on Wi-Fi). To avoid having to configure the Wi-Fi distribution again each time, check the "Save this network settings" item. After clicking the "Next" button, the network will be configured, Wi-Fi will turn off if it was connected, and instead, it will wait for other devices to connect to this laptop (that is, from this moment you can find the created network and connect to it).

To connect to the Internet, you will need to share the Internet. To do this, go to the Network and Sharing Center again, and then select "Change adapter settings" in the left menu.
Select your Internet connection (important: you must select exactly the connection that directly serves to access the Internet), right-click on it, click "Properties". After that, on the "Access" tab, turn on the checkbox "Allow other network users to use this computer's Internet connection" - that's all, now you can connect to Wi-Fi on your laptop and use the Internet.

Note: in my tests, for some reason, only another laptop with Windows 7 saw the created access point, although according to reviews, many people work with phones and tablets.
Modern technologies wireless communication greatly simplify people's lives. At the moment, using the Internet, you can find any information, the answer to any question and much more. However, far from even despite the wide distribution wireless technology WiFi Not every home has a wireless network. However, there is a laptop and a cable internet connection. In this regard, many people ask the question of how to distribute Wi-Fi from a laptop in Windows 7?
How to set up WiFi sharing from a laptop
Nowadays, there are several ways to share WiFi from a laptop:
- Configure distribution by creating a Computer-to-Computer connection;
- Organize distribution using the command line;
- Share WiFi from laptop using third-party software.
It should be noted that different distribution methods open up different opportunities. You will learn about this later when we look at all the methods in more detail. The first two options use built-in OS tools such as Windows 7. This means that you do not need to download or install anything. So, let's consider all the options in more detail.
You can also read more about these methods at.
How to Share WiFi from a Laptop on Windows 7: Video
How to organize a home network "Computer-Computer"
To do this, in the so-called tray (lower right corner, where the clock and date are located, as well as other icons), you need to find the "Internet connection" icon (as in the picture).
Click on the icon, and in the window that appears below you need to click on "Network and Sharing Center". If you cannot find the icon, then in the "Start" menu in the search bar, write the specified phrase and start the service.
In the window that appears, you need to click "Set up a new connection". Next, select "Configuring the wireless network" Computer-Computer "and click" Next ".
A window will appear in which you need to fill in only three columns:
- Network name - can be anything you like;
- Security type - it is recommended to select “WPA2-ptrsonal;
- The security key is a password that will later be required to connect other devices. You also invent it yourself, but you need to remember it.
After filling in, you need to put a tick on "remember network settings" and click "next". The system will configure the distribution of the Internet via WiFi and in the window that appears, click "Enable Internet Connection Sharing".
Now you should go to the "Network and Sharing Center" and go to the "Change advanced sharing settings" section. Here, in all items, you must set the checkbox to "Enable". This will give other team members access to files and other computer resources.
This completes the system setup. If everything is done correctly, then the PC will distribute the Internet via WiFi. As you can see, sharing the Internet via WiFi from a Windows 7 laptop or PC is quite possible. Moreover, it is easy and simple to organize a private group. But this is not the easiest method. The second option works most stably - networking using the command line. At the same time, setting up a group is simpler and faster.
How to set up WiFi sharing using the command line
It should be noted that in addition to the known advantages, this method allows you to use wireless connection laptop to receive and distribute the Internet at the same time. That is, a laptop not only creates a network, but also serves as a signal amplifier from an existing router or access point. In this case, the PC can also act as the main access point.
It should be warned that this method works only if the wireless adapter driver supports the Virtual Router function. But don't worry, any laptop that runs in the operating room windows system 7 has such a function. And even if the device is old enough, you can simply update the driver.
So, how to set up to share the Internet from a laptop via WiFi with Windows 7? It's simple. The first thing to do is run the command line. This is done using the "Win" + "R" key combination. In the window that appears, write cmd and press "Enter".
That's it, the command line is running. Now you need to write a command that will install the virtual access point driver and create a virtual wiFi network... It is spelled out as follows: netsh wlan set hostednetwork mode \u003d allow ssid \u003d My_virtual_WiFi key \u003d 12345678 keyUsage \u003d persistent, where My_virtual_WiFi is the name of the network, you can change it to any other, and Key is the password, instead of 12345678 you can come up with any another key.
After you have registered the command, you need to press “Enter”. After that, if the line is spelled correctly, the new hardware "Microsoft virtual WiFi mini-port adapter" should appear in the task manager.
Now you need to configure the connection in Windows 7. To do this, in the Network and Sharing Center, go to the "Change adapter settings" section. Here you will see a new connection called "Wireless Network Connection 2" as in the picture.
In order to distribute WiFi from a laptop with Windows 7, you should go to the properties of the connection through which the computer gains access to the Internet. Here in the "Access" tab in the "Home network connection" select the connection we have created "and check the boxes, as in the picture.
Click "OK" and close all windows. Now you need to go to "Change advanced sharing options" and enable network discovery. If necessary, you can enable access to files and other resources here.
Save the settings and close all windows. Now, to share WiFi from a Windows 7 laptop, you just need to start the created network. To do this, write a simple command in the command line: netsh wlan start hostednetwork. Press "Enter".
Remember that the distribution will only be carried out while the laptop is running, and even the device going to "sleep" stops the distribution. After each reboot, you will need to re-register the netsh wlan start hostednetwork start command.
How to create a WiFi hotspot in Windows from the command line: Video
Using third-party programs
How to share Wi-Fi from a Windows 7 laptop using special program? Everything is extremely simple. All programs work according to the same principle, therefore, their setting is reduced to three general parameters:
- Selecting a group name;
- A key to connect to a virtual group;
- Selecting the connection through which the laptop gains access to the global "web";
- Network type selection.
There are actually a lot of such programs, and many of them are absolutely free. For example, mHotSpot is one such program. It is easy to customize. However, it should be noted that for Internet distribution via WiFi laptop must be connected to cable internet. The fact is that, unlike the previous method, the mHotSpot program is not able to use one wireless adapter to access the Internet and distribute it at the same time.
It is not necessary to buy a router to have WiFi in the house. A laptop, to which an Ethernet cable is connected, can also distribute the Internet around the apartment. There are plenty of instructions on the network on how to do this on Windows 7 and older, but if you have XP, do not rush to do a complete reinstallation of the operating system.
Laptop as a router on an old OS
On any operating system from Microsoft, the distribution of the Internet via WiFi can be organized both by built-in tools and by third-party utilities. But why clutter your hard drive with unnecessary programs? On Windows XP, follow these steps step by step:
- Open “Start” and go to “My Computer”.
- In the left pane select “My Network Places”.
- Next, go to the "Display network connections" section.
- Right click on the “Wireless Connections” shortcut and open the “Properties” item.

- Then go to the address "Wireless networks" - "Advanced".
- Here select the "Computer-to-computer" option and confirm your choice.
- Click “Add” and enter the details of the created network (name, password, encryption method) and confirm.
- Next, open the "General" tab and highlight the IPv4 item, click on the "Properties" button.
- In this window, set the indicator to the item "Use the following IP ..." and enter the following data:
IP - 192.168.1.1
Subnet mask - 255.255.255.0
The distribution has been created, it remains only to enable the ability to connect to it from other devices that are within the range of the wireless network. To do this, return to the network connections window and right-click on a local connection to open its properties. You need to put an indicator in front of the item "Allow other network users ...".

The WaiFai distribution should now be fully functional.
Settings on the current OS
Similar actions can be done with Windows 7. To distribute Wi-Fi from a computer or laptop, you can, as in the previous example, create a new virtual network step by step. The only difference is in some steps.
- You need to look at the "Network and Sharing Center".
- Run “Setting up a new connection…”.

- Then go to "Configuring the wireless network" Computer-Computer "and click" Next ".
As you can see, the steps are similar. In the new window, enter the network name, encryption type and password. Save changes and click "Next". The only thing left to do here is to apply the “Enable Sharing…” setting.

But that's not all. So that you can connect to WiFi from other devices, return to the “Network and Sharing Center” and on the left side of the window, find the line “Change advanced settings…”.

After opening this menu, make the items highlighted in the screenshot active:

Done! But Windows 7 offers another, more advanced and simpler way to organize WiFi sharing from a computer or laptop equipped with a wireless adapter. This is command line usage. Find her in the list of all windows programs and open with administrator rights (right-click on the shortcut and select the appropriate item).
In the window that opens, enter a command of this type:
netsh wlan set hostednetwork mode \u003d allow ssid \u003d "new network name (at least 8 characters)" key \u003d "password"
and press Enter. This is a quick creation of a distribution, and for the Internet to begin to be distributed from a laptop, use the command:
netsh wlan start hostednetwork
It remains only to go to the "Network Control Center ..." - Properties of the Local Connection (the one that is the wire through which the Internet "enters" the apartment). Open the "Access" tab and check both boxes. Now WiFi sharing is working.
(Visited 21,556 times, 1 visits today)