Free, clean the internal storage, sd card on the Lenovo android, why not enough, the problem with the device's memory. Where are the contacts on the lenovo phone. Where are the contacts stored on the Android phone Where are the downloads on the Lenovo vibe
Comments: 0
One of the most sensitive places in a smartphone is the contact list. He is exposed to information leaks. Therefore, it is important to know where this weighty information is stored. Android has a file called contacts.db.
If this does not exist, there should be a similar file - contacts2.db. Contacts in Android are stored in the /data/data/com.android.providers.contacts/databases/ directory, this is where all contacts are stored.
Some use cases for contacts.
Suppose there was a breakdown of the smartphone, but the memory continues to function, in this case all contacts can be moved from Android. If working with Google servers does not inspire confidence in you, you can automatically set up a backup of all contacts from your smartphone to a desktop computer using an SSH server.
The best option for moving contacts from Android would be a stationary application that successfully copes with both downloading and transferring contacts, while working with the VCard format.
Where to "look" for contacts on android
So, contacts on android devices are stored in a special directory /data/data/com.android.providers.contacts/databases/, which contains a file called contacts.db. / data / is special folderwhere applications are usually located, user-installed and his personal settings. In order to read the above file, you will need to get root rights. Root rights give users the right to do whatever they want with the operating system of their gadget (in this case, the android OS) - delete, copy, modify files (even system files), and so on. The procedure for obtaining these rights on each device is different. Someone will only need to install a special application, while someone will need a special program. The main thing is that without these rights, the contacts.db file. cannot be read.
Why you need to know where your contacts are stored on your phone
Why know where contacts are stored in android? There is a fairly simple answer to this question. For example, the phone has broken down (which is not uncommon), but its internal memory may still function normally, giving the user the ability to export their contacts to a new phone. Or, knowing the location of the file with contacts, you can configure its synchronization with your home computer (you can do this using an SSH server). Then, in the event of a breakdown, you can view the contact book directly through your computer. In this case, you do not need to figure out how - it is more convenient to do it on a PC.
In addition, you can synchronize contacts stored on android devices with Gmail. To do this, you will need to find the item "Accounts" in the phone menu and put a tick opposite the line with the name "auto-sync". After this procedure, the contacts should appear in the user's mail. In case of unforeseen situations, you can go to the Gmail mail assigned to a specific device and view all the contacts there.
Quite often people are interested in where contacts are stored in Android. This question arises mainly due to the fact that modern smartphones are rapidly becoming obsolete. When replacing them, you have to think about transferring all data from the SIM card and the device as a whole. Contacts are often troublesome. But if you prepare in advance for the process, you can easily transfer the phone book from Android to Android.
Where are located
To begin with, you need to understand where exactly contacts are stored. Are they located in a text file or in some database? Further actions will depend on the answer to this question.
Where are contacts stored in Android? Users assure that this information is located in the SQLite database. Initially, contacts are recorded here. However, they can be transferred to a SIM card or memory card. So the phone book will always be with its owner.
Directory search
All that remains to be done is to find the folder with the corresponding data on the mobile device. Where are contacts stored on Android? They will be located in the contacts.db or contacts2.db document. They will have to look for them on a mobile device.
Where are contacts stored in Android? In order to copy the phone book from the device, you need to find the document mentioned earlier. It is located in the data directory. The following chain of folders needs to be opened:
- data (2 times);
- com.android.providers.contacts;
- databases.
After that, in the last folder you need to find contacts / contacts2. This is the phone book. It can be copied, deleted, or transferred to another device. Typically, this will require root privileges. For example, using specialized programs. Among them are iRoot and KingRoot.
About copying data
Now it is clear where the contacts are stored in the corresponding document, as a rule, you need to copy the phone book. easier than it sounds. Especially if it comes about using the same OS assemblies.
Typically, you can copy the phone book to a SIM card or Flash card as follows:
- Go to the "Contacts" menu on your mobile device.
- Open settings. In some phone models, you need to select the "Advanced" menu item.
- Select the "Import / Export" option. Click on the line that is responsible for this or that operation.
- Specify a location to import or export data. As a rule, we are talking about a SIM card or a memory card.
This is the simplest solution. Knowing where the contacts are stored in "Android", you can copy this phone book file using a PC and move it to the desired directory on the new device. In addition, there are various programs and applications for transferring contacts. But among modern users, data synchronization with Google is often used. This technique will help you not to think about where contacts are stored in Android. If you have mail on Google, you can synchronize data without root-rights or searching the phone book on a mobile device.

Actions in this case are reduced to the following algorithm:
- On an old Android phone in the "Settings" - "Accounts" menu, go to Google. Check the "Contacts" section when entering mail in the "Synchronization" section.
- Log in to Google on a new phone. This will automatically synchronize contacts.
Contacts are the most sensitive to leaks from your gadget. Therefore, it is important not only to protect your device from scams and viruses, but also to know where and how the data is on Android.
It is possible to use a folder with contacts only in two cases. In one of them, you can resort to exporting contacts if your Android phone breaks down. This is feasible if the memory of the broken device is still functioning.
The second case is suitable for an audience that does not trust Google servers and has not synchronized contacts with them. To save contacts to a second smartphone or any other device, you will need to use the SSH server and know the path to the file with the necessary information in the Android OS.
How to find your contacts folder
Finding the folder that contains important data is easy. You need to look for a file called contacts.db. If you suddenly do not find this, then you need to look for the second option contacts2.db. In order to find the required file with contacts, you must specify the following path: /data/data/com.Android.providers.contacts/databases/.
This will reveal the desired folder with all your contacts. They are stored and updated constantly, as soon as certain changes to the data occur.
But you can open it or copy it only if you have one. You can check for the presence of root rights on your Android device using special and simple applications that are located on Google services.
After successful installation and verification of rights, you can copy the "contacts" folder to your computer or other device. Folder transfer is easy with the appropriate cable or wireless. After sending or copying, do not forget that the files are stored in the public domain.
In this case, you will know exactly the location of the copied contacts. In addition to transferring data, you can also import the contacts you need using the same application. This will save you a lot of your time and have the same book with all your contacts.
In general, working with contacts on Android is both easy and difficult. The thing is that most people use the applications installed by the manufacturer, and these can be either standard ones from the Android delivery, or programs as part of proprietary shells. So let's start by looking at the general situation using one of the examples.
Android contacts are in the application of the same name. As a rule, Google skin developers bring it to the first home screen, so it's not difficult to find it.
The interface of the Contacts application is simple and straightforward. In the upper part there is a menu of phonebook sources, icons for searching and creating a new contact, as well as the menu of the application itself.

Swiping left and right can quickly navigate to contact groups, the speed dial screen, and even the call log.

The phonebook sources menu allows you to choose from where to show contacts in the application. There are options: SIM, Skype and other messengers, account and the phone book itself. The user can check or uncheck the boxes next to each source. Helpful hint: if you are annoyed that Android pulls email addresses, nicknames from Skype and turns the phone book into a mess, then just turn off the corresponding sources.

The search for contacts in the application has auto-selection. You don't have to type in their full name to find the person you want. It is enough to indicate the first letters and the application will pick up all the matches.


When creating a contact, the user chooses the location of his location, then indicates the number (you can choose from 6 options), e-mail. The contact can be added to the group. In addition, for each contact, you can specify additional fields: from a birthday or other significant events to an arbitrary note.


The application menu includes eight items. We will dwell on some of them later. The settings are mainly related to the way contacts are displayed in the application. You can also set up synchronization with accounts, view the capacity of the SIM card, and also select the tabs that will be shown when swiping left and right.
How to Transfer Contacts from Android to Android
Unlike iOS, Android offers a large selection of native options by default for transferring contacts from one device to another.


Every Android smartphone is linked to a Google account. To transfer contacts using Google, you just need to make sure that the synchronization of contacts with the Google profile and Gmail is turned on on your old smartphone. To do this, go to Settings - Account and Synchronization - Google - Gmail. Then click on the name account and there select the item Contacts. Depending on the settings you made earlier, they will sync automatically or when clicked. Then, on the new device, it is enough to do the same for the contacts to appear on it. It is important that the gadgets are connected to the internet.

It is also possible to transfer contacts from Android to Android using SIM card or VCard file. To do this, in the Contacts application, go to Menu - Manage Contacts - Import / Export Contacts. Here you can export contacts to a SIM card, memory card or phone memory.
Then the SIM is inserted into new phone, you can also rearrange the memory card there. On the new device, the same actions are performed, only instead of Export, you need to select Import from the appropriate place.
If the user exported contacts to the phone memory, then he will need to transfer the VCard file from there. This can be done by connecting phones to a computer - most Android phones are defined as removable disks, either send by e-mail to yourself (but here it is more logical to use synchronization via Gmail, described above), or transfer via Bluetooth. Then on the new phone, you need to repeat the steps already described for importing contacts.

You can also transfer contacts from phone to phone using Bluetooth. However, this method is suitable only for a small number of records - and once you can send no more than 10 pieces. To do this, go to the Contacts application menu and select the Send contacts option. Then mark the necessary entries with the checkbox and then select the sending method - Bluetooth. First, you need to establish a Bluetooth connection between the phones.
Also, the Send contacts item allows you to send them by e-mail, using SMS or MMS, but these methods are not relevant when transferring contacts from phone to phone.
How to Transfer Contacts from iPhone to Android
There are two ways to transfer contacts from iPhone to Android, syncing with Gmail and using a VCard file. Both will take some effort.

Contacts +
- Developer: Contacts Plus team
- Assessment: 4,1.
- Installations: 50 million.
Makes contacts more fun. All contacts are presented with avatars. This view makes it easier to call the desired subscriber - choose by faces faster. There are advanced search functions: you can search not only by name or phone number, but also by mail, SMS, etc.


Themes and various design options for the phone book are supported. Contacts + also have a call log and SMS.
Contacts are stored encrypted.
The app has a separate backup function. However, in the free version you can save only up to 2000 contacts, calls or SMS. Copying is configured separately for each category of information.
Save contacts to TXT
- Developer: Viked.
- Assessment: 4,3.
- Installations: 15 thousand.
On Android, contacts can be exported in vCard format. This application allows you to save them in txt. You can save in text file all contacts, individual records or several.


It is also allowed to customize which fields will be saved in the file.
IN further file can be used at the discretion of the user. You can also send it by e-mail.
Simpler Contacts Dialing
Applications for exporting and importing contacts in Excel files. Excel is for import to Outlook.
The application allows you to customize which fields will be exported to Excel. All contact fields can be transferred, including the photo. The only exception is a personal ringtone assigned to a contact.


The application also automatically converts encodings to meet the requirements of Windows and Microsoft applications, so that names in contacts are displayed correctly.
The exported file can be stored on a memory card, sent by mail, uploaded to cloud services.
Free version limitation - only first 300 contacts can be exported. You will have to pay for a larger phone book.
Output
Working with contacts in Android is well organized. There is practically no need to go to third-party applications if you read our guide. Using Android tools, you can perform all possible actions with contacts.
However, if you want to decorate and diversify the dialer or the phone book, then the Play Market has enough applications. True, one must be careful when choosing them. It's still about personal data.
18 May 2015 Where are contacts stored on Android? Comments: 0 One of the most sensitive places in a smartphone is the contact list. He is exposed to information leaks. Therefore it is important ...
18 May 2015 Where are contacts stored on Android? Comments: 0 One of the most sensitive places in a smartphone is the contact list. He is exposed to information leaks. Therefore it is important ...
Posted Mon, 02/15/2016 - 19:27
Android Assistant software, Link2sd, X-plore, Root App Delete.
Transfer of backbone applications using special software. You can use special program, eg Android Assistantwhich contains 18 necessary tools to control the system. How to use Android Assistant.
By installing Android Assistant from Play Market on Lenovo ideatab s2110, s2109a, ideapad a1, a2109a, go to the "Tools" tab and select the item "App2Sd". Next, open the "Maybe" tab - this is a list of applications that can be transferred to the SD memory card. Sequentially select applications and press the button "To SD memory card".
Through the button "Batch uninstall", you can see what programs are installed on the ROM and delete them immediately in a list.
If you still got root rights or you already had them, then you can recommend the program Link2sd... This program for the correct transfer of mobile applications from internal memory to SD Card Lenovo windows 8, a2107ah, s890, k900 and it effectively controls the "cache" and RAM, keeps them at a minimum.
And through the program X-plore, you can clearly see in the form of a diagram system partition ideaphone a800 black, a820, 720, s880, for this you need to press the "disk map" button.
Using Root App Delete, you can remove programs that are not needed at the moment and are useless.
Lenovo Rooting Apps: 360root, FolderMount, RAM Manager Free
Program 360root will help to issue root-rights to Lenovo b50, a328, s860, a6000 devices running on Android versions 2.2-4.4. The probability of getting root access is 90%. You can download the program from the developer's official website at 360root.ru.
How the program works. After launching 360root, to get superuser rights, press the button in the center of the screen. Then press the button to root the Lenovo phone.
We reboot the phone, now it will be possible to completely transfer to external storage from lenovo phone s820, g50, b590, a7600 all backbone applications, thus freeing up the built-in memory.
FolderMount - the application allows you to unroot a Lenovo phone based on Android 2.3 - 6.0. Through the program menu, you can do all the same manipulations with the transfer of backbone programs.
You can download FolderMount through the Play Market.
RAM Manager - will allow you to create a paging file in the Lenovo s 50, a8, a916, tab 2 a10 phone, which frees rAM and speeds up the Lenovo device. Download Ram Manager available through the Play Market.
After installing the program, you need to give it root rights.
Then we select one of the operating modes:
Balance - maximum optimization of RAM.
Balance (with more free memory) - Maximum RAM optimization for Lenovo with up to 512MB.
Balance (with more multitasking) - Maximum RAM optimization for devices with more than 512 MB.
Hard gaming - to run resource-intensive programs such as 3D games.
Hard multitasking - to run several programs at the same time.
Default settings of your phone - reset the RAM settings to "default".
Comparison of Root Uninstaller, Root App Deleter, Root Cleaner for Lenovo.
Clean Master - Clean up trash from Lenovo system.
So, after spending some time, you can solve the memory problem on any android phone, including Lenovo s 50, z90a40, pb2, P70 and other models.
But after this action, it is necessary to control the situation: periodically go into the File Explorer and watch the appearance of new files and folders and react accordingly.
Video review: We clean Android from garbage.
This manual process can be automated through the use of special software, for example mobile application It's simple and convenient program to clean the internal memory of a Lenovo device based on Android OS. This program speeds up the system well and optimizes the RAM of Lenovo a690 black, 770, 800, a2107a and other models.
SD maid app - analog Clean master... SD maid analyzes junk files left after deleting old applications and puts them in the "Trash" section. After carefully reviewing this section, you can give the "Remove Trash" command. The Refresh button starts the search again junk files on Lenovo phone.
Preliminary results.
It was said above how to transfer files and programs to removable storage Flash Sd Card and clear memory.
In addition to this topic, you can talk about cloud storagesuch as Google drive, Yandex Disk and the like. The use of cloud storage very effectively frees up not only internal memory, but also the flash memory inserted in the phone 7, tab 2 30, tb2 tab 2 16, tab4 tab 4 plus tb. These services are free, provided that the limit of cloud space is not exceeded.
Using cloud technologies you can transfer photo files, videos, photos from internal memory mobile device Lenovo g580, 70, s660, vibe x2 on internet servers google companies, Yandex and others.
Let's consider the example of the service Yandex.Disk, how you can transfer your photo and video files to the cloud.
1.Download from Google play Yandex.Disk application and install it.
3. The program automatically starts uploading photos, videos and documents to the "cloud".
2. It is possible to forcibly show which file should be sent to the "cloud" from Lenovo. To do this, press the button + and select a file or folder to sync.
In total, 15 GB of memory is available to the user in the "cloud" for free.
If you do not use your account in the "cloud" for a long time, then your files will be automatically deleted.
Cloud applications for Lenovo vibe z2, a7, g570, a5000 and other models: Yandex.Disk, Google drive, Picasa, Degoo, Dropbox, G Cloud, MEGA, BOX, OneDrive, [email protected].
But I would like to go deeper into the topic of freeing the ROM and consider different points in solving the problems of the Lenovo shoot shot phone mobile device.
Professional memory cleaning for Lenovo Android devices.
The following information has been collected from various sources: from sites, forums, and may be useful to someone. But you need to use it very carefully, because it has not been tested by the author and thoughtless actions on applying these tips can permanently lock your Lenovo phone or lead to costly repairs.
SD Maid program - clearing the phone memory with root rights.
SD Maid- another program is a device memory, cache cleaner and has additional functions: batch uninstallation of programs, forced closing of applications, performance improvement by optimizing the operation of RAM and processor.
SD Maid is optimized to work on lenovo devices tab3 tab 3, p2, a7600 h, k6 note power and other models. Tablet SD Maid suitable for tablet computers from this manufacturer.
Video Review: Acquiring root rights, how to swap memory locations.
To effectively use this program, it is desirable to have root user rights.
Titanium Backup and instructions for freeing up memory on your Lenovo smartphone.
Titanium Backup - this program effectively transfers software to SD Card Lenovo a1000, s1 lite, a6010, tab 10, and updates after the transfer are also loaded onto the external drive. The transfer scheme using this covina is described below.
Required:
1. Root rights.
2. Titanium Backup
3. File manager, for example Total Commander for Android.
Instructions:
1. With the help of Titanium, at startup automatic mode the system is cleared of "garbage". Titanium Backup can easily clear dead files in dalvik-cash (menu-\u003e more-\u003e clear dalvik cache) on Lenovo shoot shot, 4 10 plus 64, k5, x304l 64gb. Also in this program is a good backup, a service for rolling back the system to a previous state.
2. Through the menu - "integrate sysDalvik into ROM", files are transferred from / cache / dalvik-cache to system / app.
3. Then the programs are transferred manually, as described above.
4. Removing useless system programs, located in the system / app folder, but attention, if you delete something wrong, then it will turn the device over, the phone will need to be reflashed, in the worst case it can only be thrown away. You can delete the Market with its service, Google maps, live wallpapers, dead wallpapers, cyan themes.
5. Removal of the English-language voice synthesizer Pico (/ system / tts). And removing system ringtones - ringtones from the / system / media / ringtones directory.
Another way to solve Lenovo memory full problem
I also had the same nonsense - "out of memory" on Lenovo. I naturally transferred all applications to the memory card, except for the browser. But the problem repeated itself, again there was not enough memory. And what is surprising, I moved the Opera and everything worked, while there are no problems.
Yet google browser Chrom "clogs" a lot system memory your data. Using it on Lenovo c2 power, tb3, zuk, phab 2 or another model is simply not realistic and not possible, maybe in new versions it will be made better. In the meantime, it is better to delete it or replace it with another browser or use the built-in one.
Replacing the "internal storage" and "microSD" partitions
To radically change the situation with the lack of memory Lenovo s 50, tb x704l, p1ma40 8gb 32, k 5, there is such an original way: Swap "internal storage" and "microSD". What does it do? The system should treat the SD card as internal by default and internal as SD.
Video review: How to swap android memory... Android memory remapping.
To do this, you need to have a as root superuser and download on Lenovo File Manager Root Explorer. Next, we act on the points:
1.Open the root explorer, go to the / system / etc folder, click on "RW rights" from above and open the vold.fstab file with the editor
There are 2 lines (without the # sign at the beginning):
Question answer. What to do if photos are lost in Lenovo Phone Gallery
1 question. What to do if the photos on the flash card of the Lenovo a820, 720, s880, ideaphone a800 black phone become cloudy or cannot be read at all. After transferring files from Lenovo main memory to a USB flash drive, the files cannot be read, although the phone sees the card. When you connect your phone to your computer, they will not open. How do I get my photo files back to main memory? Answer 1. Perhaps you transferred to the memory card not originals of photos, but previews, sketches. The originals of the photos could remain in the internal memory of the Lenovo a690 black, 770, 800, a2107a phone in a different folder, the program will help to solve this problem DiskDigger. Answer 2. So that such situations do not arise, before performing certain operations with the memory of the Lenovo phone, it is necessary to make a backup (data backup). To do this, you need to connect your smartphone to the computer via a USB cable and completely copy all the memory, all folders and files to hDD PC. After these steps, you can move files to the SD-card cell phone.2. Question. I got the "Not enough memory on my phone" error. I removed unnecessary files, folders and cache according to the recommendations. Now, when viewing photos, when opening the "Gallery", the system writes another error "The storage is not available". I have a Lenovo s 50 phone. How can I solve this problem? How to return photos, photos, photographs back to the Gallery?
Answer. In order that such problems do not arise, you must always do backup Lenovo main memory and flash cards. In this case, when cleaning the system, you may have accidentally deleted the folder with photos on the memory card, which is located at: SDCARD / DCIM / CAMERA. You can try to recover lost files using data recovery programs: CardRecovery or PhotoRec.
On this page you can read instructions on how to connect, increase, clear, expand the RAM, cache on the Lenovo s 50 phone on the OS platform on the screen with the resolution, type and other models. How to free, clean the internal storage, sd card on android Lenovo 7, tab 2 30, tb2 tab 2 16, tab4 tab 4 plus tb, tab3 tab 3, p2, a7600 h, k6 note power, a1000, s1 lite, a6010, tab 10, shoot shot, 4 10 plus 64, k5, x304l 64gb, c2 power, tb3, zuk, phab 2, s 50, tb x704l, p1ma40 8gb 32, k 5, s 1, 2 a10 70l, p1m, ideacentre aio, yoga 2gb, essential, z90a40, a5500, y720 4g, tb 4 8504x, x x3, 730x, a859, a369i, a316i, 850m, pb2, k10a40, p770, a660, p700i, a789, ideaphone s720 gray, P780 4Gb, Sisley Sisley 32Gb, A2010, P70, A536, S850, A319, S60, Vibe Shot, K3 Note, g580, 70, s660, vibe x2, vibe z2, a7, g570, a5000, b50, a328, s860, a6000, s820, g50, b590, a7600, a8, a916, tab 2 a10, vibe p1, vibe pro, a2109, s2109, k1, thinkpad tablet 2, ideatab a2107 16gb 3g, yoga, ideatab s2110, s2109a, ideapad a1, a2109a, windows 8, a2107ah, s890, k900, a820, 720, s880, ideaphone a800 black, a690 black, 770, 800, a2107a, the answer to the question why is not enough, a problem with the device memory.
Instructions on how to clean, release, internal memory, cache on Lenovo A319, S60, Vibe Shot, K3 Note and other models can be found here. Find out where the files are located and how to move or delete them correctly. How to clean a flash memory drive, sd card of an android phone for Lenovo tab 2 30 phone based with a screen type with resolution and other models.
Popular Lenovo Reviews
| Cuts are quickly launched on the phone and do not take up much space in the phone memory. | The social network vk.com is the most visited network in our country. Initially, it was possible to use the network only on a computer, 10 years ago there were no phones with touch screen and nothing more lenovo tablets.|
| Where to download and how to install the application for free - Traffic Rules with questions and answers and with explanations on Lenovo | |
| Talking Cat Tom is the most famous talking game for Lenovo phones and tablets. It’s not even a game, but interactive animation, beautifully "traced" animals, reminiscent of soft toys. | |
 | Social networks have become commonplace in our lives. The user, having registered on the site, gets the opportunity to get acquainted, correspond, give cards to friends, leave comments without limiting the social circle. | Opera mini has advantages over other programs: the program does not slow down, quickly loads sites, a convenient interface, correct work on different devices, phones and platforms.
| - Transparent, protective film, covers the cell phone screen without changing the image quality. Film sticker is an inexpensive way to protect your Lenovo phone display from scratches and dirt. |
Modern phones perform many tasks: making calls, playing audio and video files, launching games, etc. The smartphone can also act as a player - the user can store a collection of songs directly on the SD card and not use additional devices... Today we will talk about how to find music on your phone.
Where is the music stored?
Audio files can be located in different folders, it all depends on where the user originally saved the music.
Note! Music is usually stored in the "Music" folder in the device's internal memory or on an SD card. Compositions downloaded from the Internet must be searched for in the “Download” directory, where all downloads are located.
To find files you need to use the standard file manager or install a more functional application, for example, ES Explorer. In order to quickly find audio files on Lenovo's phone, you can use the search.
For quick access you can install a third-party audio player for music. There are many such programs on Google Play. Don't forget to read the app rating and reviews before downloading.
Now you know where the music is stored in Lenovo and you can find it.
Android includes a large number of directories, but here the question arises - which folders can be deleted on the phone, and which cannot be touched?
This article is suitable for all brands that produce phones on Android 9/8/7/6: Samsung, HTC, Lenovo, LG, Sony, ZTE, Huawei, Meizu, Fly, Alcatel, Xiaomi, Nokia and others. We are not responsible for your actions.
Attention! You can ask your question to a specialist at the end of the article.
We are not responsible for your actions
Read the article before deleting folders.
Android folders - structure
The folder list may differ depending on the Android version. Some applications can create their own directories in memory - for example, instant messengers. However, in general, the list of folders at all android versions will be the same, so you just need to know what is stored in them.
- Cache - folder with temporary update files. If you are not going to update the system, you can delete it.
- data / app - setup files all third party applications... If you don't use them, you can delete them.
- data / data - settings, saving and other service information required for applications to work. If you don't use installed programs, delete the directory.
- data / clipboard - data clipboard with the latest screenshots. It is not recommended to delete.
- data / dalvik-cache is the cache area for the java virtual machine that allows the phone to run APK files. Files must be regularly cleaned, but not deleted. (read)
The Documents folder contains a variety of documents. If you are not interested in their content, feel free to delete the directory. The same applies to the Bluetooth directory, which contains the files received by this wireless technology.
Enlarge
The DCIM folder contains photos taken with the camera. If you don't have the photos you want, you can safely erase the catalog. Will not affect android work deleting the folders Images, Pictures, Musi, Audio, etc.
Folders that cannot be deleted
There are folders in Android that absolutely cannot be deleted, since without them the system will not work correctly. Remember these names:
- efs - Information about IMEI, Mac, Bluetooth and Wi-Fi.
- etc - configuration files used when booting the system and various firmware processes.
- lib - libraries required for the operation of programs and modules.
- mnt - images of mounted systems.
- proc - key information about the installed system.
- sbin - executable files of all programs involved in system management.
- sys - current system configuration.
In no case should you delete the system folder with all its subdirectories. System is the backbone of the system, so if you delete any data from here, you will be flashing the phone again.
Removal methods
To delete system folders, you need superuser rights - root. If you don't have them, then you definitely won't be able to break Android. If you have one, you need to be extremely careful - deleting important system files will lead to the fact that you have to flash the device again.
If you figured out which folders can be painlessly deleted, then proceed to clearing memory using standard functions:
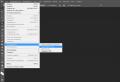
- Open the main Android menu and launch the file browser (file manager).
- that you can delete. Click on it and hold your finger.
- When the menu appears, choose Delete.
 Enlarge
 Shown is a multi-select manager option. The delete button is in this case at the top right in the form of a trash can icon.
The standard file manager does not display all files and android folders... To clean the memory of the device well, use ES Explorer or another outside manager files.
- Launch ES File Explorer.
- Choose what to clean - Internal Storage or memory card.
- Hold your finger on the folder you want to delete. Once it's checked, start highlighting other files and folders.
- After selecting all the items to be deleted, click on the "Delete" button in the bottom menu.
 Enlarge
 You don't have to use file managers on Android, but simply connect your phone to your computer by selecting the media device mode, in which you can view and change the contents of the memory.
Android is an operating system that has a file system. AT file system contains a wide variety of files, including photos, video and audio recordings, archives, folders with applications, etc. The same photos can be seen using the Gallery application, the icon of which is usually located on the device's desktop. But what if you need to find a file by name or a folder with music?
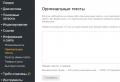
For such cases, you must use a file manager. If you open Google Play Store, you will see a large number of all kinds of file managers for every taste, including paid and free ones. Which application is worth using is up to you. We will show file search using ES Explorer as an example.
Download the file manager if it is not installed (some firmware have a built-in file manager) and run it. In the screenshot we see two memory cards: one is internal memory (device memory), the second is the memory card installed by the user.

Choose desired sectioneg internal memory. Go to the section and see the folders. So, all your photos are stored in the DCIM folder, and music is stored in the Music folder (there are exceptions, be careful).

If you need to find a file by name, it's easier to use search. Click on the magnifying glass icon and enter the name of the file you want to find.

Please note that folders with system files available only if provided.