Network and Sharing Center xp. Setting up a network connection
Windows setup 7 with your own hands. How to make work easy and convenient Gladky Alexey Anatolyevich
Network Control Center and shared access
In the vast majority of cases, to work with a local network, you need to go to the Network and Sharing Center. This is where almost all the basic tools necessary for setting up and administering local networks are contained.
The Network and Sharing Center (Fig. 4.1) is located in the Network and Internet category of the Control Panel.
Rice. 4.1. Network and Sharing Center
In this mode, you create new and edit existing connections, switch to the mode for setting adapter parameters and sharing, as well as perform a number of other functions. Here you can view information about current state networks in real time. You can also determine whether this computer is connected to local network or the Internet, and if connected, find out the connection method and level of access to computers and network devices. This information is needed both to set up your network and to troubleshoot connection problems.
From the Linux for the User book author Kostromin Viktor Alekseevich15.1.3 KDE Control Center A typical window view when working with the KDE Control Center is shown in Fig. 15.3.As you can see, there is a menu on the left, and a field of tabs on the right, each of which usually serves to configure a specific element of the graphical environment. We will consider
From the book Computer for 100. Let's start with Windows Vista author Zozulya YuriFavorites Center After you've spent some time online, you may have favorite web pages, you may want to subscribe to news feeds, or you may want to view your history.
From the book Windows Vista without stress author Zhvalevsky Andrey ValentinovichFavorites management center and more Available in Internet Explorer Another useful thing is the Favorites Control Center (Fig. 5.21), which opens with the button of the same name on the toolbar. Rice. 5.21. Favorites Management Center The Favorites Management Center has three tabs.
From the book Windows Vista author Vavilov SergeyFavorites Management Center While traveling on the Internet, you will probably identify your favorite pages that you will visit regularly by adding them to your Favorites folder, you will want to subscribe to receive news through web channels, and also have quick access to earlier
From the book AutoCAD 2009 for students. Self-instruction manual author Sokolova Tatyana Yurievna From the book Database Processing in Visual Basic®.NET author McManus Geoffrey PUsing Views to Control Access to Data A view is essentially a definition of a query stored in a database. It is similar to defining a query in databases Microsoft data Jet, however, differs in storage location: it is located in the database and
From the book AutoCAD 2009. Let's get started! author Sokolova Tatyana YurievnaAutoCAD DesignCenter Control Center DesignCenter Control Center is designed to organize access to drawings and their elements and provides: viewing the contents of drawings on local disk, network drive and web pages; viewing and inserting blocks, layers,
From the book TCP/IP Architecture, Protocols, Implementation (including IP version 6 and IP Security) by Faith Sydney M14.6.1 Access control commands Commands and parameters that determine user access to the remote host file storage are defined in Table 14.1. Table 14.1 User authorization commands for accessing the archive
From the book Setting up Windows 7 with your own hands. How to make work easy and convenient author Gladky Alexey AnatolievichNetwork and Sharing Center In the vast majority of cases, to work with a local network, you need to go to the Network and Sharing Center. This is where almost all the basic tools needed for configuration and administration are contained.
From the book Linux Network Tools by Smith Roderick W.Access Controls One of the advantages of xinetd is that it combines the superserver functionality and access controls found in TCP Wrappers. In addition, setting up xinetd is quite simple. Access Controls
From the Linux book: Complete Guide author Kolisnichenko Denis Nikolaevich4.2.4. KDE Control Center The Control Center plays the same role as the Control Panel Windows management, with the only difference being that the Control Panel configures the entire system, while the Control Center configures only KDE. But within KDE, almost everything can be customized. In different distributions
From the book AutoCAD 2009. Training course author Sokolova Tatyana Yurievna16.3.11. Access control directives for individual directories You can define individual parameters for each directory on your server - directory design, access parameters to this directory. Directory directive block The Directory directive block defines the properties of the directory (see.
From the book AutoCAD 2008 for students: a popular tutorial author Sokolova Tatyana YurievnaAutoCAD DesignCenter Control Center In practice, it is very important to be able to use previously created developments: experience shows that most design projects are created on the basis of new combinations of elements that have long been known as
From the Ubuntu 10 book. Quick Guide user author Kolisnichenko D. N.AutoCAD DesignCenter Control Center In practice, it is very important to be able to use previously created developments: experience shows that most design projects are created on the basis of new combinations of elements that have long been known as
From the book Taming the Digital Monkey [How to get rid of Internet addiction] author Pan Alex Soojung-Kim4.6. GNOME Control Center Configuring Ubuntu is done by calling configurators from the System menu. If you've worked with another distribution before, it probably had one main configurator (DrakConf in Mandriva, YaST in openSUSE, etc.). On Ubuntu, you can launch Control Center (command
From the author's bookAppendix 2. Rules for the contemplative use of social networks Proceed with caution. Consider communication in social networks as an opportunity to practice “virtuous speech.” There is no need to make trouble for no reason. Be thoughtful about your
Ubuntu
Settings network connection in Windows XP
Default in Windows XP automatic retrieval of settings is already enabled DHCP servers. Need to change automatic setup manually, open:
Start -> Control Panel -> Network Connections
Double click on "Local Area Connection", click on the button "Properties" :
In the window “Local Area Connection – Properties” select the inscription "Internet Protocol (TCP/IP)" and press "Properties" .

Enable options "Use the following IP address" And "use the following addresses DNS servers", placing dots opposite these inscriptions, as shown in the figure.

Fill in the fields with your data specified in your contract, click "OK" and close all previously open windows.
Setting up a network connection in Windows Vista
To set up a network in Windows Vista, go to: “Start” → Control Panel → Network and Internet → Center
network and sharing management → Manage network connections.


Find "Local Area Connection". Click on it right click mice. In the context menu that opens, select “properties”.

In the “Local Area Connection - Properties” window, select “TCP/IP Internet Protocol version 4” and click on the “Properties” button.


Setting up a network connection in Windows 7
To set up a network in Windows 7, you need to go to: “Start” → Control Panel → Network and Internet → Center
network and sharing management → Changing adapter settings.


In the window that opens, check the “dots” Use the following IP address and Use the following DNS server addresses and fill in the fields with the data specified in the agreement.
Then click OK and close all windows.
Setting up a network connection in Windows 8
To configure network card There are two ways in Windows 8.
The first is to go to the desktop, right-click on the icon that looks like a monitor and select .


The second way is to press the key combination at the same time Win+W(Search) and in the search bar type " Network and Sharing Center". The desired settings item will be displayed on the left.


Then you need to go to the properties of your network card and specify the settings that can be found in your contract.
The network connection name may vary.
If you do not have a local network connection, then you probably do not have drivers installed on your network card or it is faulty.
If the network connection icon is gray, then most likely the network connection is simply disabled. To turn it on, double-click on the icon.
Right-click on the network connection.


In the window that opens, check the “dots” Use the following IP address and Use the following DNS server addresses and fill in the fields with the data specified in the agreement.
Then click OK and close all windows.
Today, there is an Internet connection in almost every home. Some people limit themselves to one computer. Others buy routers and create a home local network for several devices (including smartphones). In any case, to do everything correctly, you need to know how it is done correct setting local network in Windows 7. This is the topic that is discussed in this article.
Network and Sharing Center
This menu is the heart of all network connection settings in Windows. Set up a local network, change the IP address, find out the MAC address of your network card, create a new PPPoE connection - all this can be done here. Of course, all actions can be performed through command line Windows, but for most users this method will be very inconvenient.
To bring up Control Center in Windows 7, you can go in several ways:

Connecting to new network equipment
Let's assume you connected to a provider and purchased new router. The router setup itself is not covered in this article - there is too much variety. When the device is fully configured and ready to use, you need to connect your personal computer to it.
You connect the router and PC using a patch cord, and the network connection icon in the Windows tray changes its appearance. This means that everything is fine with the network card and cable. If your router is in DHCP mode, i.e. independently assigns IP addresses to new devices - most likely none additional settings you won't need it.
The operating system will ask you to select a connection type: “Public”, “Home” or “Work” network. For the private Windows user this step doesn't matter. Select, for example, home and click “Ok”. Try going online - if everything works, you don’t need to do anything else. 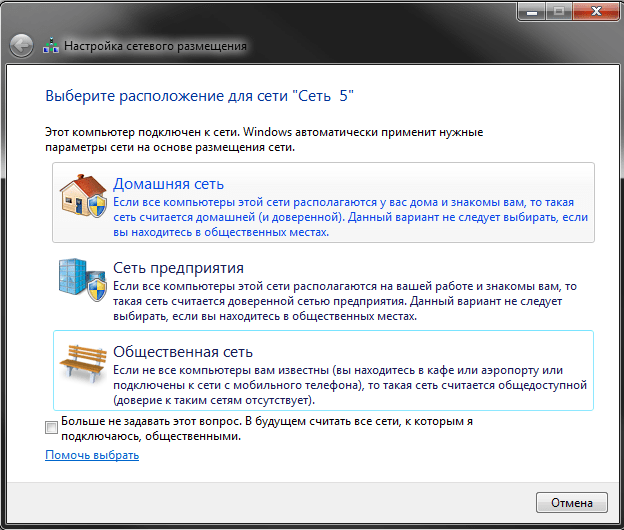
If not, you need to configure the adapter, which is discussed below.
Pay attention! If you don't have a router and you connect a cable from your ISP to your computer, it probably won't work for you. Modern providers rarely use DHCP technology, preferring PPPoE or Static IP. In this case, follow the further instructions.
Configuring adapter settings
This section of the manual is intended for those users who need to configure the properties of the adapter (network card). If, according to the agreement with the provider, you need to assign a specific IP or mask, or specify a specific gateway, proceed according to the instructions. If the contract specifies a login and password for connection, skip this step and go to the section dedicated to PPPoE.

New home connection
If you connect directly to your provider by cable, bypassing the router, most likely you will need to do the following.
We continue to look at new and improved features of the new operating system Windows 7. Next up are tools for working with the network. In addition to them, in this article we will focus on new troubleshooting tools, features of the updated defragmentation tool hard drives, and also consider new interface for management external devices Device Stage.
Creation home group will take a few seconds, after which Windows will generate a password that will be needed to add other computers to the homegroup. Since this difficult-to-remember password will need to be entered on all computers that will be joined to the homegroup, for convenience you can print it using the link posted right there. You can't specify your own password at this stage, but you can change it later in your HomeGroup settings.

After clicking the "Done" button, the system will open the homegroup settings window, where you can change the sharing settings different types data, view the password or change it.

If you want to change your password, keep in mind that before you do so, you will need to make sure that there are no computers on your home network that are in sleep or hibernation mode. After changing the password, you will need to change it on all computers connected to the homegroup. That is why it is much more convenient to change an automatically generated password immediately after creating a homegroup, even before you join other computers to it.
Joining a homegroup is done in the same Network and Sharing Center window. After a home group has been created on the local network, on other computers in the "View" section active networks" You will be able to see the "Ready to Join" link. By clicking on it, you can specify which resources of this computer you want to share. After this, you will need to enter the homegroup password.
If you need to join a homegroup additional computer, and you forgot your password, you can always view it on any of the computers that are part of the homegroup. To do this, go to your homegroup settings and click on the “Show or print homegroup password” link.
If, when you join your computer to a homegroup, you receive a message that the password is incorrect, but you are sure that you entered it correctly, the reason may be due to the date and time settings. According to the official message published on the Microsoft website in the user support section, this error occurs when the date and time settings on homegroup computers do not match. The computer that you want to join the homegroup must be set to the same date and time as the PC on which the homegroup was created.
Once computers are joined to a HomeGroup, they will be visible in Explorer under the HomeGroup section, and all users can quickly access files that have been shared.
![]()
Using context menu Explorer, you can quickly manage the resources that will be open to other users connected to the home group. Right-click a folder or library and select the "Sharing" submenu. After that, you can open the resources for reading or for reading and writing for homegroup users.

Note that since HomeGroup is a simplified mechanism for sharing files, it does not provide for setting access rights for each user separately. For more fine tuning restrictions, you must go to your sharing settings and manually specify who can view or change files.
A computer cannot be connected to multiple homegroups at the same time. If you want to join another homegroup, you must first leave the first one. To do this, you need to open the home group settings window and click on the “Leave the homegroup” link, and then confirm your desire to do this.
The HomeGroup feature is not available if the system settings indicate that the computer is connected to an office or public network. If you need to temporarily connect your computer to a homegroup (for example, you took home a laptop that you usually use in the office), you must first change the network type, after which you can become part of the homegroup and gain access to home network resources.
Using the HomeGroup feature, you can not only quickly access files stored on other computers, but also stream data over the network. This function will be useful, for example, if digital photo frames are connected to your home network, modern televisions, Wi-Fi streaming radio receivers and others similar devices. To enable data streaming, you need to check the appropriate box in the homegroup settings, and then decide on some parameters.

First, you need to choose a name for your media library. Under this name, the library will be displayed on other computers on the network in Windows Media Player in the "Other Libraries" section. You can then configure your access settings. The "Select default settings" link opens a window in which you can specify general parameters access, and if you click on the “Configure” link next to each device on the network, you can set your own settings for each computer.

You can quickly block access to shared files multimedia for a specific computer.
⇡ Quickly connect to available networks from the system tray
In the first article of our series (see “The Hidden Potential of Windows 7: Installing New Windows”) we already talked about the improvements that have occurred in the notification area. One of them directly concerns working with the network. Now, when you click on the "Network" icon, which is displayed by default in the system tray, you can see a list of all networks available for connection, including wireless, corporate, mobile broadband, etc.

By clicking on the name of a network, you can immediately connect to it and just as quickly disconnect from it. The View Available Networks menu shows all current connections for this computer, and also has a link to quickly open the Network and Sharing Center.

The ability to quickly connect to the network is especially convenient when working with a laptop, because using it in different places, you are constantly changing your Internet connection settings.
The Windows 7 Control Panel is replete with applets for configuring and managing all aspects of the operating system. To make it easier to find the right tools in this variety, Microsoft developers even provided a search feature in the Control Panel.To introduce readers to all the Windows 7 Control Panel applets, I wrote a series of articles “”, which gives brief overview all tools in each Control Panel category. This article is dedicated to the Network and Internet category.
The Windows 7 Control Panel is divided into eight main categories, the second of which is Network and Internet. This section contains all the tools for checking the status and changing network connection settings, setting up file and computer sharing, changing Internet connection settings, and so on.

The Network and Sharing Center is the main element of the Network and Internet category. Here are the most commonly used tools. If the computer is connected to wireless network, in the Network and Sharing Center you can see the status wireless connection and use the wireless network management option.


From the link " Home network» (Home Network) opens the Set Network Location dialog box, where you can select a different connection type. This automatically applies the settings Windows Firewall (Windows Firewall) and security settings for the selected network type.
Related posts:
 Leonid Grokhovsky - promotion of portals and online stores The master class is adapted to the needs of the participants
 Where are iOS firmware stored in iTunes? How to remove firmware from iTunes
 3 zup deleting marked objects
 Distributed information base
 Adjusting video card performance for games through the NVIDIA control panel How to enter nvidia settings


