Installing Windows 7 from USB. Installing Windows from a flash drive via BIOS. Boot priority in BIOS
It doesn’t matter whether you need to install windows 7 via a USB flash drive on a laptop or install windows 10 via boot disk to a computer, or vice versa in any combination, this article will solve your problem quickly and without nerves. Installing windows 7 from a flash drive to a laptop in clear language- installing windows 10 on your computer step by step.
After we have selected and downloaded a version of windows suitable for our PC and purposes in the form of an ISO image. We create or. We do not recommend installing windows from another operating system, most likely you won’t succeed.
Installation, and any other version, takes place in three stages. First, we boot from the media (flash drive or disk we created), which is already prepared in advance. We install the system and configure it. The following is detailed instructions.
How to boot the system from media.
The first way to download a program is to select it from the download menu on the media. This option is the simplest, as it does not create the need to change anything after the system is installed. It is recommended for those who have a relatively new device. With older computers, this boot path may cause problems.
The second way is that you need . It is possible for all computers, however, if you do not have the necessary skills, it may seem difficult. This is due to the fact that after Windows is installed, all settings are reverted back.
Let's start with the first method.
When the Windows logo or motherboard information appears on the screen, you need to press a key. This is how it opens BOOT menu(boot menu).
A single key for all companies and motherboards does not exist. In order to find the desired key, enter a query with the name of your computer model into a search engine. For example, "LENOVO Legion Y520-15IKBN enter boot menu"
It is important that if the fast boot function is enabled on your computer, you may not get to the menu.
In order to disable the fast boot function, you must follow the following path: Control Panel – System and Security – Power Options – Actions of the power buttons. Uncheck the “Enable fast boot” checkbox.
So, to boot the system from media, you need to:
Connect the media to the computer.
Reboot the system, and while your equipment is turning on, go to boot menu.
Select the desired media, then press Enter; if the command Press any key to boot from CD\USB appears, press Enter again.
Start installing Windows.
For those who perceive information better through video, we recommend watching the video instructions on how to install Windows 7 from a flash drive.
Video review of how to install Windows 10 from a flash drive or disk. A guide for dummies.
Connect the media to your computer. There is a specific key to open the BIOS. But since the basic system is varied, there are also different keys for each type. Therefore, the following description will be universal and not specific for certain models.
To use this method, it is best to know at least a little English. Carry out the installation strictly according to the instructions. A step to the left, a step to the right - and some equipment may be damaged.
After you have opened the BIOS, look in the menu for Boot, Boot Options or Boot Priority.
Having opened the “First” section, select “Next”, and then select “media”. And again – Enter.
Be sure to check out the other items. They should show the Hard Disk device. If this is not the case, then set it manually.
Save your work and close the base system.
For every device BIOS setup individual. Therefore, it is best to search the Internet for a specific case.
Once you have exited the BIOS, the computer will begin to reboot and detect your media. If the command comes up again: “Press any key to boot from CD\USB” – press some button on the keyboard.
When the computer reboots for the first time, you need to go into the BIOS again and return all the settings back.
Operating room installation Windows systems.
It is important to save everything before installation important files from drive "C", because it will be formatted during the process.
First, you need to choose Windows bit depth, if the computer requests it. There are 32- or 64-bit bits. But there can only be one of them on the media. Then you can skip this step.
The OC manager window will appear on the screen: Image.
If you are inactive for 30 seconds, the computer itself will select the first bit in the list. Therefore, decide in advance what kind of system you need.
After you click on the bit depth, the system logo will pop up on the screen, but the system icon will be missing. It will appear after the download manager scans the files on the flash drive or disk.
Now you should select the language and set the options. It is important that you can change the language only after installation, but not during at the moment. Other parameters, such as keyboard layout, date and time, can also be changed.
Once you have set everything, press "Enter".
Next, you will need to enter the license key. You don't have to choose.
Now you need to select the OS edition. It is associated with the image that is on the bootable media. For example, home or professional edition.
It is important to choose exactly the one to which there is a key. Keep in mind that the key from the home edition will not fit the professional edition and vice versa.
You will be asked to read further license agreement. Read the document and accept it if you are satisfied with everything in it.
However, if you don’t like something about it, you won’t be able to install Windows.
Since we are considering installation from scratch, as soon as you are asked to select an installation option, click on the “custom installation” item. But you can go for more the simple way and update your system.
Click on the drive where you decided to install the OS.
If you are installing an operating system on your computer for the first time, then free space will be available. In this case, you need to select partitions in the hard drive.
By clicking “Create”, write the volume of the section, and then “Apply”. Do this until you have the number of sections you need.
The “C” drive on which Windows will be installed requires about 30 GB.
If the computer already has partitions, then you need to select drive “C”, format and delete. Then there is a free space where you should create a partition by specifying the largest partition possible. This is the newly created “C” drive.
Do not do anything with other drives, otherwise you risk losing all the files on your computer. In order to expand them, use certain programs.
Finally, select drive “C” and finish installing the operating system.
This may take a long time and the computer will restart several times. However, do not perform any actions with it until the first settings window appears.
After you have read - installing windows 7 from a flash drive on a laptop in clear language and successfully installed, we recommend installing
You don't need to buy a disk and drive to install Windows 7, as you can install the operating system from a USB flash drive.
Inexperienced users are perplexed by the question of how to install Windows 7 from a flash drive. Not everyone knows how to install from a disk, and even fewer know how to install from USB. In fact, there is nothing complicated; it is important to strictly follow the installation instructions and not break the sequence of steps. Let's immediately decide that you need USB Flash or external hard disk with a capacity of at least 4 GB. The file system in which the media is formatted does not matter. In addition, you can even burn the image to an SD card or external device, for example, an MP3 player, which is recognized on the computer as a flash drive.
Installation sequence
If you install the OS on a blank disk, then you don't need to worry about its contents. If you are reinstalling the OS, remember that the disk on which you are installing the system will be completely formatted, which means that all data on the disk will be deleted. Therefore, the very first step you need to think about is what files you need to save. Next, follow the following instructions:
- Download the OS;
- Create installation media;
- Changing BIOS settings;
- We start the computer from an external device;
- Follow the instructions for installing the OS;
- Install drivers and update the installed OS;
These 6 steps are similar for all versions of the operating system; the scheme also works for other versions of the OS, including Windows Vista or Windows 8.
Where to download OS
You need to download not just system files, you need an ISO image suitable for writing to a flash drive. You can download it here. Already at this stage you need to decide which version of the OS you need. The question is not only whether you will use the “Home” or “Professional” version, but also what bit capacity it will have - 32 or 64 bits. After you decide on the OS version, download it to your hard drive.
How to write an OS to a flash drive
If you simply burn the distribution kit to USB, then you will not be able to run the OS from it, nor can you run the installation from a flash drive. To create bootable media you need to use specialized software. One of best programs to create – . Let's look at creating this utility as an example. First of all, open our ISO image of Windows 7 inside UltraISO:


You need to choose not only the drive, but also the recording method. Select USB-HDD+, you don’t need to touch other settings.

How to start installation via BIOS
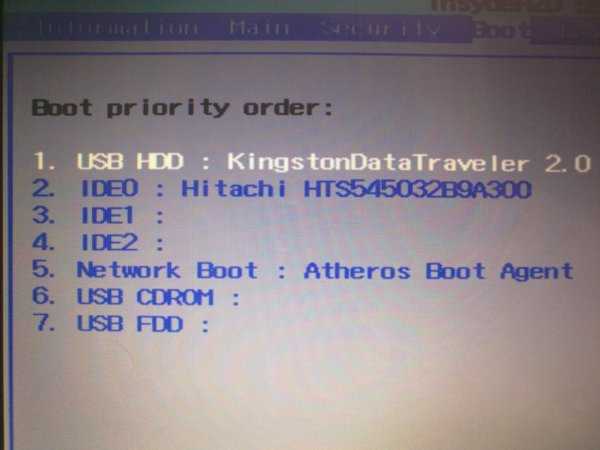
After you have created a flash drive with seven, you need to boot your computer from it. To do this, you need to reboot it and during system startup go into the BIOS and specify the startup sequence. Depending on the BIOS version, entry is available using the F2, Del, Esc keys, but there may be other keys. Inside the BIOS you need to find the BOOT tab, where you can specify the startup order. Your media must already be in the device, otherwise you will not be able to specify it to start when you start your PC. The loading sequence should be something like this:
After making changes to the BIOS, they must be saved and exited. Then the system will automatically reboot and start from USB.
Installation
After the start, the installation of the system itself will begin. If you downloaded the Russian version, then the entire installation will be accompanied by Russian instructions and recommendations. Just follow the instructions that appear on the screen, and within 20-30 minutes the operating system will be installed on your computer. If you have any questions, look at the instructions:
Don't forget that the hard drive where you install the OS will be formatted. This means that all data on the disk on which you are installing new system, will be deleted. Therefore, you need to take care of their preservation in advance.
Setup and updates
After installing Windows 7 on your computer, it’s too early to relax. Next you have to configure the system, and then install all the necessary drivers. For settings and drivers you can use the following programs:
- DriverPack Solution;
The first program will optimize the operation of the system. The second program will automatically install everything necessary drivers. During setup, be sure to create backup copy OS, as well as the first restore point, which will be useful to you in the future if you have any problems, for example, you encounter errors.
The question of how to install Windows 7 yourself is one of the most common on the network. Although, in fact, there is nothing complicated here: installing Windows 7 is something that can be done once, using the instructions, and in the future, most likely, no questions about the installation should arise - you won’t have to ask for help. So, in this guide, we will take a detailed look at installing Windows 7 on a computer or laptop. I will note in advance that if you have a branded laptop or computer and you just want to return it to the state in which it was, then instead you can simply reset it to factory settings. Here we will talk about pure Windows installation 7 on a computer without an operating system or with an old OS, which will be completely removed during the process. The manual is completely suitable for novice users.
What you need to install Windows 7
To install Windows 7, you will need an operating system distribution kit - a CD or flash drive with installation files. If you already have bootable media, great. If not, then you can create it yourself. Here I will present only a couple of the most simple ways, if for some reason they do not fit, full list You can find ways to create a bootable USB flash drive and a bootable disk in the “Instructions” section on this site. In order to make a boot disk (or USB flash drive) you will need an image Windows ISO 7.
By default, the vast majority of computers boot from the hard drive; to install Windows 7, we will need to boot from the flash drive or disk created in the previous step. To do this you should go to Computer BIOS, which is usually done by pressing DEL or another key immediately after turning it on, even before Windows starts loading. Depending on the BIOS version and manufacturer, the key key may vary, but is usually Del or F2. After you enter the BIOS, you will need to find the item responsible for the boot order, which may be located in different places: Advanced Setup - Boot Device Priority (boot priority) or First Boot Device, Second Boot Device (first boot device, second boot device - you need to put a disk or flash drive in the first item).
If you don’t know how to boot from the desired media, then read the instructions (opens in a new window). For a DVD disc this is done in a similar way. After completing the BIOS setup to boot from a flash drive or disk, save the settings.
When the computer reboots after applying the BIOS settings made in the previous step and booting from the installation begins Windows media 7, on a black background you will see the inscription Press any key to boot from DVD or an inscription of similar content on English. Click it.

Selecting a language when installing Windows 7
After which the download will occur for a short time Windows files 7, and then the window for selecting the language to install will appear. Select your language. At the next stage, you will need to set the input parameters, time and currency format, and the language of the operating system itself.

After selecting the system language, the following screen will appear prompting you to install Windows 7. From the same screen, you can run System Restore. Click Install. Read the terms and conditions Windows licenses 7, check the box indicating that you accept the license terms and click “Next”.

Now you will need to select the installation type of Windows 7. In this guide we will cover clean install Windows 7 without retaining any programs or files from the previous operating system. Usually this best option, since it does not leave various “garbage” from the previous installation. Click " Full installation(additional parameters).

Select the drive or partition to install
In the next dialog box you will be prompted to select a hard drive or hard section disk on which you want to install Windows 7. Using the “Disk Settings” item, you can delete, create and format partitions on your hard drive (split the disk into two or combine two into one, for example). How to do this is described in the instructions (opens in a new window). After the necessary actions with hard drive fulfilled and required section selected, click Next.

The process of installing Windows 7 on your computer will begin, which may take varying amounts of time. The computer may restart several times. When you reboot for the first time, I recommend that you return the BIOS to boot from the hard drive so that you don’t see a prompt every time to press any key to install Windows 7. Disk or bootable USB flash drive it is best to leave it connected until the installation is completed.

Enter your username and computer name
After Windows 7 Setup has completed all the necessary operations, updating the registry entries and starting services, you will be prompted to enter your username and computer name. They can be entered in Russian, but I recommend using the Latin alphabet. You will then be prompted to set a password for account Windows. Here it is at your discretion - you can install it or not.

Enter Windows key 7
The next step is to enter your product key. In some cases, this step may be skipped. It is worth noting that if Windows 7 was preinstalled on your computer and the key is on the sticker, and you install exactly the same Windows version 7, then you can use the key from the sticker - it will work. On the “Help automatically protect your PC and improve Windows” screen, I recommend that first-time users select the “Use recommended settings” option.

The next setup step is to set the time and Windows dates. Everything should be clear here. I recommend unchecking the “Automatic transition to daylight saving time and back” checkbox, since this transition is not currently used in Russia. Click Next.
If there is a network on your computer, you will be asked to choose which network you have - Home, Public or Work. If you are using Wi-Fi router to access the Internet, you can set it to “Home”. If the Internet provider cable is directly connected to the computer, it is better to select “Public”.

Wait for application Windows settings 7 and booting the operating system. This completes the installation of Windows 7. Next important stage- installation Windows drivers 7, which I will write about in detail in the next article.
The next article will be about how to burn and install Windows 7 from a flash drive. This is a really relevant way to install today Windows 7, since it’s much more convenient with a flash drive than with a disk. In order to install Windows 7 from a flash drive First you need to create a bootable flash drive from which we will install the operating system.
To create a bootable USB flash drive we will need:
1. Windows 7 operating system image
2. Flash drive at least 4GB
3. Windows 7 USB/DVD Download Tool, download.
Create a bootable USB flash drive:
1. Format the flash drive. Be careful, as formatting will delete all data from the flash drive. Go to “My Computer” and click right click to our flash drive, select “Format” and where file system select NTFS and click “Start”
2. Launch Windows program 7 USB/DVD Download Tool.
3. Click on “Browse” and Select the disk image. I will say that it doesn’t have to be Windows 7, XP is also possible.


5. Select the flash drive you want to burn Windows 7 to and click “Begin copying”

6. That’s it, all you have to do is wait until the flash drive is created to install Windows 7.
Now you will always have a flash drive with which you can install the operating system. All new computers support installation from flash drives, you just need to select a special boot item in the BIOS. , and continue. Good luck!
If you download ISO image with the Windows distribution and even write it correctly on DVD disc or creating a bootable USB flash drive using the same UltraISO is almost no problem for anyone. Many people have difficulties with the second stage, directly installing the operating system from a disk or flash drive on a PC.
I know of three ways to start installing Windows.
1) the simplest and most unreliable is to open the image with Windows already running using virtual drive and start the installation, but there are many factors that can interfere and give an error at some stage of such an installation.
2) Insert the flash drive we created into USB connector or a DVD with Windows into your drive, no matter what version, Windows 7, Windows 10, even Win95. This works for everyone. Then, when you turn on the PC, call the BOOT menu, this is a list with the media from which you need to boot, select the media you need and press ENTER. You can read more about how to install Windows via the BOOT menu here.
3) It differs from method 2 only in that we indicate what we want to boot from not through the boot menu, but in the BIOS of our device.
In this article we will talk in detail about how to install Windows from a flash drive via BIOS or Windows boot 7 from a BIOS flash drive.
Booting Windows 7 from a BIOS flash drive
Installing Windows from a flash drive via BIOS starts with calling the BIOS menu or it is also called Setup, this is most often done with the Delete button immediately after turning on the laptop or computer, press continuously until you see blue screen with some text, but sometimes it happens that you need to press another button, this is F2 or F10 or Esc. You can try all the options until you see the desired result, or you can read in the welcome window mother firmware text like “Press DEL to run Setup” it tells us that in order to get into the BIOS you need to press DEL.
And so, after we got into the BIOS SETUP UTILITY, we look for the Boot tab and use the arrows to go there. We need a line Boot device Priority

The logic here is simple: the higher the device is in the list, the higher the priority in the download queue. That is, the top one in the list is loaded first, and so on in turn until the system boots.

And so, using the arrows, select the first drive in the list and press ENTER, we see a list of all possible devices from which the computer can boot.

If we want to select loading the BIOS via a USB flash drive, then select USB interface, this is Removable Dev or something with the text “USB” included, or if the flash drive is already inserted, the name of the flash drive manufacturer will be written. If you need to select a DVD drive, then as a rule this line begins with the words CDROM: or DVDROM: or it can also be written by the manufacturer of the DVD drive.
If you have made your choice, press ENTER and in the same way select the second device in turn, the second on the list should be yours hard drive on which Windows will be installed. If the BIOS does not see the flash drive, then try inserting the flash drive into another USB connector and do everything all over again.
In order for all changes to be saved in the BIOS Setup, before leaving, you need to go to the Exit tab and select the Exit & Save Changes line and press ENTER.

After this we can Windows bios install via flash drive or dvd drive. Not everyone has a bios with a blue screen anymore. In 2017, you can increasingly see a new generation BIOS, it is more graphically thought out, there are pictures of icons for a clear association, if you are not good at English, so as not to make a mistake. But essentially all the settings are the same.
Attention!- after our changes to the BIOS, now the computer will always boot first from a flash drive, then from hard drive, so it is important when installing Windows after the first installation stage, when the laptop or PC reboots, YOU NEED HAVE TIME TO PULL THE FLASH DRIVE FROM USB connector, or remove the disc from DVD-Roma. Otherwise, the first installation stage will be repeated endlessly.
Now we know how to configure the BIOS to install windows from a flash drive. And having with us a bootable USB flash drive with an image of WINDOWS 7 or 10, we can easily install or reinstall the OS on any device.
Related posts:
 High magnification monoculars - features and benefits Monocular magnification 50
 World of Tanks crashes on startup - fixing errors World of tanks crashes after every battle
 Server key 1c over the network
 How to turn on WiFi on laptops Add a new wireless network to a laptop
 How to find out iPhone serial number?


